Introduction to Handheld GPS Waypoint Coordinate Export and Import Software
Part I Theoretical part
Handheld GPS is also referred to as handset.
What is the waypoint file?
Waypoint file is the file that saves the waypoint coordinates, such as the GPS exchange format exported by the user from the handset(*.gpx)File.
Software running environment
Software and hardware environment for running the software system:
The software system is divided into network version and stand-alone version.
1,Network version
It is also divided into Internet version and LAN version. The Internet version is suitable for anyone to use online at any place, and the LAN version is suitable for companies and units.
The Internet version of this software system is suitable for a variety of mainstream browsers, preferably equivalent to IE10.0Above version. Computers, mobile phones, virtual machines, etc. can be operated and used online without installation or uninstallation. Large computer screen, easy to operate, recommended.
2,Stand-alone version
It is also divided into browser version and form version. Suitable for single computer and virtual machine.
The use of virtual machines is mainly suitable for units and individuals with high security level.
The software will be released both online and stand-alone versions.
For stand-alone version, Intel is required i3 CPUOr above, minimum 2G memory hardware configuration, Windows 7 or above operating system(32Both 64-bit and 64-bit)。The installation and uninstallation are simple and clear, and the uninstallation is complete without leaving traces.
There are many kinds of handheld GPS. At present, the software has only been debugged on a few handheld computers. If users find any problems during the use, please contact us in time to solve them.
Main functional features
This software system can help handheld GPS users quickly export and import a large number of waypoint coordinates.
The so-called export refers to the conversion of the waypoint file saved by the user from the handheld into the coordinate system coordinates required by the user. It can be any of the four coordinate systems 1954, 1980, 1984 and 2000, including plane coordinates and geodetic coordinates.
The so-called import refers to the conversion of user coordinates into waypoint files so that users can read them into handheld computers for navigation. That is, convert any of the four coordinate systems into plane coordinates or geodetic coordinates in the handset. The user only needs to connect the waypoint file generated by the system to the computer and read it into the handset.
There is no maximum limit on the number of waypoints that can be exported and imported. It is only related to the computer hardware configuration and network environment, and the mutual conversion between 1954, 1980, 1984 and 2000 coordinate systems. If the user does not have coordinate conversion parameters, the system will use a(Or more than one)The coordinates of the common points are directly calculated and used by the user to set the handset.
The two main functions can be described as follows:
Export coordinates from the waypoint file submitted by the user(Waypoint file→coordinate),Or, convert the waypoint file to coordinates.
Convert the coordinates submitted by users to waypoint files(coordinate→Waypoint file),Or, convert coordinates to waypoint files.
The third function of this software is to solve the five conversion parameters of the handheld machine:ΔX,ΔY,ΔZ,daAnd df.
This software can complete more than ten required tasks
The summary is as follows:
Only five conversion parameters of the handset are calculated;
Only the original geodetic coordinates are exported, without Gaussian projection calculation, and without selecting the coordinate system and target projection zone;
Only plane coordinates are exported, and parameters are not converted(That is, do not upload),Select the coordinate system and target projection zone;
Export coordinates(Earth and plane),Upload conversion parameters(Or common point coordinates),Select the coordinate system and target projection zone;
Export geodetic coordinates and upload conversion parameters(Or common point coordinates),Select the coordinate system instead of the target projection zone;
Export plane coordinates and upload conversion parameters(Or common point coordinates),Select the coordinate system and target projection zone;
Only waypoint files are generated, parameters are not converted, coordinate system and target projection zone are not selected. For example, the user's original 84 geodetic coordinates are directly written to the xml waypoint file(Namely:*.gpxfile);
Upload conversion parameters(Or common point coordinates),Generate waypoint file.
System conventions
Convention 1: Convention on coordinates and coordinate system representation
This software requires that the Gaussian plane coordinate must be true, and its abscissa must include the band number and 500 kilometers. If the abscissa provided by the user does not have a number, or a number of high-order integers are omitted for work convenience, the software system will prompt the user to enter this high-order integer once in operation. In China, the ordinate is a 7-digit integer, and the abscissa contains an 8-digit integer with a number.
The software represents the coordinate system in numbers: 1954, 1980, 1984 and 2000 represent the 1954 Beijing coordinate system, 1980 Xi'an coordinate system, WGS84 coordinate system, and 2000 national geodetic coordinate system respectively.
Convention 2: agreement on angle format
The separator between degrees, minutes and seconds must not use spaces, tabs, commas, and semicolons because they have been assigned as the separator between complete data. The system supports three angle formats: degree.Minute second, ° ′ ″, degree:branch:Seconds. As required, there are generally many output formats for angles.
Degrees, minutes and seconds separated by other single characters can first be uniformly replaced by colon separators, and vice versa. The colon will be used as a symbol for the separation between degrees, minutes and seconds of a single character pair.
About the definition of export and import
Export and import can also be called download and upload. However, more precisely, the specific definition of export and import in this software is as follows:
Convert the handheld waypoint file saved by the user through the computer into the coordinates of the coordinate system required by the user, which is called export.
Convert user coordinates into waypoint files so that users can read them into handheld computers, which is called import.
In other words, the user saves the waypoint in the handset first by using the special software provided by the handset manufacturer through the computer(download)Is a waypoint file, and then uses this software to parse and convert the coordinates into the coordinates of the coordinate system required by the user. The user also uses these special software to read the waypoint file generated by the user's coordinates through the computer(upload)Into the handset.
Special precautions for users
The selection of coordinate system shall be correct and carefully checked;
The current coordinate system and target coordinate system of the coordinate conversion parameters used should be clear;
If common point coordinates are provided, the common point should be consistent with the corresponding coordinate system. The projection band used should also be consistent, as if it were a 3 degree band or a 6 degree band.
The above needs special attention of users.
Also note:
① If the coordinates exported and imported by the user are the same as those of the handheld coordinate system, no setting is required. That is, you do not need to select the coordinate system, nor do you need to convert parameters, and you can directly upload the waypoint file or coordinate file. However, these two cases are often rare. Generally, users need to clearly know which coordinate system the coordinates used and the coordinates in the handset are from.
② If the waypoint coordinates are directly imported without coordinate conversion, the user should pay attention to checking the geodetic coordinates used in most handheld devices to avoid uploading them to plane coordinates by mistake. If there are only plane coordinates but no geodetic coordinates, you need to set the coordinate conversion.
For the stand-alone version, when do you select the "Conversion parameters required" check box? Answer: If the current coordinate system is different from the target coordinate system, you should select this check box first.
Summary of operation steps
Now summarize the operation steps:
1,If it is not necessary to convert coordinates, select the coordinate system and directly submit the waypoint file or one of the coordinate files for export or import, and click the "Submit" button. However, for export, if Gaussian plane coordinates are also required, the current coordinate system, target coordinate system and target projection zone should be selected.
Corresponding achievements include:
For export, there are export coordinates(That is, the coordinates of the original coordinate system in the handset)Or target plane coordinates.
For import, there are waypoint files.
2,If you need to convert coordinates, you need to submit the conversion parameter file or common point coordinate file after selecting the coordinate system, and then submit one of the waypoint file or coordinate file for export or import. However, for export, if you still need Gaussian plane coordinates, you should select the current coordinate system, target coordinate system and target projection zone. Then, click the "Submit" button.
Corresponding achievements include:
For export, there are export coordinates(That is, the coordinates of the original coordinate system in the handset),Target plane coordinates and target geodetic coordinates.
For import, there are waypoint files.
The coordinate conversion parameter requires only three coordinate translation amounts. However, if a common point coordinate file is submitted, five conversion parameters are also available for user handset settings.
The above is also applicable to the stand-alone version, just change the above "submit" to "confirm".
3,On the determination of projection zone
If the user submits Gaussian plane coordinates, the software can automatically calculate the projection zone. That is, if the user submits Gaussian plane coordinates, it is not necessary to consider the selection of projection zone, and this software system does not arrange such options. If the target coordinates require Gaussian plane coordinates, the user must select the projection zone, because the software cannot predict the user's intention.
If you need to convert the coordinate system and Gaussian projection, you must select the coordinate system. That is, except for two cases, it is not necessary to select the coordinate system and projection belt: directly take the coordinates from the waypoint file uploaded by the user or put the original coordinates into the waypoint file.
Handset and computer online operation
Users should be familiar with the special software provided by the handset manufacturer to connect the handset with the computer, so that they can skillfully save the waypoint from the handset(Also known as download)It is a waypoint file, and can also read the waypoint file generated by the software according to the coordinates submitted by the user(Also known as upload)To the handset.
For all types of handsets, users connect the handsets with computers and export waypoint files to the handsets in a similar way GPS 72As an example, the simple steps are briefly described for the user's reference:
a) Export waypoint file from handset
Run MapSource6.16.3(If it is not in the user's computer, you need to download or install it on the official website of the corresponding manufacturer first) → Click "Receive from device" → Find device → Tick the "waypoint" check box → Click "Receive", the waypoint will be read into MapSource, and displayed in the window of the waypoint tab on the left. Select(Important: You must select the waypoint to export in the left waypoint window before saving it as a gpx file to export waypoints)The waypoint to be exported is saved as "Untitled.gpx”File, that is, select the GPS exchange format when saving as(*.gpx),Use the default name "Untitled.gpx”Or change the name.
Sometimes it will be saved as unsuccessful. Just try more times. Or select the copy waypoint first(Waypoints in the left waypoint tab window),Then you can save it as a gpx file.
Note: The above is the basic method reference. The specific method shall be subject to the software version and handset model used by the user and the specific handset user manual.
b) Import the gpx file into the handset
The system generates waypoint files from the coordinates provided by users.
·The user connects the handheld GPS with the computer and turns on the handheld GPS;
·Run MapSource6136, click "Open" from the file menu, browse to the gpx file made above, and then click the "Send to device" command → Click "Find Device" → Select "Waypoint" → Click "Send";
·At this time, you can view the handheld GPS. Press the "Find" key → a stop en route → Press the Enter key to view the 80 spewed by the handheld GPS(54)Check whether the coordinates are the same as the original ones, and check the accuracy and correctness of the three translation parameters of the handheld GPS.
be careful:
1,Due to the different versions of MapSource software, the operation may be different, which requires attention.
2,For other handset models, please refer to the accompanying user manual or consult the specific handset manufacturer for detailed information.
Waypoint file download
Please download the waypoint file generated by the software system through this website, start the special software provided by the user handset manufacturer to connect the handset with the user's computer, and then import the waypoint file into the user's handset for navigation. Before actual navigation, check the settings of the handheld machine. In addition to setting the five conversion parameters of the handheld machine, other parameters, such as the central meridian, should also be set correctly at the same time. Then, it is recommended to actually check several known points, and then start the formal navigation after checking.
General format of waypoint file
What is the waypoint file. Waypoint file is a file whose coordinates are contained in an XML code file like the following, that is, a file like the following:
    <?xml version="1.0" encoding="UTF-8" standalone="no" ?>

    <gpx xmlns="http://www.topografix.com/GPX/1/1" creator="MapSource 6.16.3" version="1.1" xmlns:xsi="http://www.w3.org/2001/XMLSchema-instance" xsi:schemaLocation="http://www.topografix.com/GPX/1/1 http://www.topografix.com/GPX/1/1/gpx.xsd">
    <metadata>
    <link href="http://www.garmin.com" />            <text>Garmin International</text>            </link>
    <time>2012-10-16T03:29:28Z</time>
    <bounds maxlat="28.372980688139796" maxlon="102.3412963616848" minlat="28.349930469244719" minlon="102.86387163735926" />

        </metadata>
    <wpt lat="28.332300294563174" lon="102.86387163735926">
    <ele>683.1289999999999</ele>
    <name>PQS1</name>
    <cmt>2012-04-29 10:24:21AM</cmt>
    <desc>2012-04-29 10:24:21AM</desc>
    <sym>Flag, Blue</sym>
    <extensions>
    <gpxx:WaypointExtension xmlns:gpxx="http://www.garmin.com/xmlschemas/GpxExtensions/v3">
    <gpxx:DisplayMode>SymbolAndName</gpxx:DisplayMode>
                </gpxx:WaypointExtension>
            </extensions>
        </wpt>
    <wpt lat="28.346928978711367" lon="102.86962329931557">
    <ele>650.7639999999999</ele>
    <name>PQS2</name>
    <cmt>2012-04-29 10:24:21AM</cmt>
    <desc>2012-04-29 10:24:21AM</desc>
    <sym>Flag, Blue</sym>
    <extensions>
    <gpxx:WaypointExtension xmlns:gpxx="http://www.garmin.com/xmlschemas/GpxExtensions/v3">
    <gpxx:DisplayMode>SymbolAndName</gpxx:DisplayMode>
                </gpxx:WaypointExtension>
            </extensions>
        </wpt>
    <wpt lat="28.349930469244719" lon="102.3412963616848">
    <ele>645.779</ele>
    <name>PQS3</name>
    <cmt>2012-04-29 10:24:21AM</cmt>
    <desc>2012-04-29 10:24:21AM</desc>
    <sym>Flag, Blue</sym>
    <extensions>
    <gpxx:WaypointExtension xmlns:gpxx="http://www.garmin.com/xmlschemas/GpxExtensions/v3">
    <gpxx:DisplayMode>SymbolAndName</gpxx:DisplayMode>
                </gpxx:WaypointExtension>
            </extensions>
        </wpt>
    <wpt lat="34.686749847605824" lon="102.87150998190045">
    <ele>637.182</ele>
    <name>PQS4</name>
    <cmt>2012-04-29 10:24:21AM</cmt>
    <desc>2012-04-29 10:24:21AM</desc>
    <sym>Flag, Blue</sym>
    <extensions>
    <gpxx:WaypointExtension xmlns:gpxx="http://www.garmin.com/xmlschemas/GpxExtensions/v3">
    <gpxx:DisplayMode>SymbolAndName</gpxx:DisplayMode>
                </gpxx:WaypointExtension>
            </extensions>
        </wpt>
    <wpt lat="28.313265495374799" lon="102.86631051972508">
    <ele>642.963</ele>
    <name>PQS5</name>
    <cmt>2012-04-29 10:24:21AM</cmt>
    <desc>2012-04-29 10:24:21AM</desc>
    <sym>Flag, Blue</sym>
    <extensions>
    <gpxx:WaypointExtension xmlns:gpxx="http://www.garmin.com/xmlschemas/GpxExtensions/v3">
    <gpxx:DisplayMode>SymbolAndName</gpxx:DisplayMode>
                </gpxx:WaypointExtension>
            </extensions>
        </wpt>
    <wpt lat="28.344176948443055" lon="102.89117359146476">
    <ele>922.62800000000004</ele>
    <name>PQS6</name>
    <cmt>2012-04-29 10:24:21AM</cmt>
    <desc>2012-04-29 10:24:21AM</desc>
    <sym>Flag, Blue</sym>
    <extensions>
    <gpxx:WaypointExtension xmlns:gpxx="http://www.garmin.com/xmlschemas/GpxExtensions/v3">
    <gpxx:DisplayMode>SymbolAndName</gpxx:DisplayMode>
                </gpxx:WaypointExtension>
            </extensions>
        </wpt>
    <wpt lat="28.303700402751565" lon="102.88913385532796">
    <ele>630.28999999999996</ele>
    <name>PQS7</name>
    <cmt>2012-04-29 10:24:21AM</cmt>
    <desc>2012-04-29 10:24:21AM</desc>
    <sym>Flag, Blue</sym>
    <extensions>
    <gpxx:WaypointExtension xmlns:gpxx="http://www.garmin.com/xmlschemas/GpxExtensions/v3">
    <gpxx:DisplayMode>SymbolAndName</gpxx:DisplayMode>
                </gpxx:WaypointExtension>
            </extensions>
        </wpt>
    <wpt lat="28.340383131429553" lon="102.89146947264671">
    <ele>788.2</ele>
    <name>V001</name>
    <cmt>2012-04-29 10:24:21AM</cmt>
    <desc>2012-04-29 10:24:21AM</desc>
    <sym>Flag, Blue</sym>
    <extensions>
    <gpxx:WaypointExtension xmlns:gpxx="http://www.garmin.com/xmlschemas/GpxExtensions/v3">
    <gpxx:DisplayMode>SymbolAndName</gpxx:DisplayMode>
                </gpxx:WaypointExtension>
            </extensions>
        </wpt>
    </gpx>
The waypoint file extension is generally in GPS exchange format(*.gpx)。
About the selection of coordinate system
This section will answer questions such as what is the current coordinate system and what is the target coordinate system.
1,For export, the current coordinate system is the coordinate system in the user's handset, and the target coordinate system is the coordinate system that the user needs to convert the coordinates of the coordinate system in the handset into the required coordinates.
2,For import, the current coordinate system is the coordinate system you want to submit. The target coordinate system is the coordinate system in the user handset.
If the coordinates given by the user are the coordinates of the coordinate system in the handset, there is no need to convert parameters. At this point, the target coordinate system and the current coordinate system are the same coordinate system, which is also a sign that coordinates do not need to be converted.
The export and import of the software are submitted separately and cannot be performed at the same time. This has been differentiated and controlled in the interface of the software, so that users will not make mistakes generally. In this way, the two functions are recorded twice. Among them, the calculation of coordinate conversion parameters is a built-in function, and the export and import functions are included.
Because the user did not choose which projection zone to convert to, or did not set the conversion parameters, or set two identical coordinate systems, it means that the user does not need coordinate conversion.
A brief summary is as follows.
For export:
The current coordinate system refers to the coordinate system used in the handset. Generally, it defaults to the 1984 coordinate system, but it can also be set to other coordinate systems.
The target coordinate system refers to the coordinate system that the user wants to convert the waypoint coordinates in the handset into the coordinates required by the user.
For import:
The current coordinate system refers to the coordinate system that the user submits.
The target coordinate system is the coordinate system in the handset.
Coordinate conversion and coordinate conversion parameters
If there are conversion parameters, submit them directly. You only need to submit three coordinate translation parametersΔX,ΔY,ΔZ,There is no need to submit da and df.
If the accuracy of the three coordinate translation parameters is not high, they can be collected in similar areas, as long as they meet the needs of users. For example, you can collect reliable conversion parameters from relevant surveying and mapping units or departments, or online.
If the accuracy of the three conversion parameters is required to be high, one of the two coordinate systems can be submitted(Or more than one)The coordinates of common points are automatically calculated by the built-in coordinate conversion parameter program of the software, and coordinate conversion is completed.
In addition to the three coordinate translation parameters, the conversion parameters obtained by common point calculation also include the other two parameters da and df. The five coordinate conversion parameters calculated by this software can also be used by the user to set the handset.
Note: The absolute values of the mutual conversion parameters of the two coordinate systems are the same, but the symbols are opposite. If the user has one of the conversion parameters, when the other is needed, just reverse the conversion parameter with a minus sign.
For example, if you want to convert the conversion parameters from 1984 coordinate system to 1980 coordinate system, and if you want to convert the coordinates from 1980 coordinate system to 1984 coordinate system, you only need to reverse the conversion parameters of the former to a minus sign.
At the same time, pay attention not to reverse the two coordinate systems.
The calculated transformation parameter file indicates the original coordinate system and the target coordinate system, and the user should not delete these coordinate system information. Unless necessary, the contents can be copied to avoid confusion between the original coordinate system and the target coordinate system applicable to the transformation parameter.
1,Convert parameter data file format
The format of conversion parameter data file is:
ΔX
ΔY
ΔZ
or
ΔX ΔY ΔZ
2,Common point coordinate data file format
The format of the common point coordinate data file submitted by the user is:
Current coordinate system coordinates
============
Target coordinate system coordinates
Note: More than one equal sign should be used(Suggest five consecutive“=”)As the coordinate separator of two coordinate systems.
The roll call of public points should be the same. If there is more than one public point, the order of roll call must be consistent.
example:
P01 Nx1 Ey1 H1
P02 Nx2 Ey2 H2
===========
P01 Nx1' Ey1' H1'
P02 Nx2' Ey2' H2'
You should pay attention to the selection of the current coordinate system and the target coordinate system, and note that the common point coordinate must be consistent with the corresponding coordinate system.
If the user only needs the coordinates in the handset without conversion, it is not necessary to select the "Need conversion parameters" check box for the stand-alone version. At this time, the system only parses and displays the coordinates of the coordinate system in the handset downloaded by the user. For the network version, the two options are mutually exclusive, and users will not select the wrong one.
About importing coordinates in the function text box
For the coordinates in the text box on the stand-alone import function interface, it is better to import the coordinate file, but you can also copy the coordinates from other files and paste them into the text box, and the system will check these coordinates for errors.
If you manually enter the established coordinates in this text box, you want to import them again after saving. In this way, the system will conduct a comprehensive inspection of the user's input coordinate data to find some important errors that may exist in the user's input for the user to correct and save the user's data inspection time.
technical service
Due to the user's own conditions, after the user purchases the software, we will have a special staff to actively contact the user and guide the user to master the use of the software in the shortest time according to the specific situation, so that the user can save a lot of hands-on exploration time.
contact information:
Person in charge: Yang Hao
Mobile: 15324911957
Tel: 0371-67117589
E-mail: yanghao 1959@sina.com
Address: Yard 10, Shuike Road, Jinshui District, Zhengzhou City, Henan Province
Post code: 450008
Part II Operation part
Stand-alone operation interface
This software system can complete more than ten kinds of requirements and tasks, which cannot be listed one by one. This user manual only lists "3 This software can complete the "4)”And "7)”For example, the specific operation methods of export and import are introduced. Users can refer to it to complete other required tasks.
15.1 Export operation
Main interface after running the software:
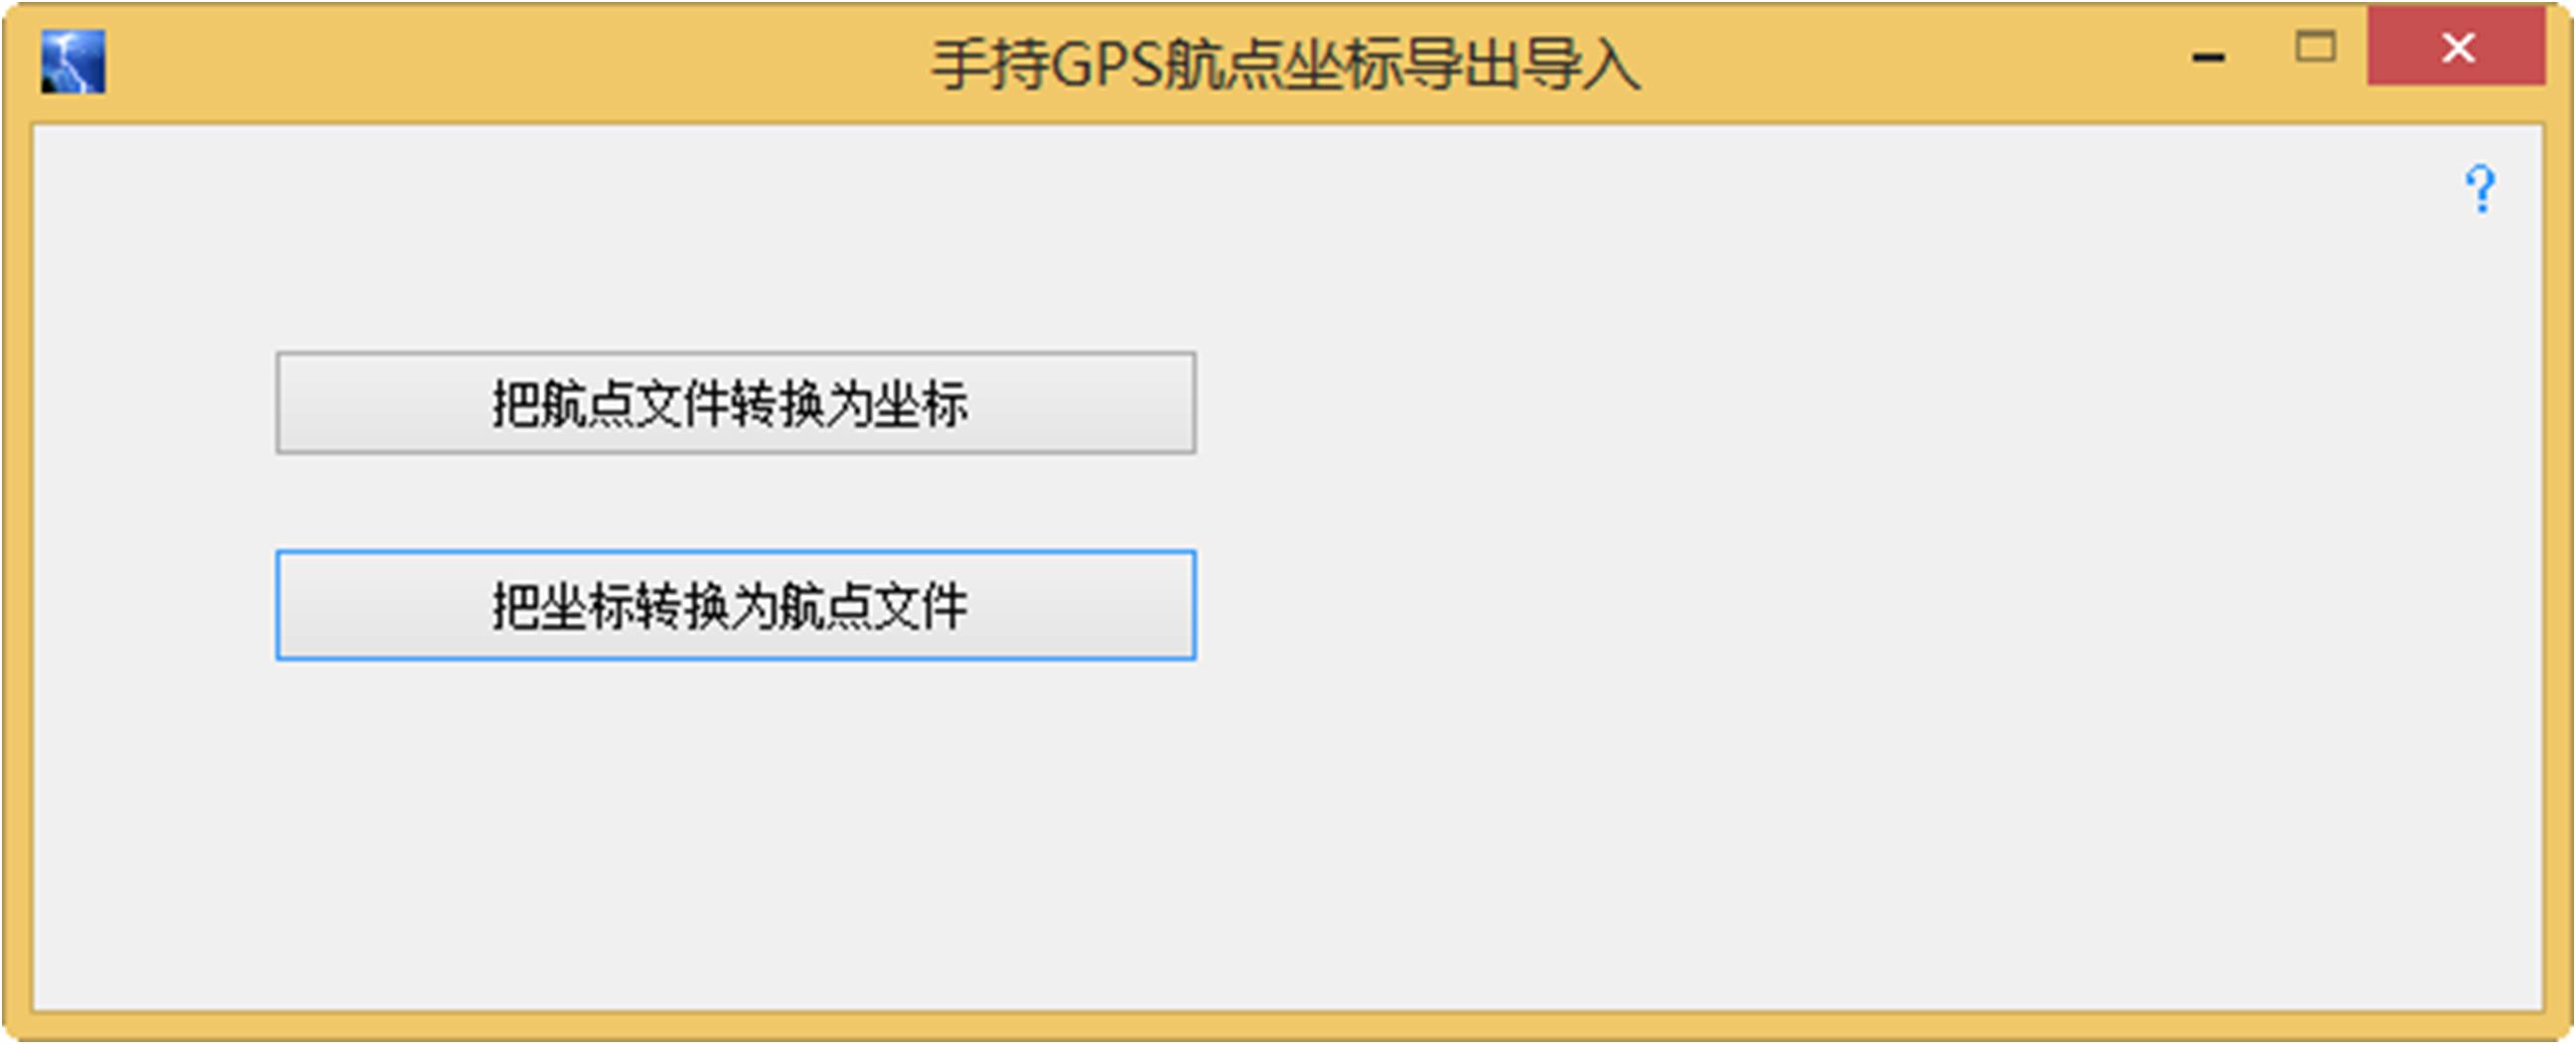
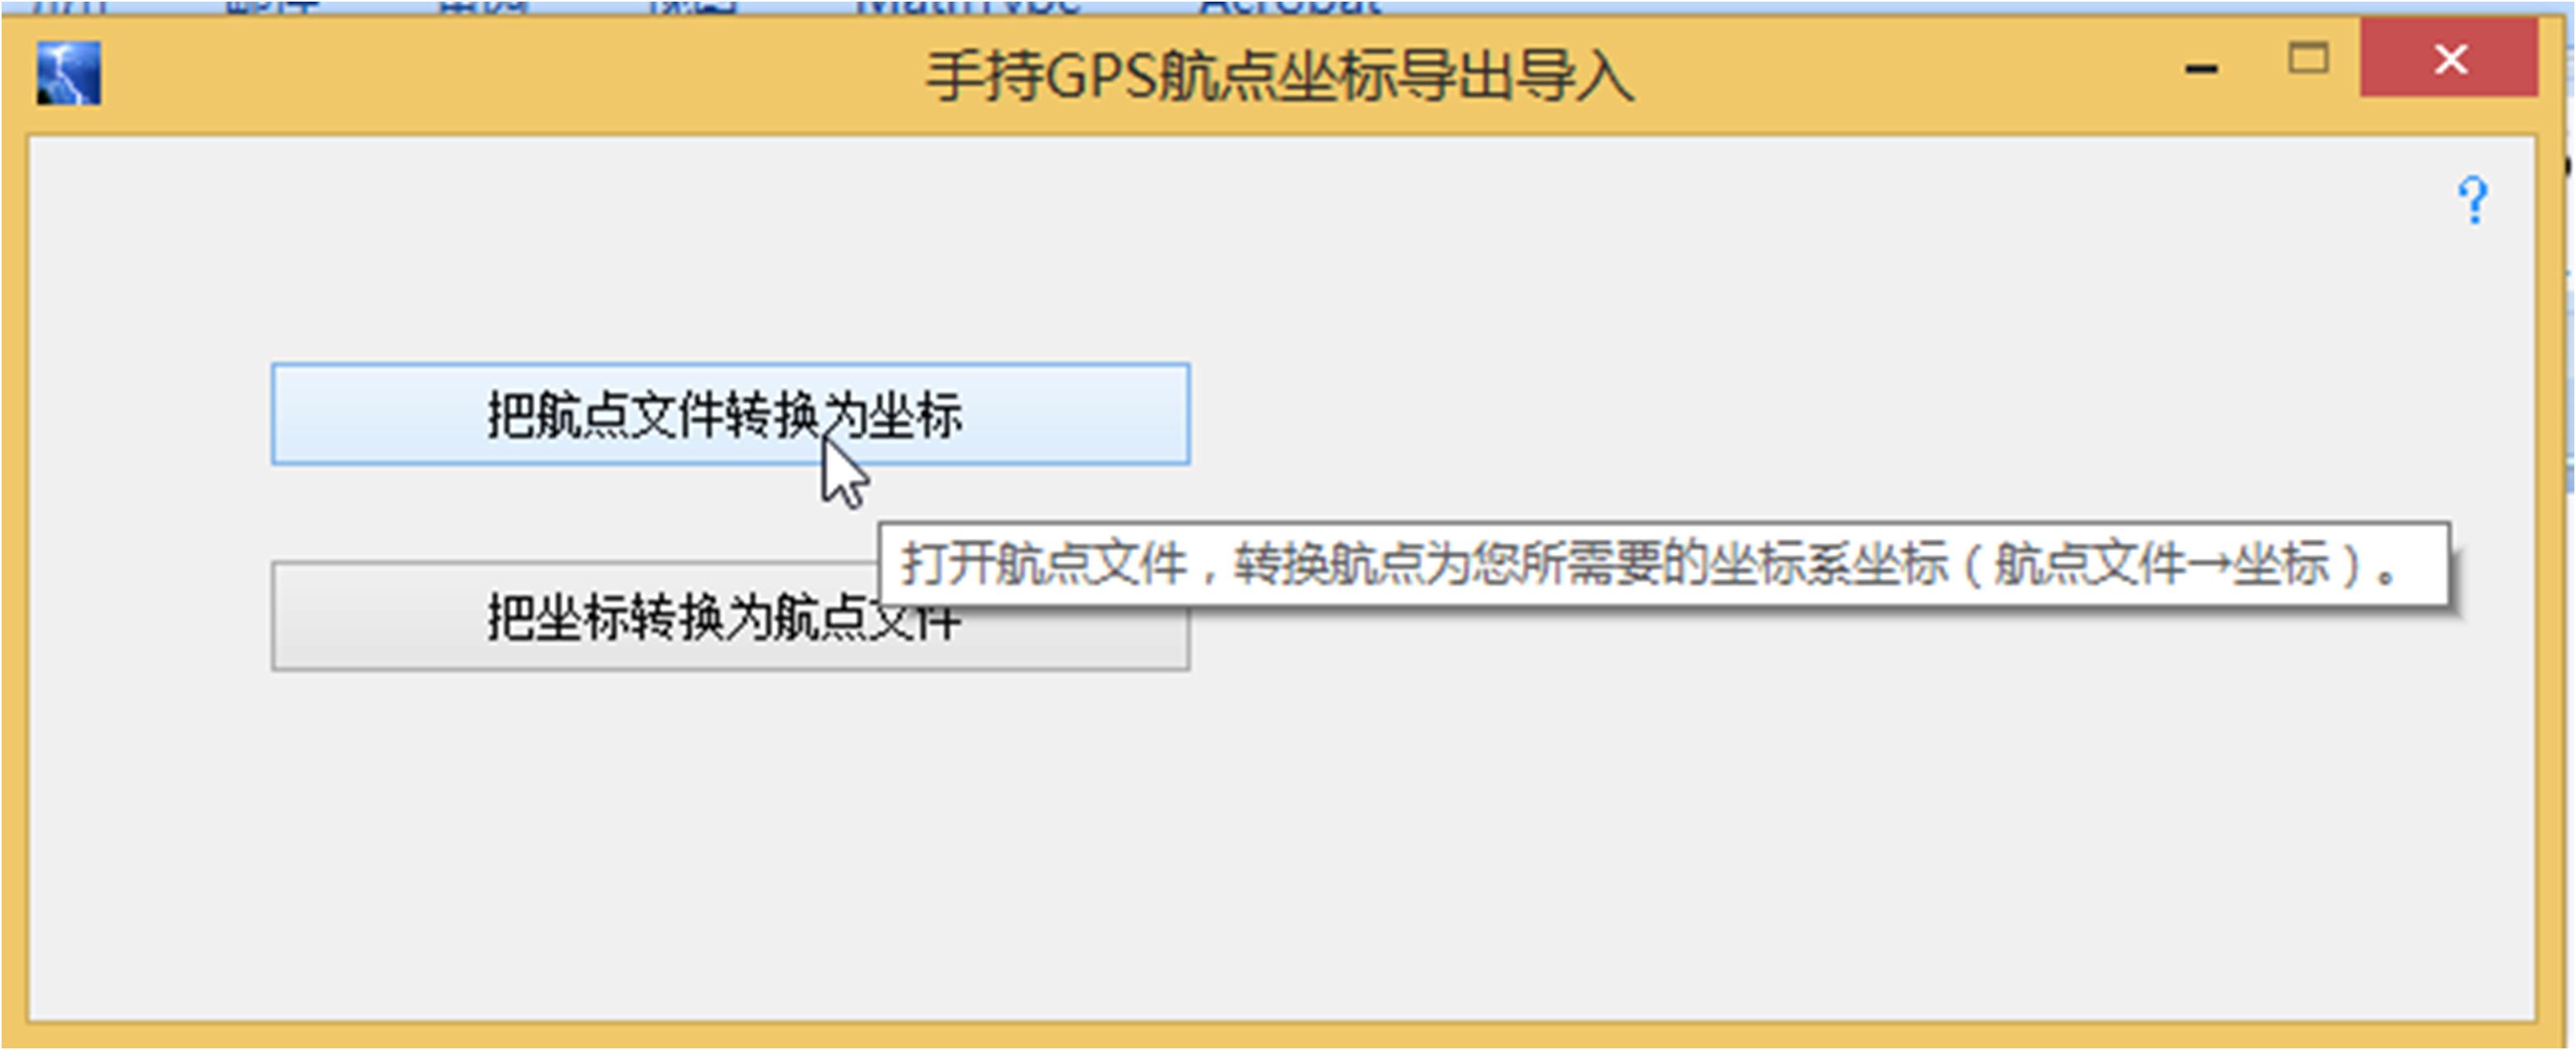
Click "Convert waypoint file to coordinates":
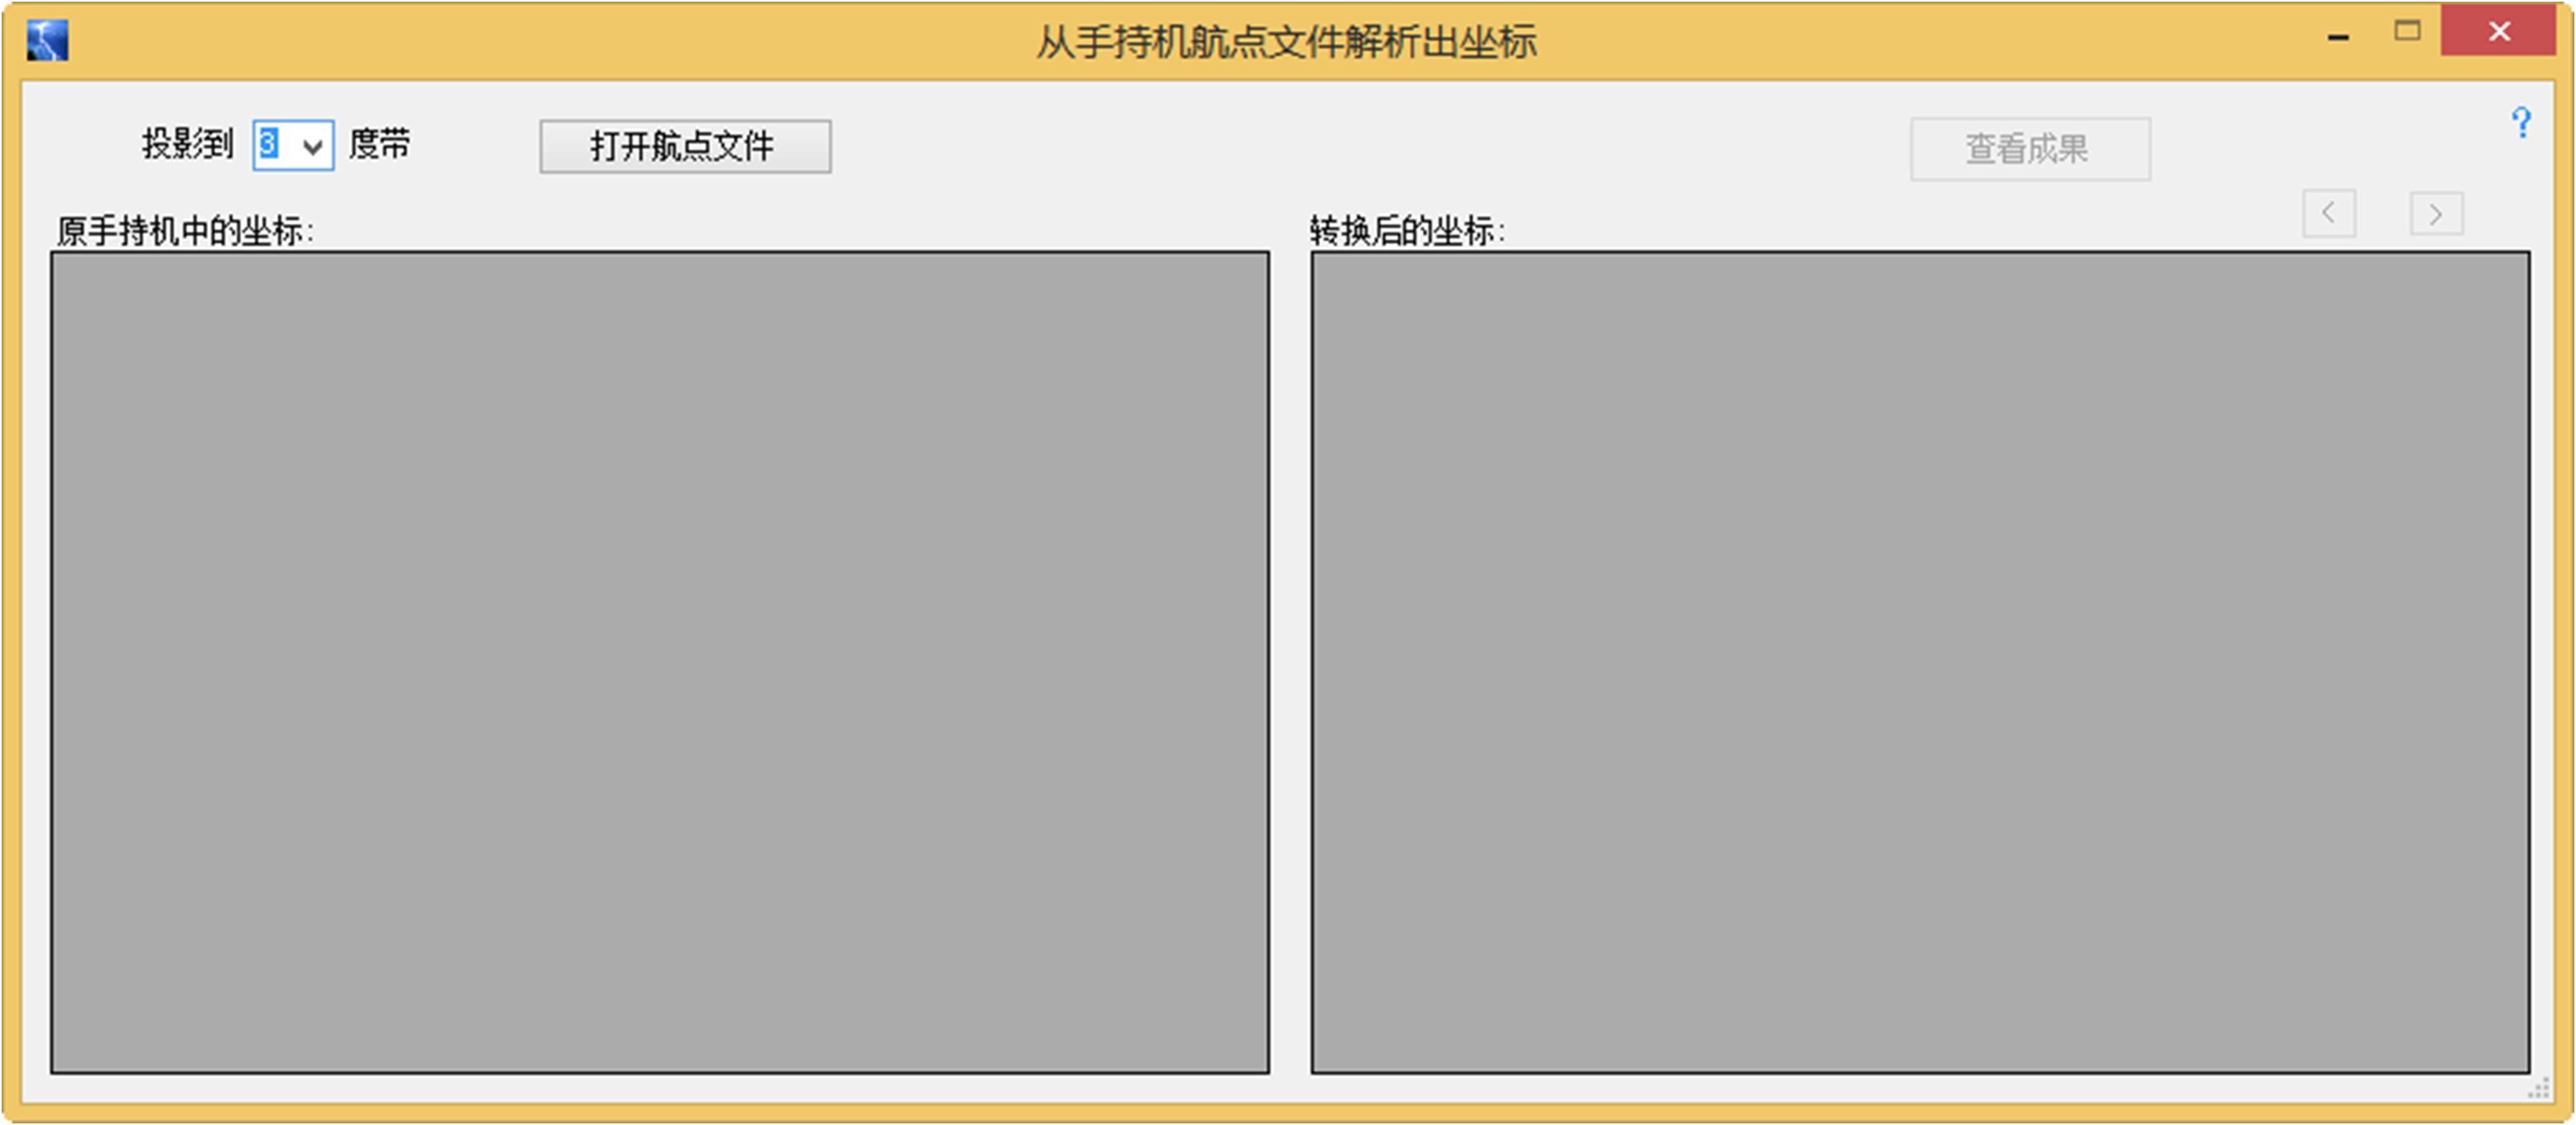
The following form pops up:
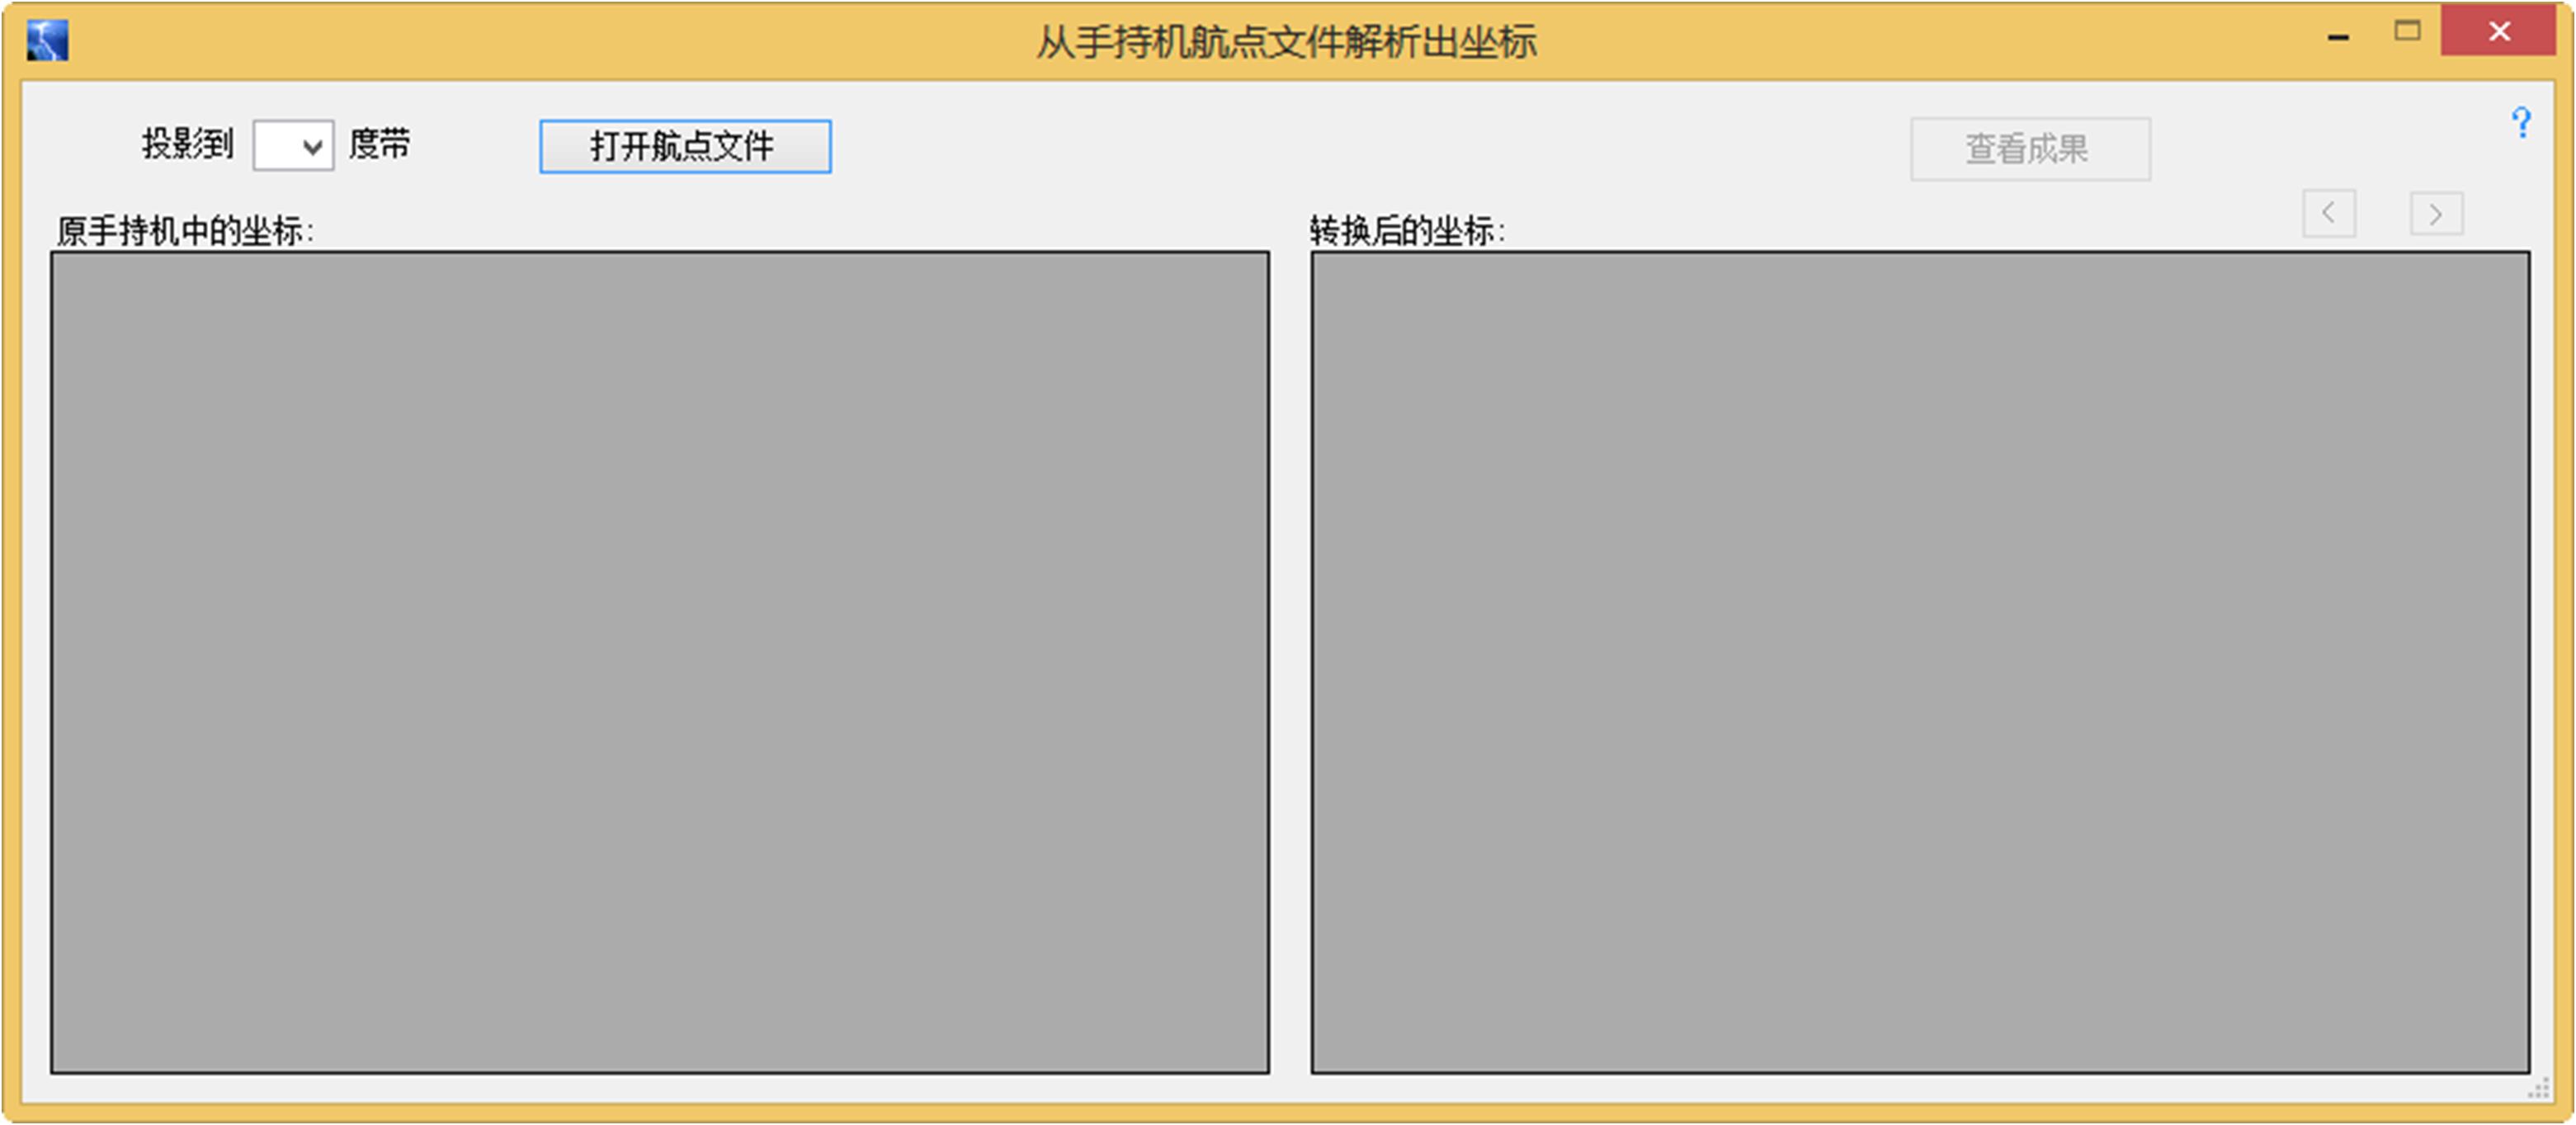
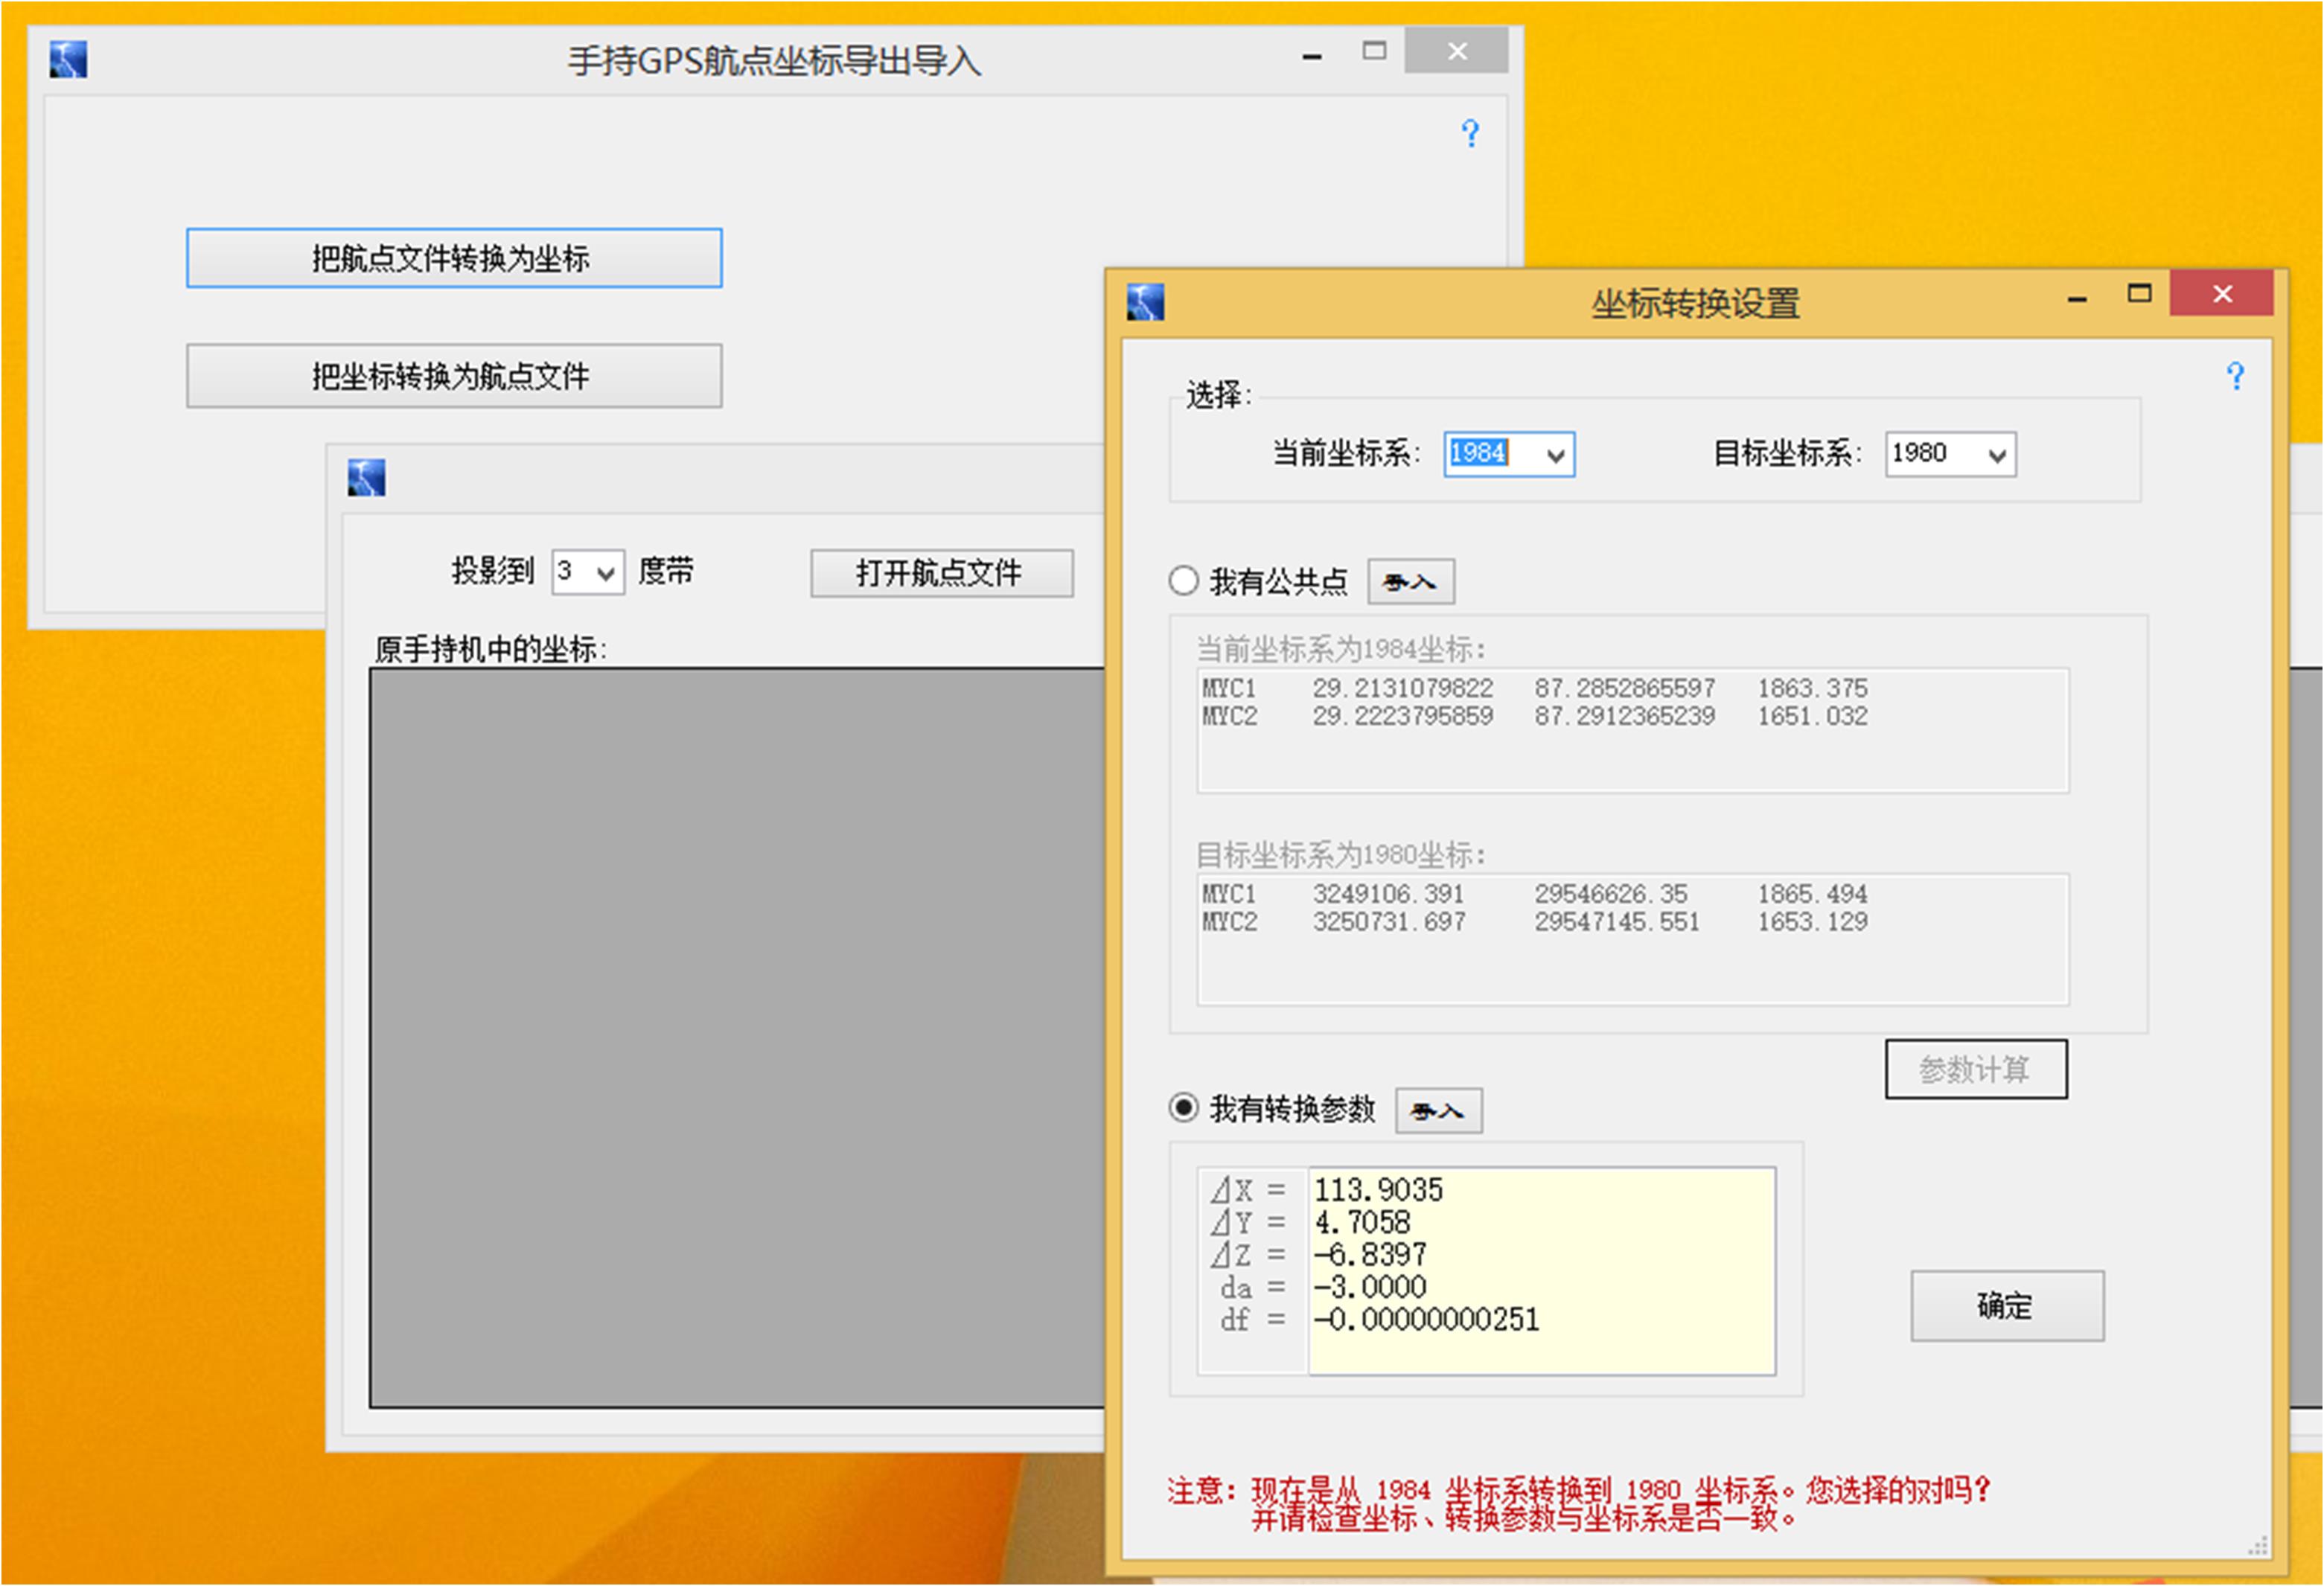
Select projection band(In the following example, 3 ° projection zone is selected),At this time, if the target coordinate system is the same as the original coordinate system, the geodetic coordinate of the hand-hold coordinate system is projected to the 3 degree band Gaussian plane coordinate; If the target coordinate system is different from the original coordinate system, it is converted to the Gaussian plane coordinates under the target coordinate system, and the software also gives the target geodetic coordinates. After selecting the projection belt, the coordinate conversion setting window will pop up automatically. The user should carefully set it, especially pay attention to the selection of the two coordinate systems, and the relationship between the two coordinate systems selected and the common point coordinates and coordinate conversion parameters must correspond, and pay attention to the prompt information below the setting window:
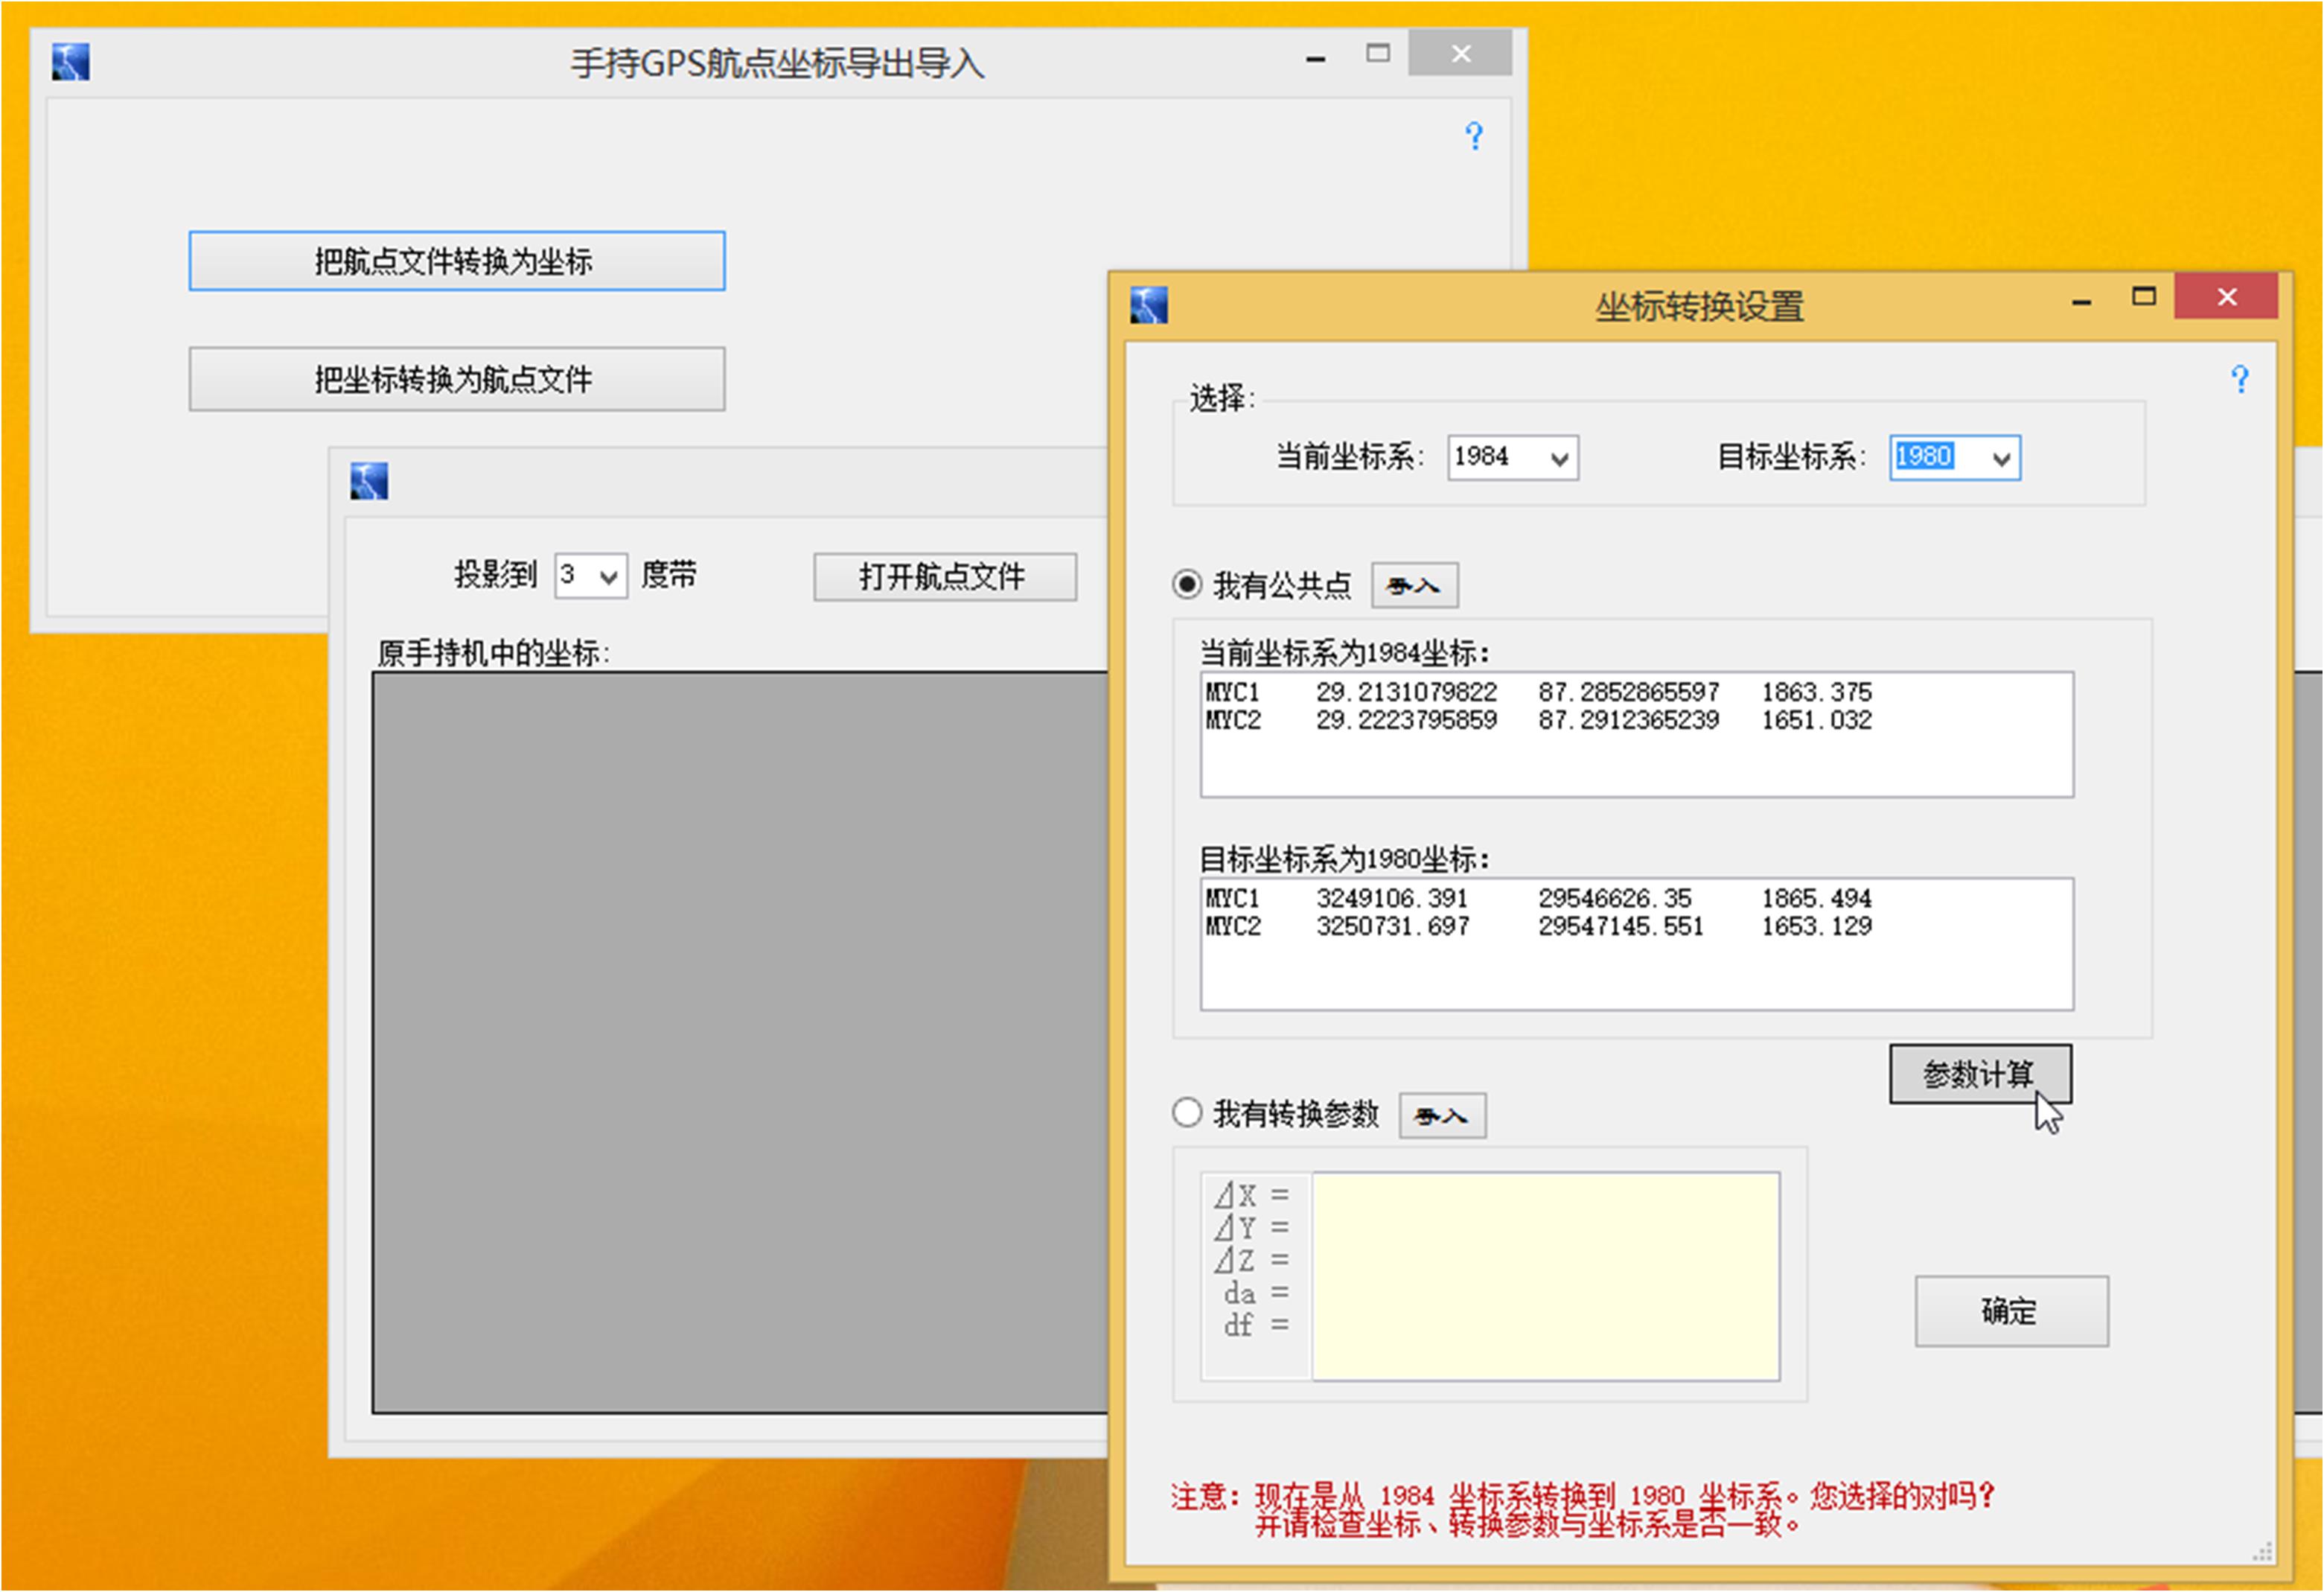
If there is no coordinate conversion parameter, you should select "I have a common point", and then load the common point coordinate file, or copy and paste it from another document, or enter it directly. Then, click "Parameter calculation", and the software will fill the calculated five handheld coordinate conversion parameters into the text box under "I have conversion parameters". As shown in the figure below:
Click "OK" to return to the original window:
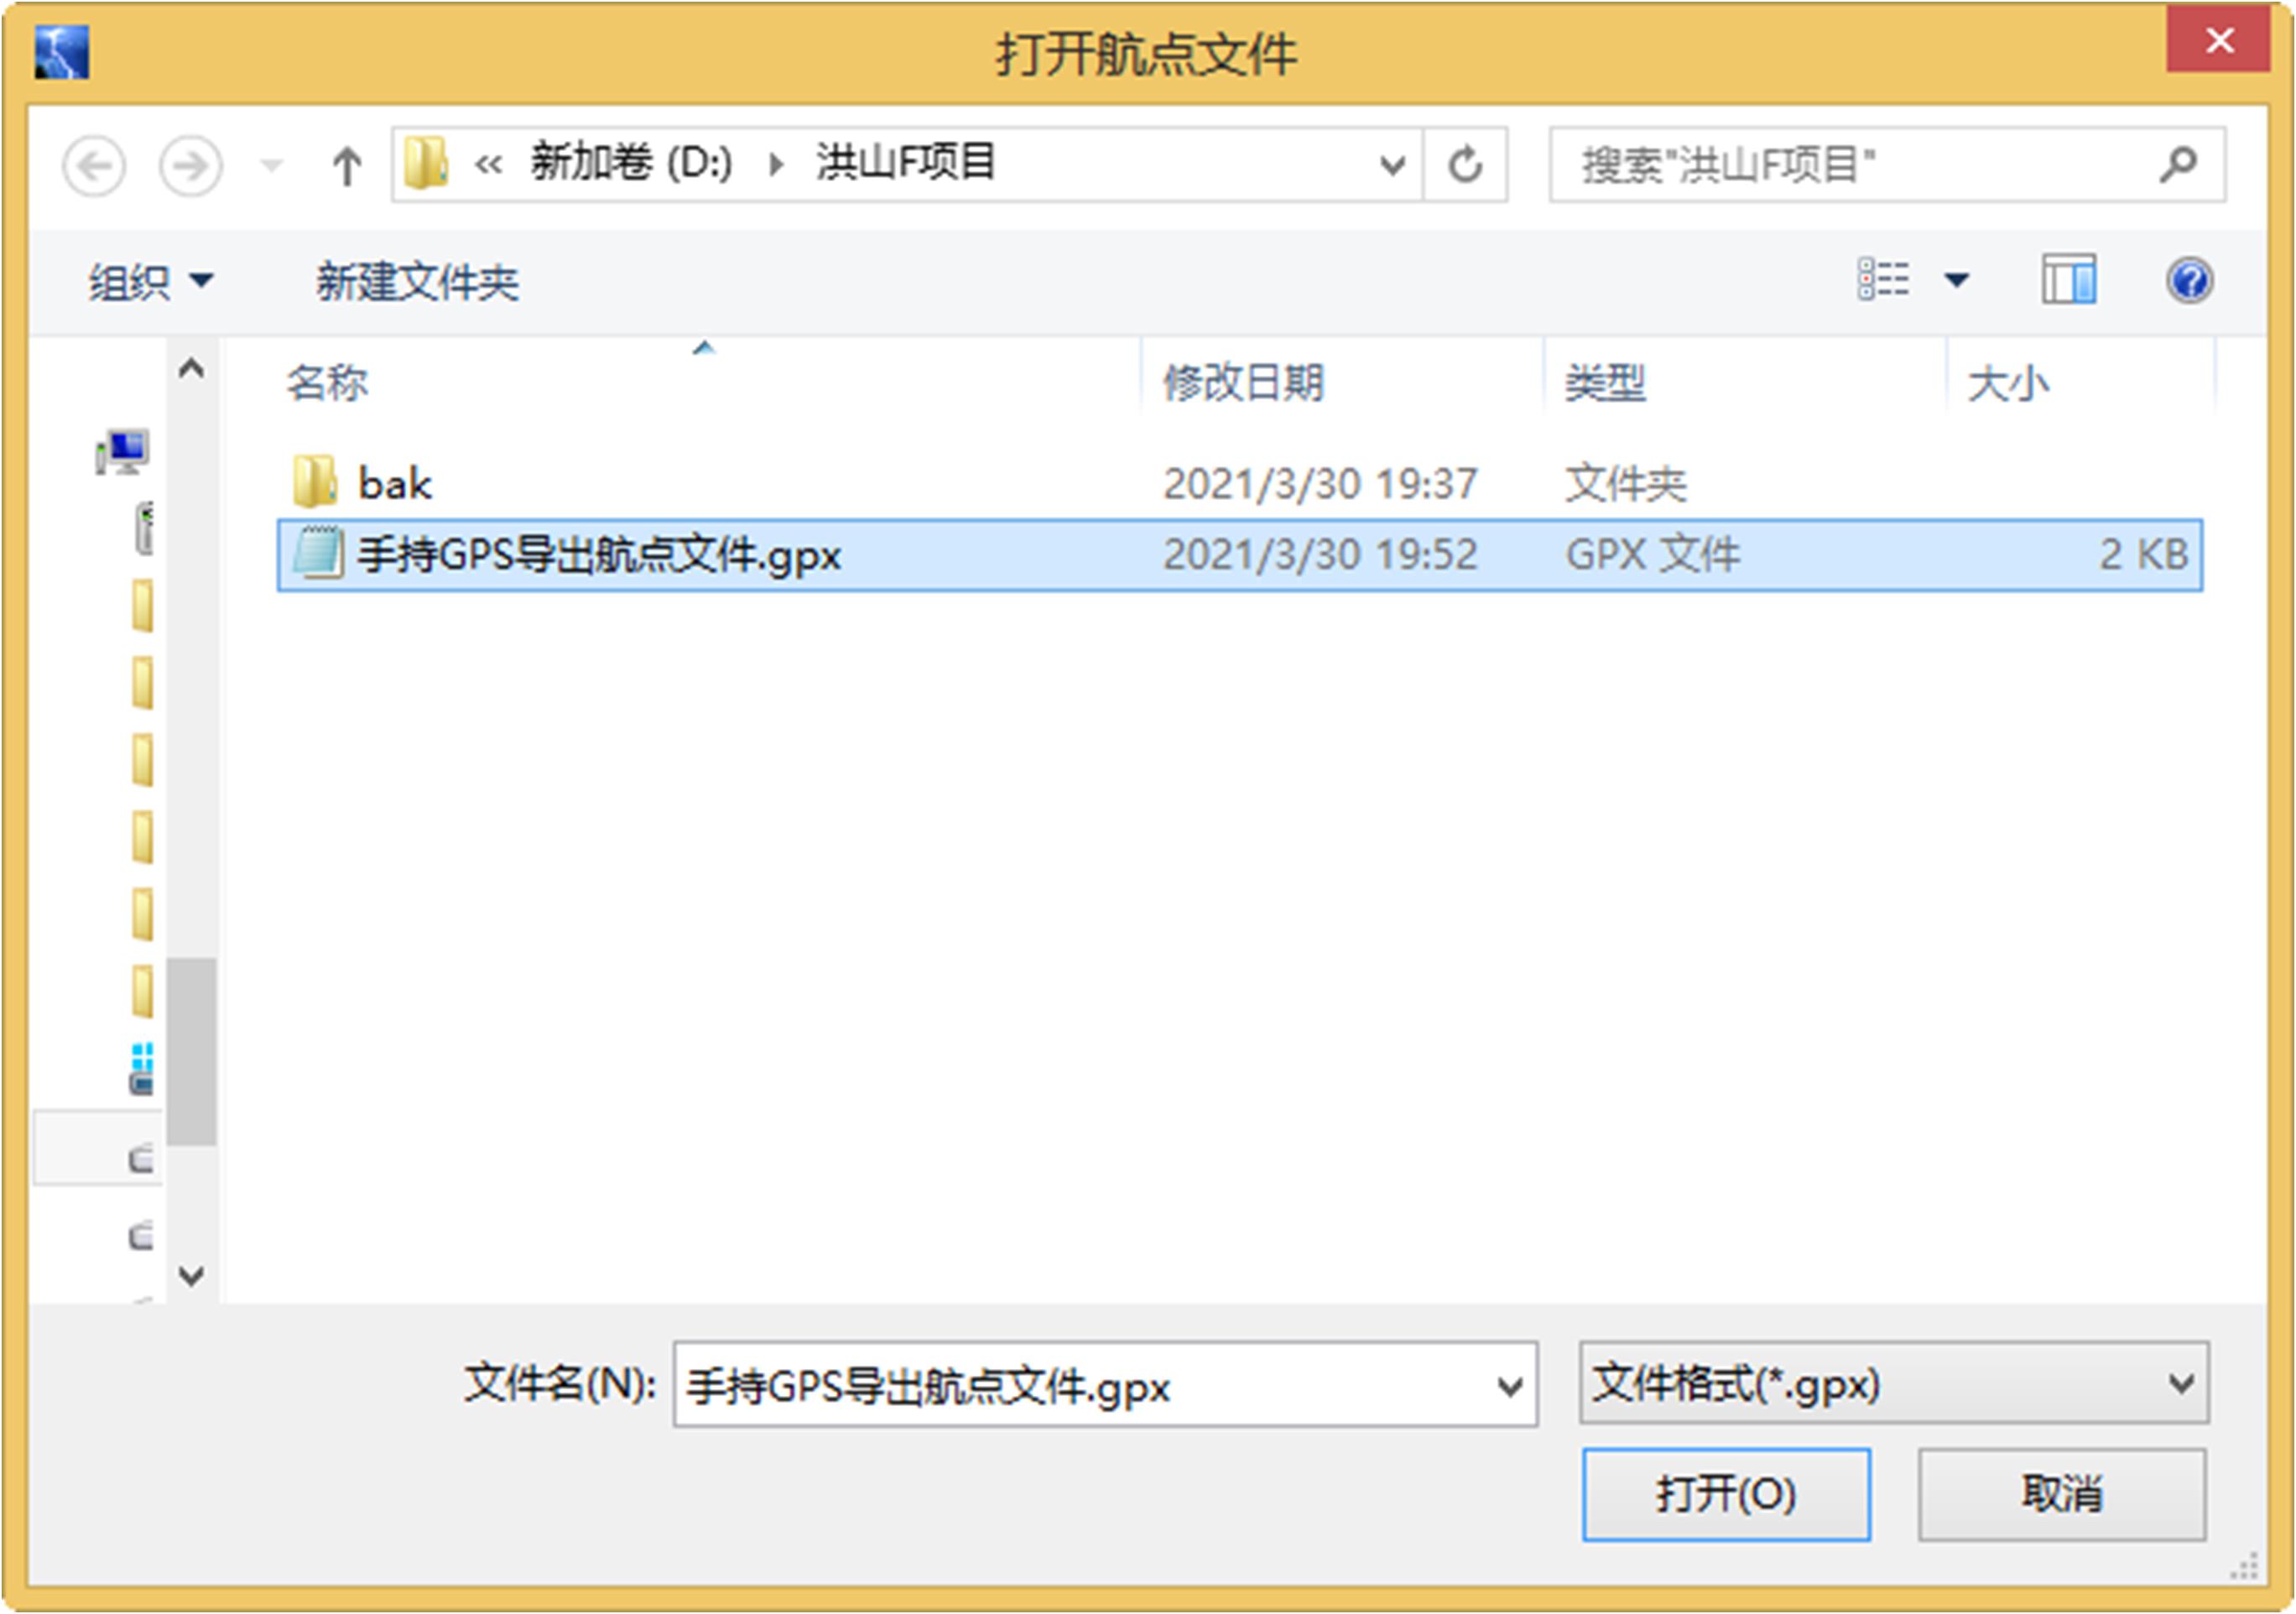
Then, click "Open waypoint file":
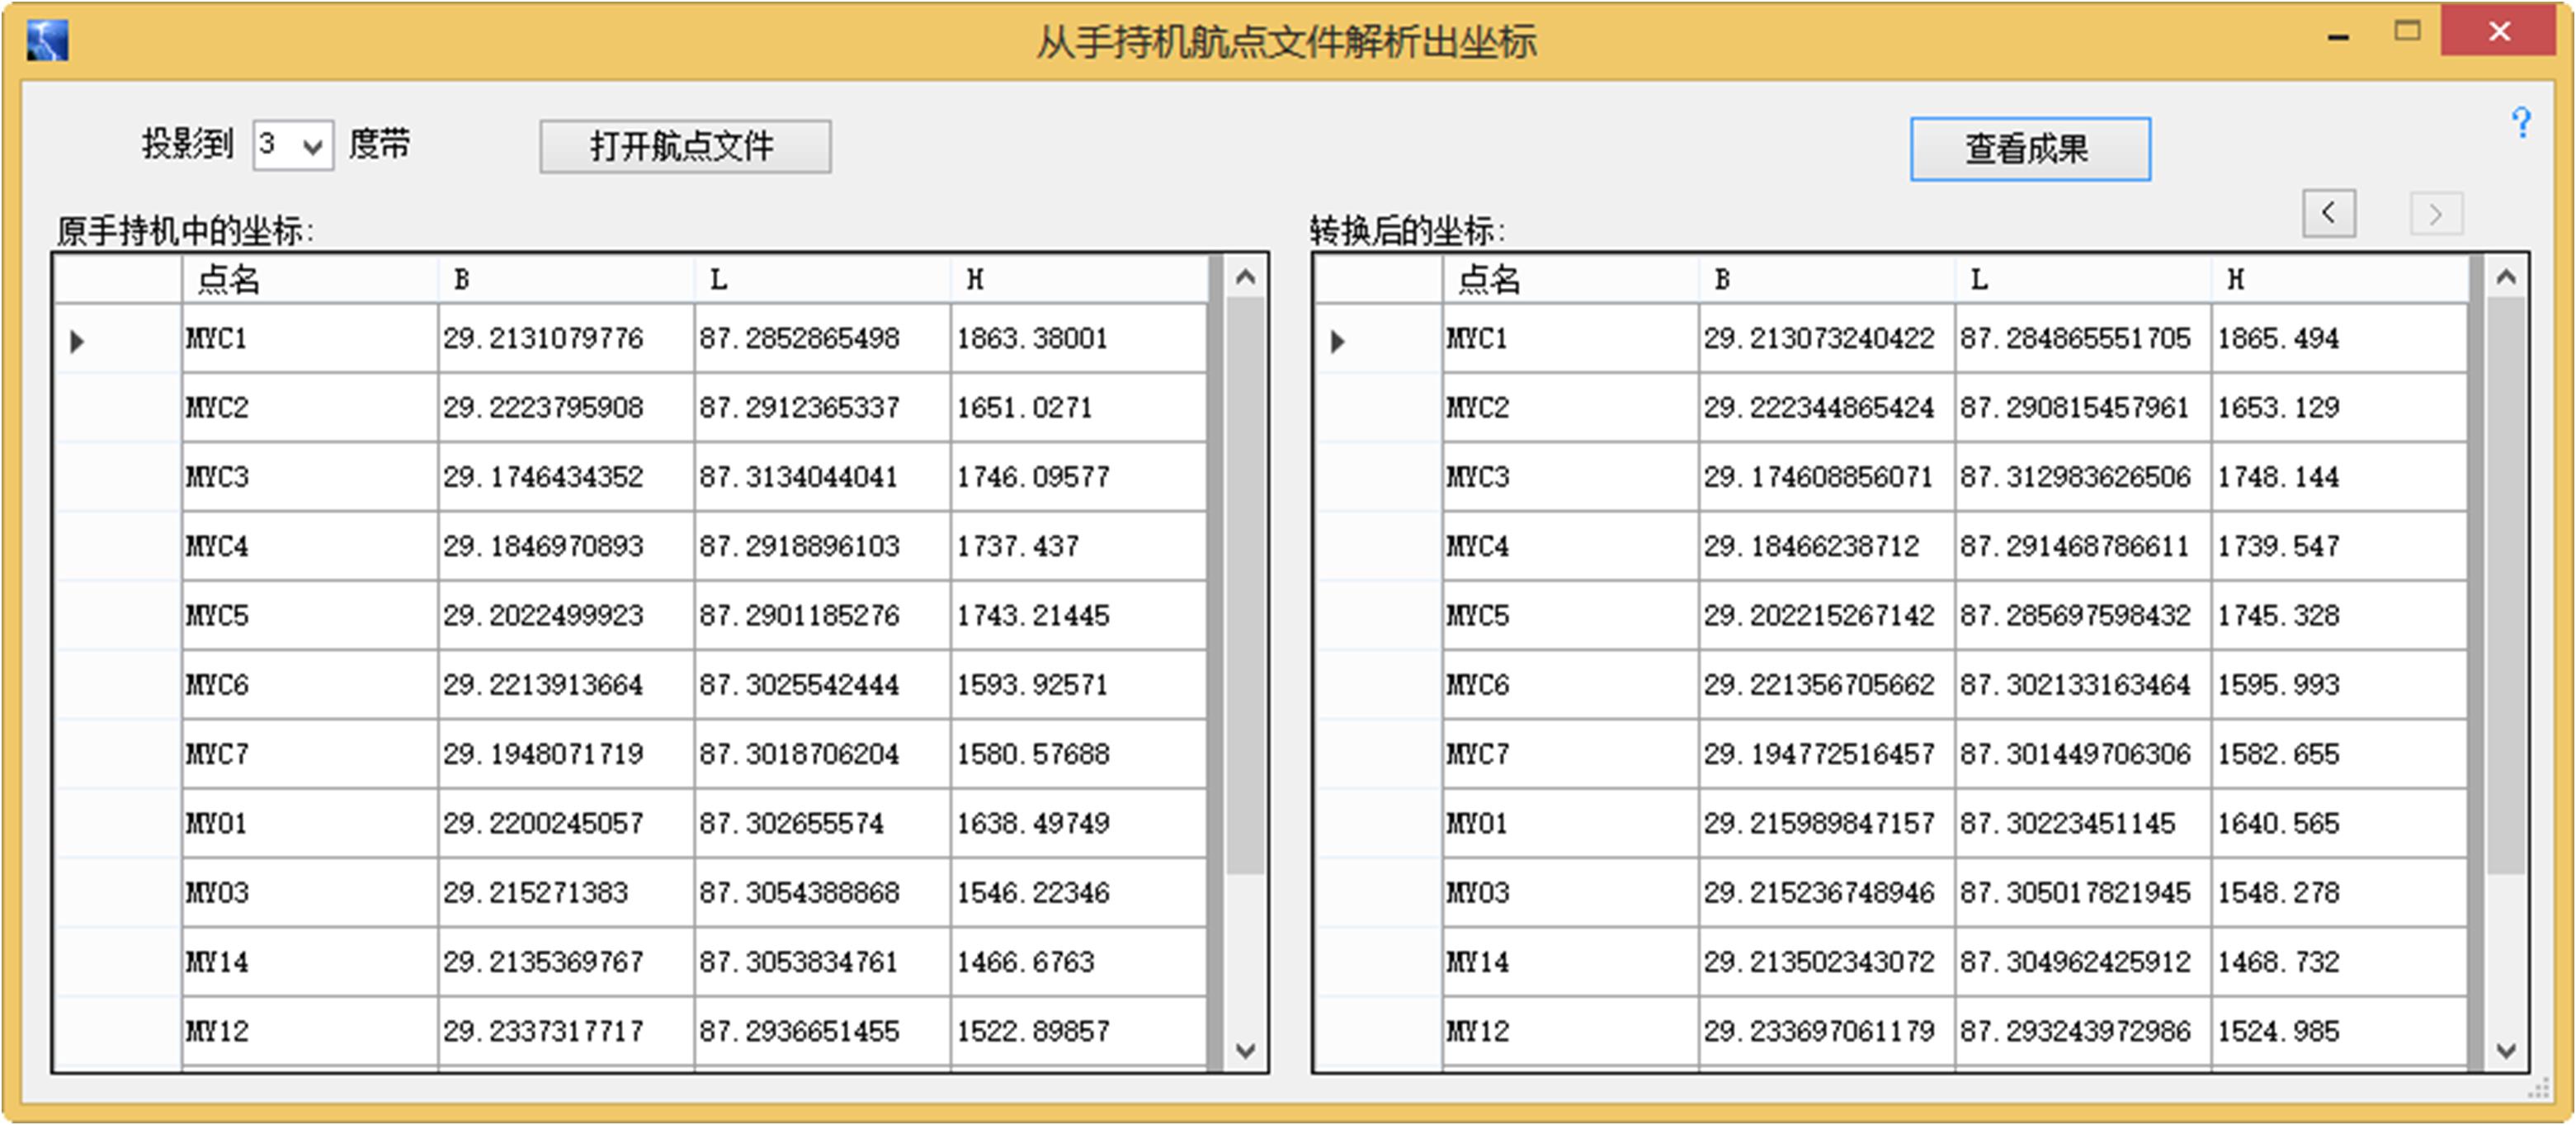
After clicking "Open", the results will appear. You can view the coordinates in the original handset and the plane coordinates of the target 3 degree band:
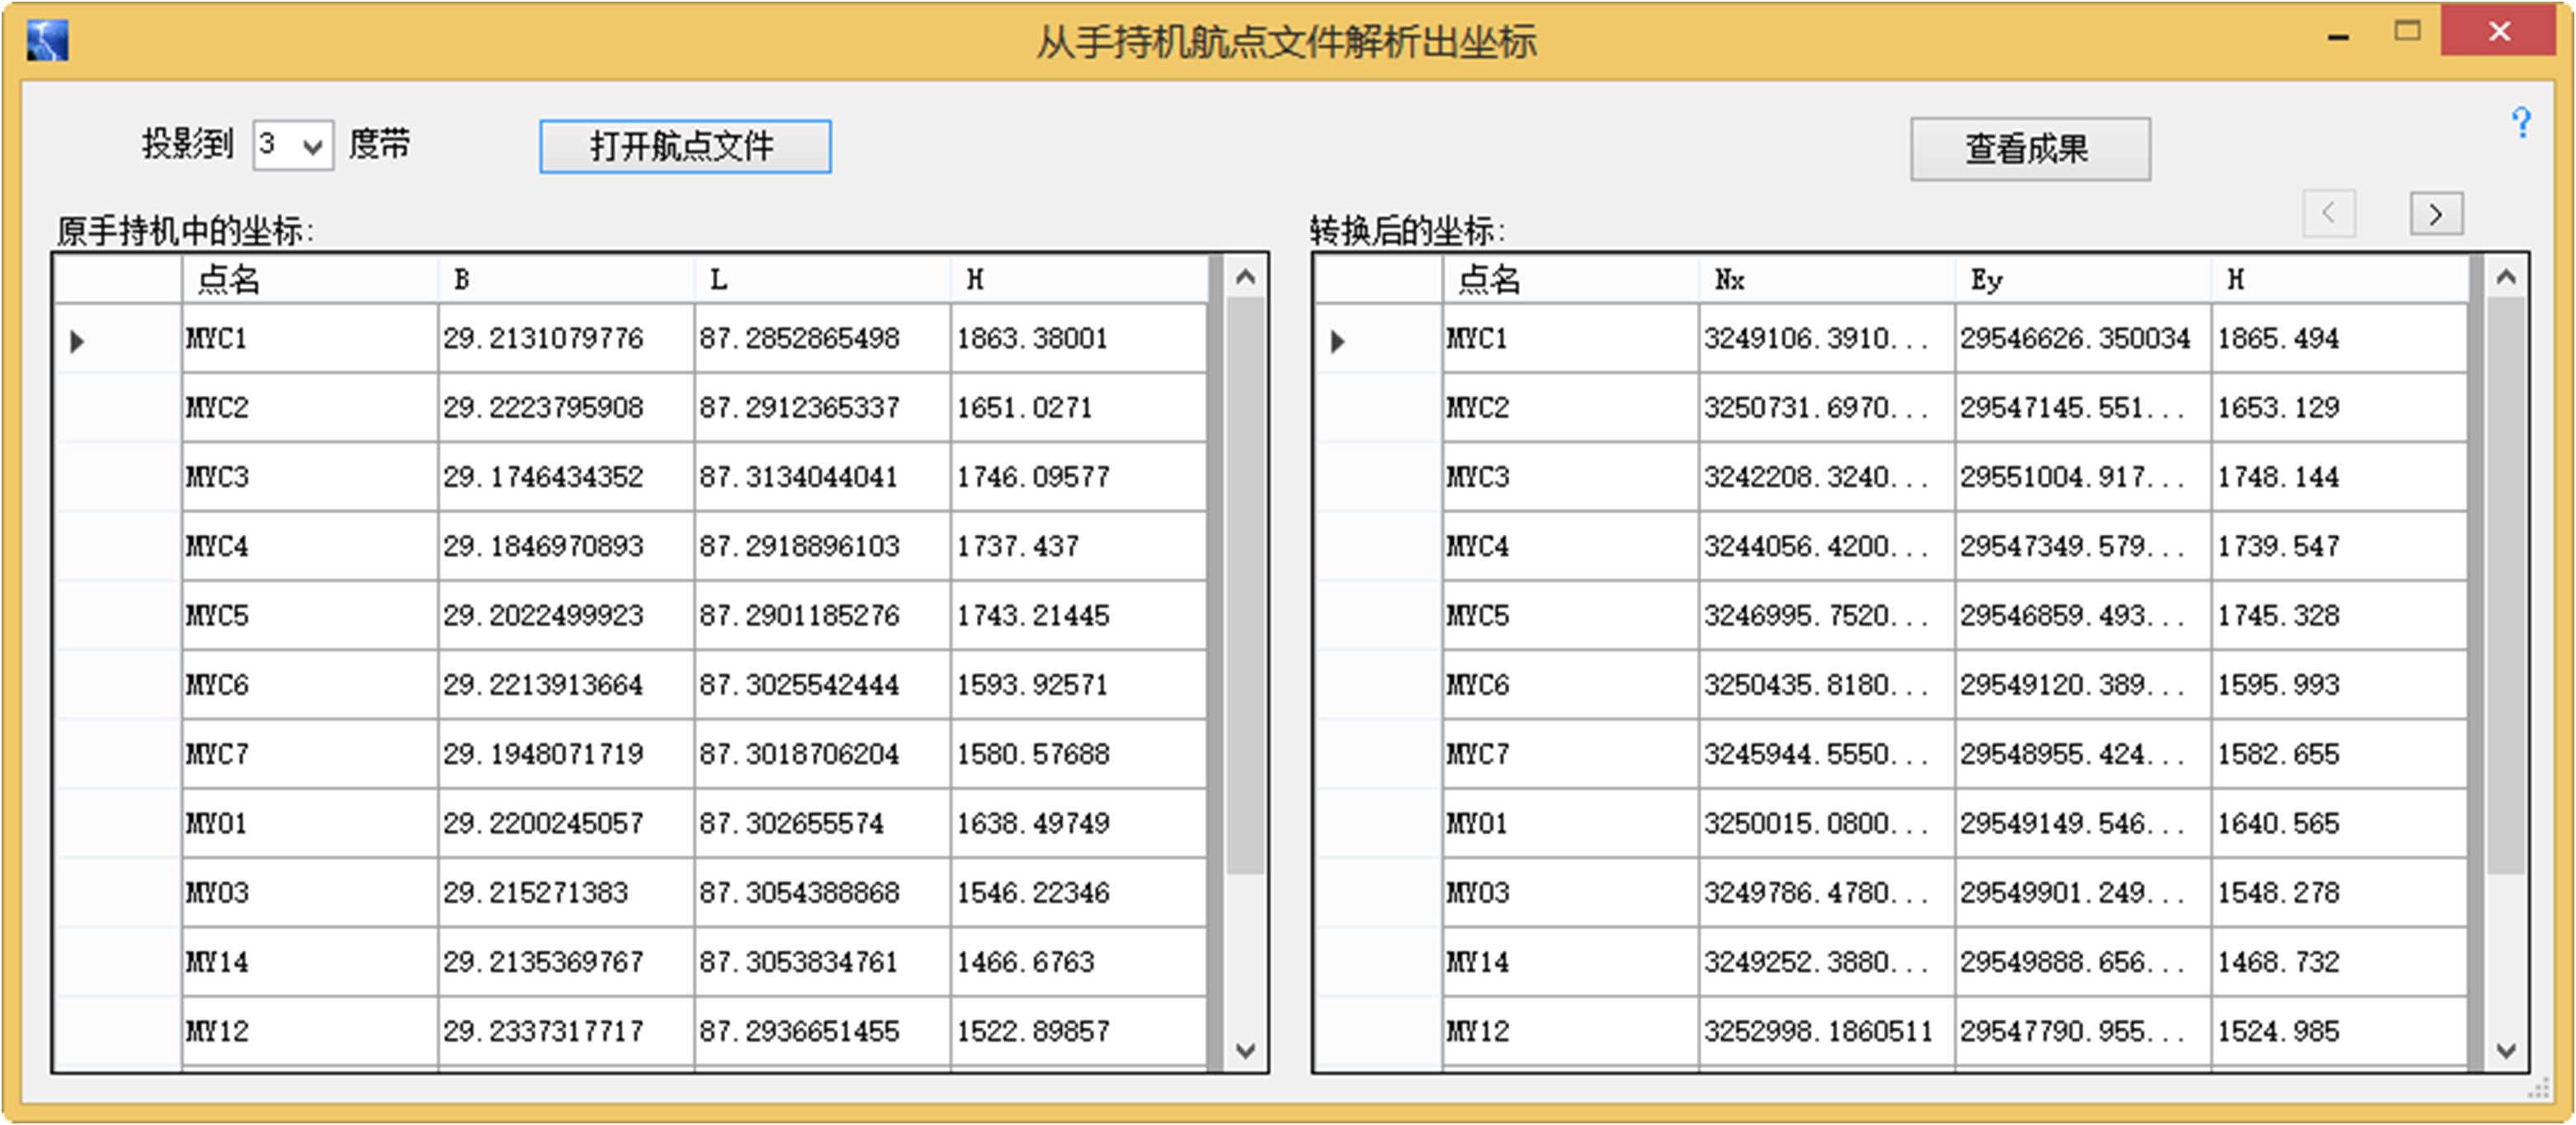
Click the upper right corner“>”You can view the target geodetic coordinates:
Click "View Results", and you can see that the following four formats of the target coordinate system coordinate document and the original coordinate system coordinate document are generated, totaling nine documents(The first eight documents are the coordinate documents of the target coordinate system),For users to choose in their work.
Note: The docx file and xlsx file are installed with Microsoft Office Word,ExcelIs generated.
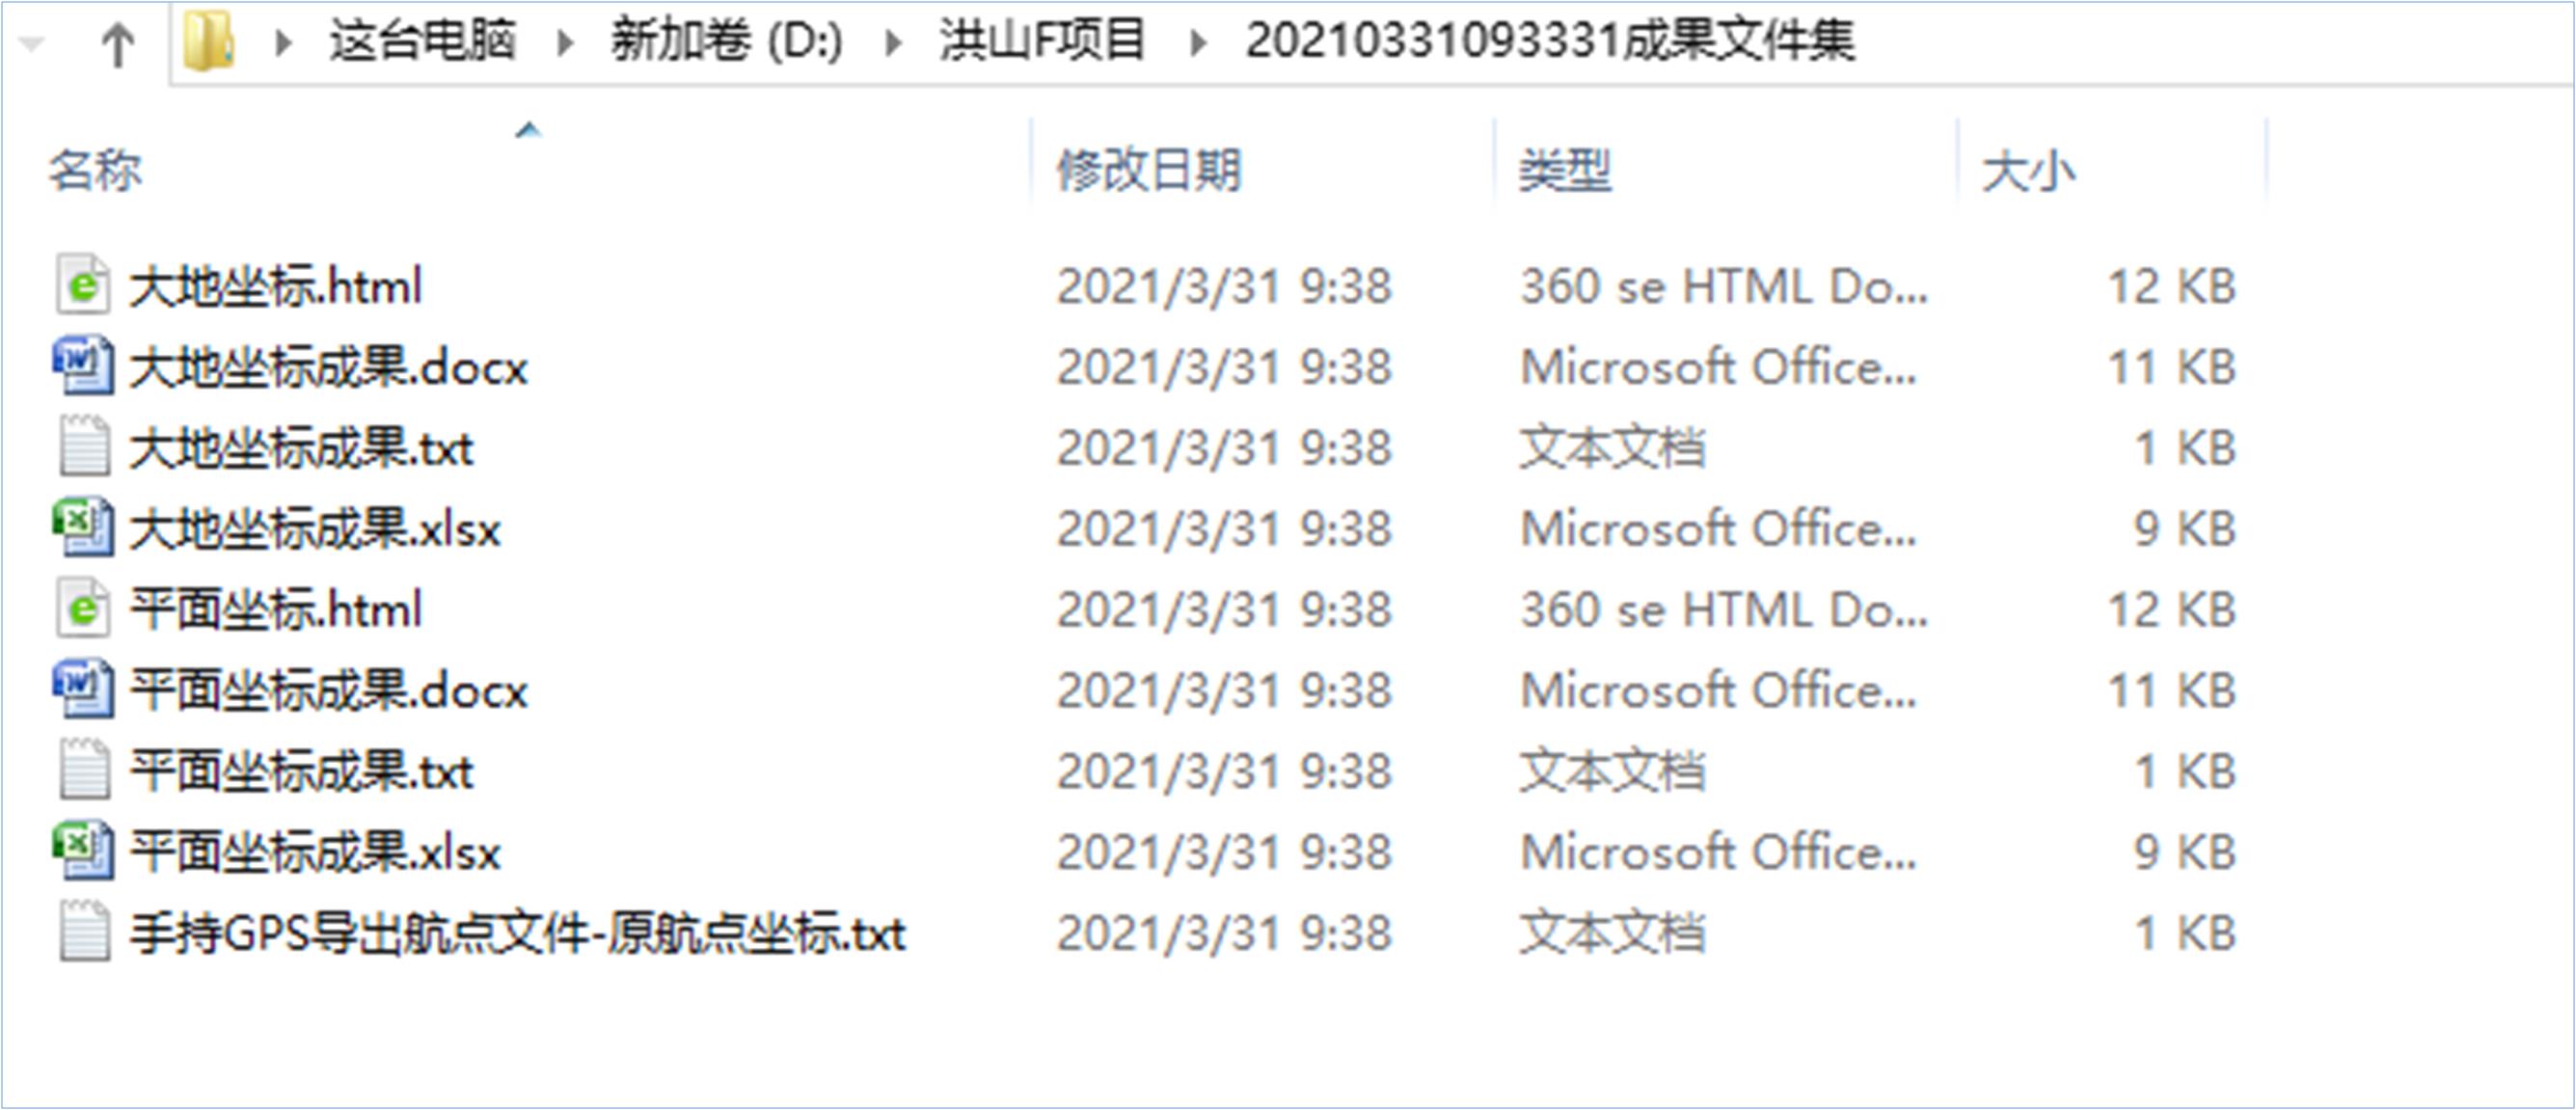
Browse the contents of the above nine documents:
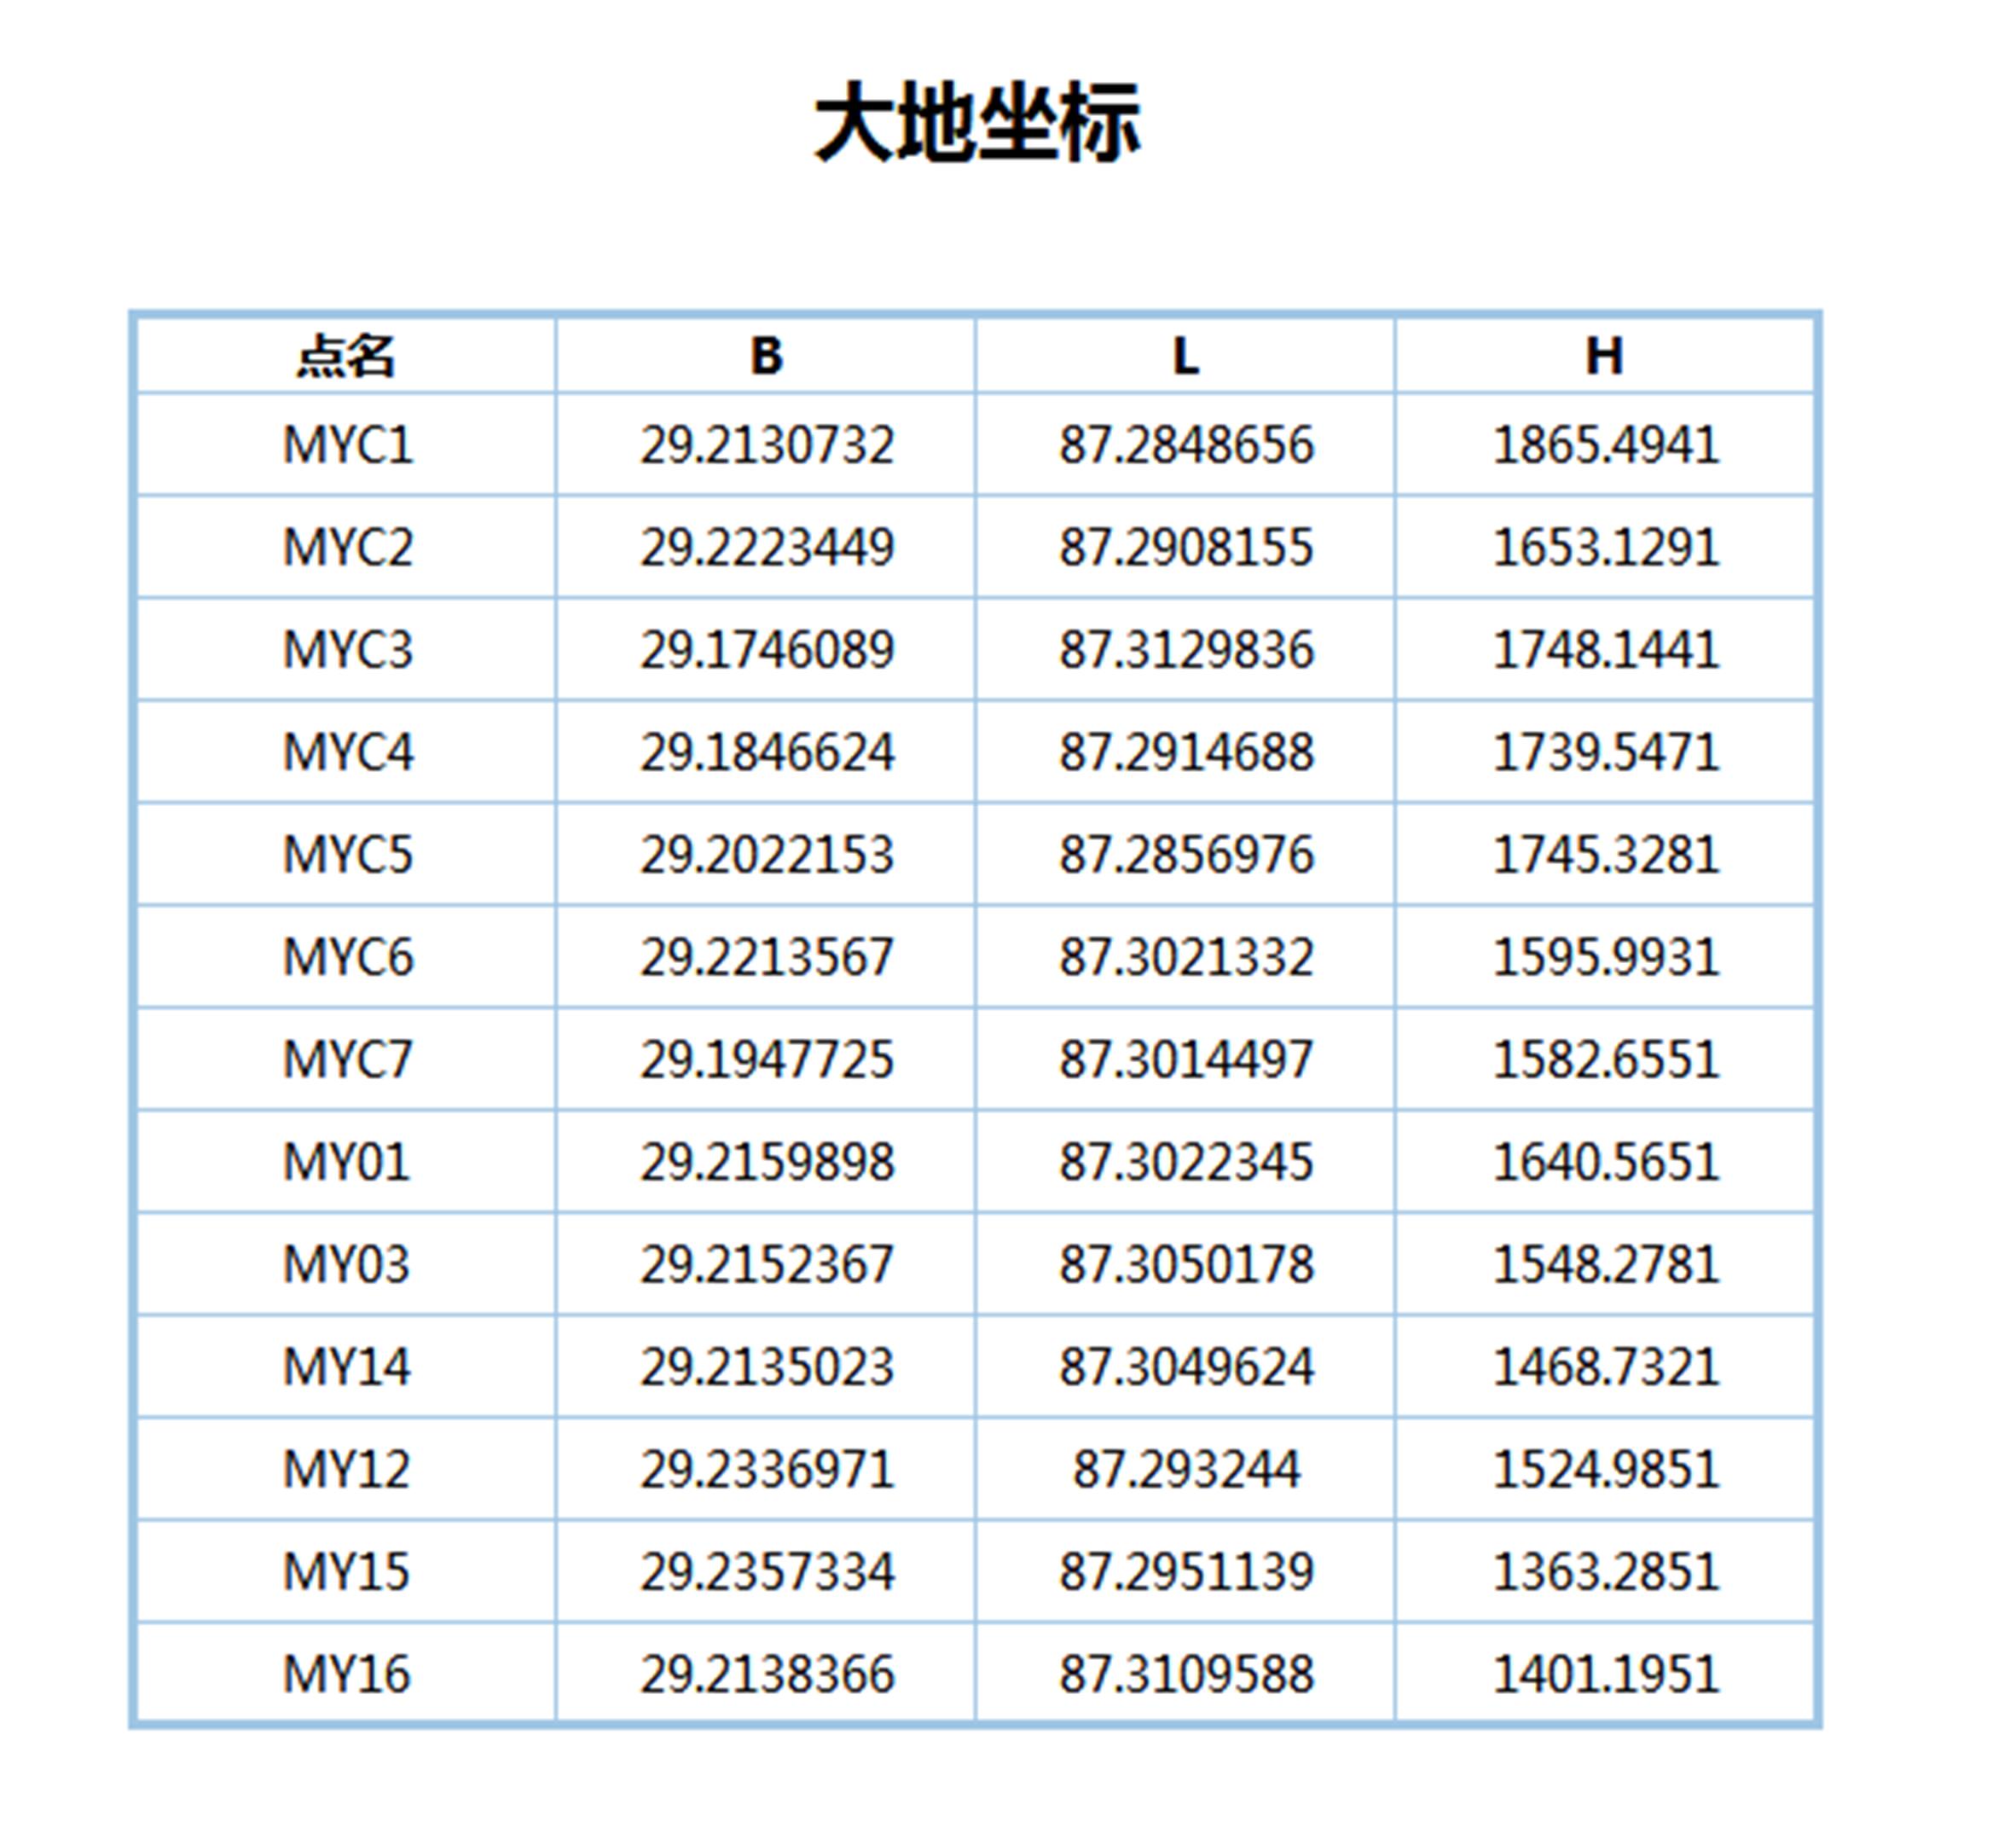
Web page format of geodetic coordinates:
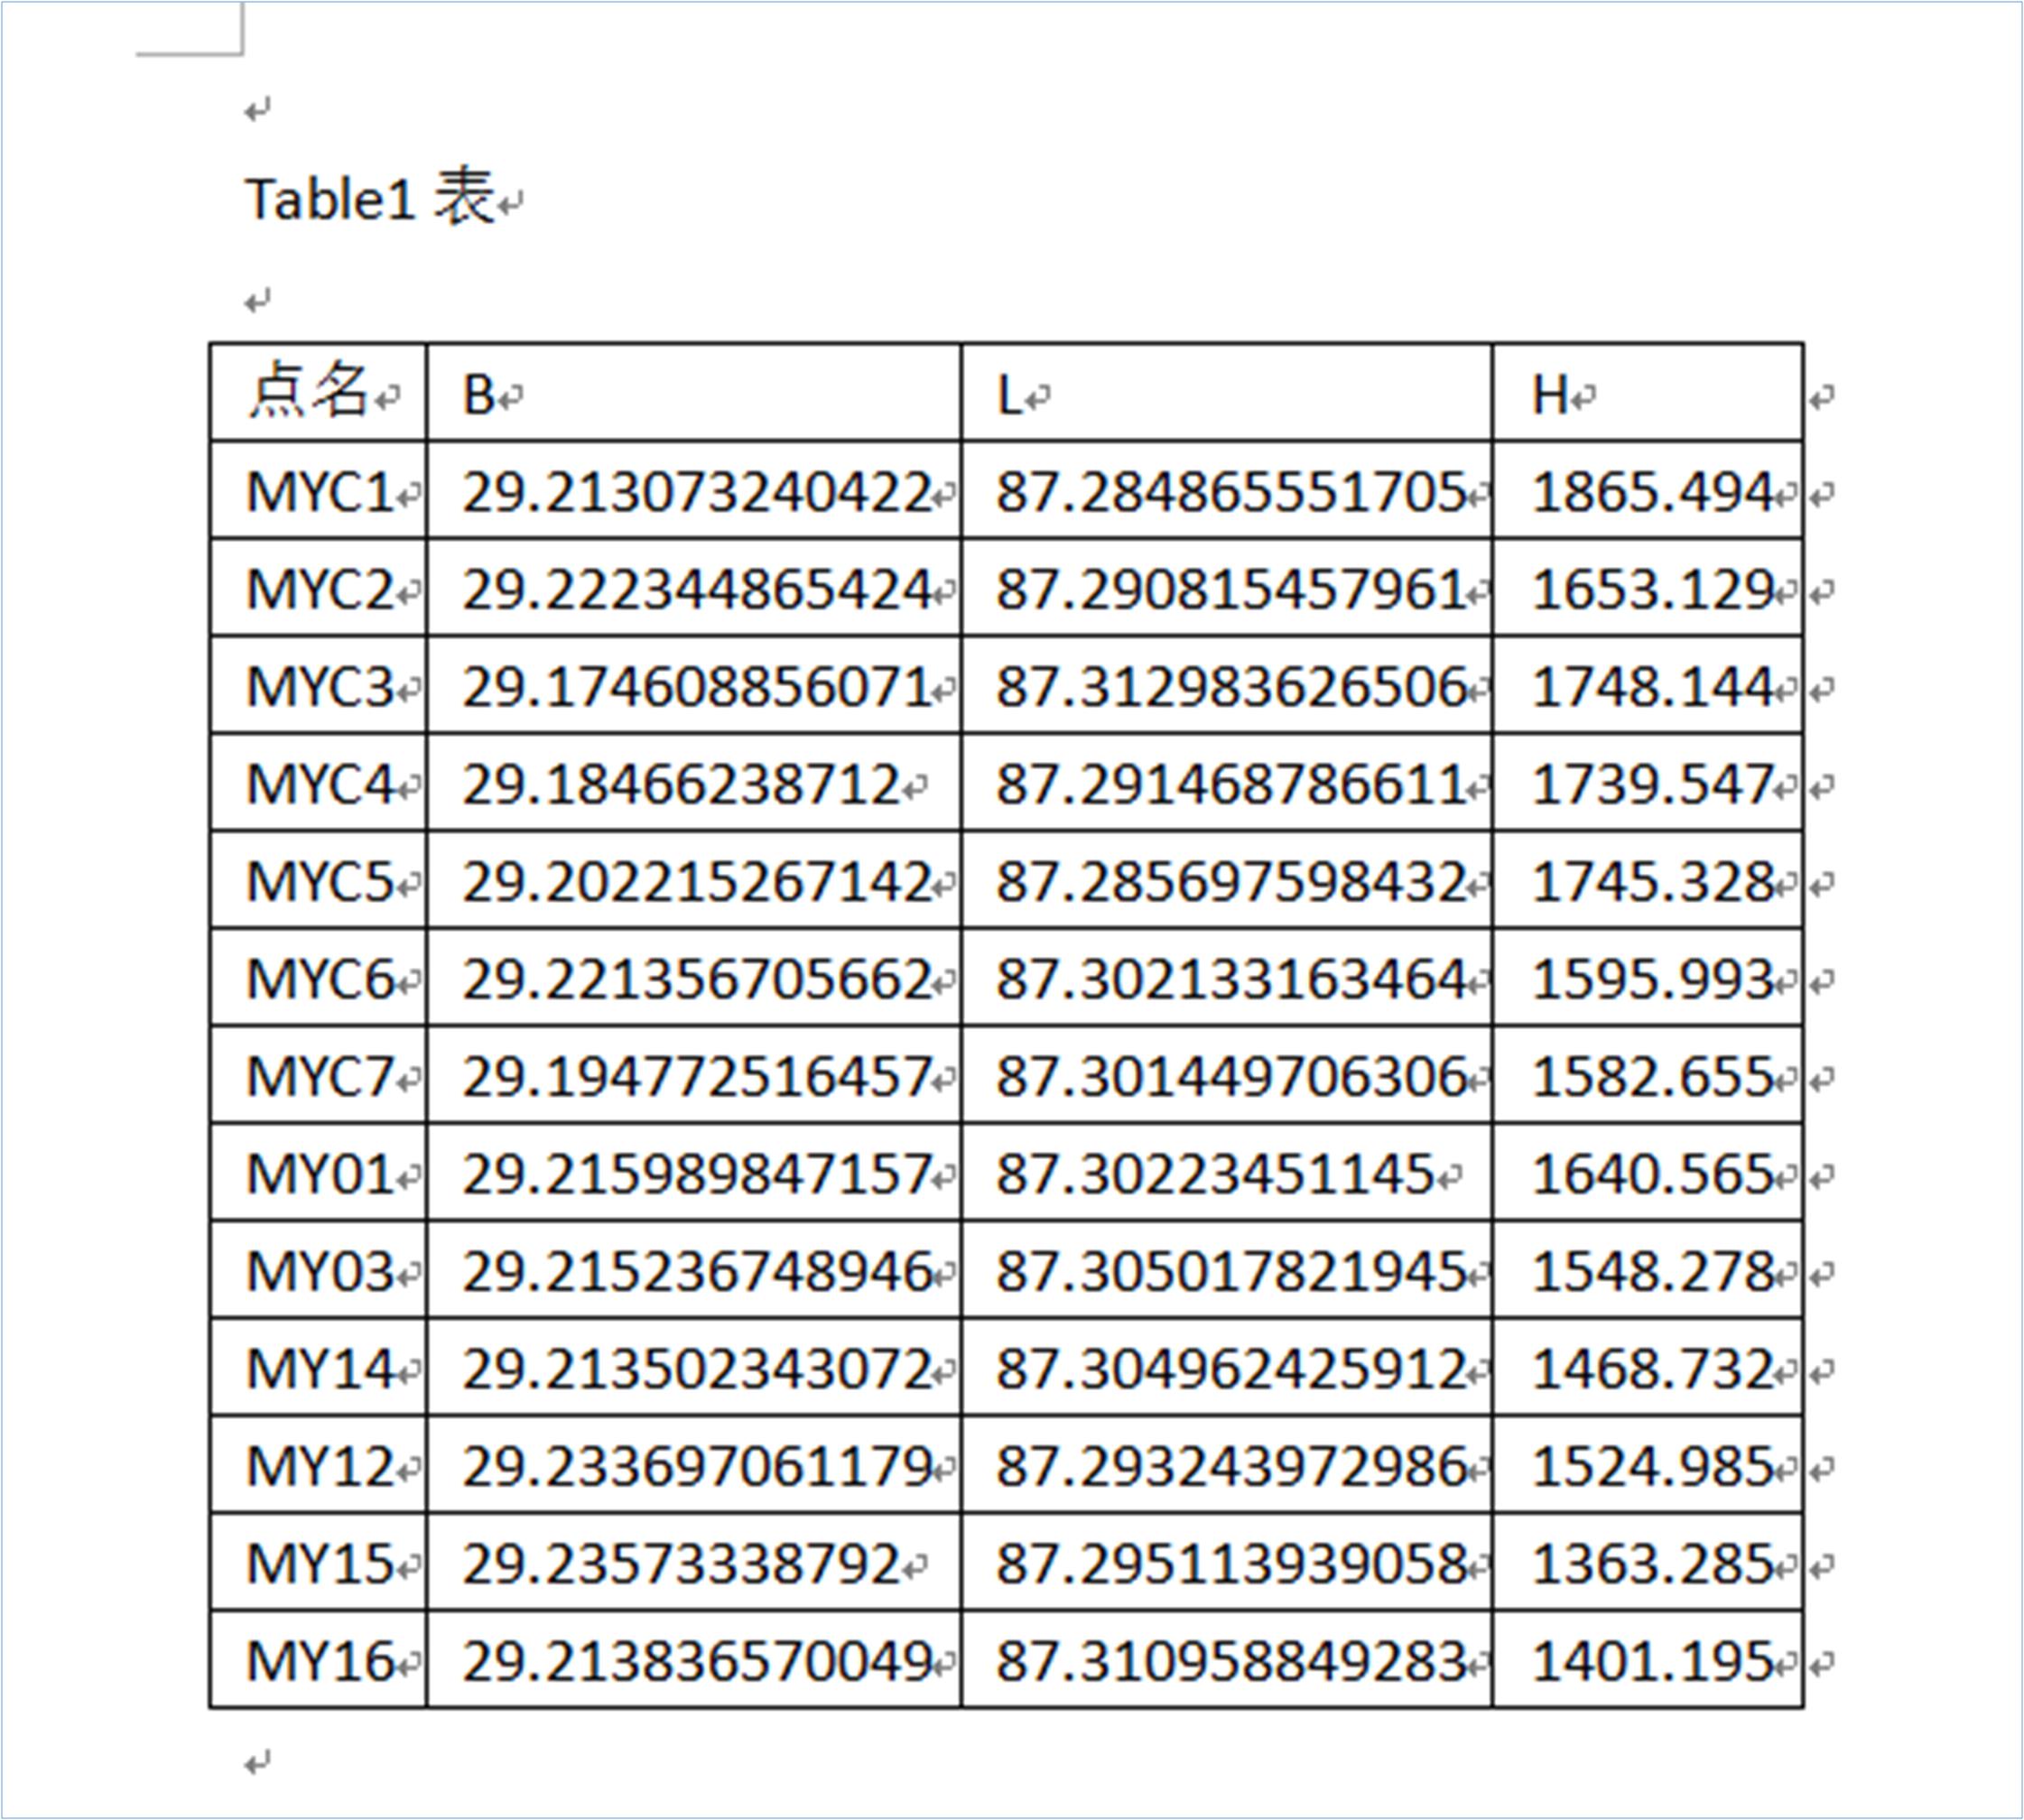
Word document format of geodetic coordinates:
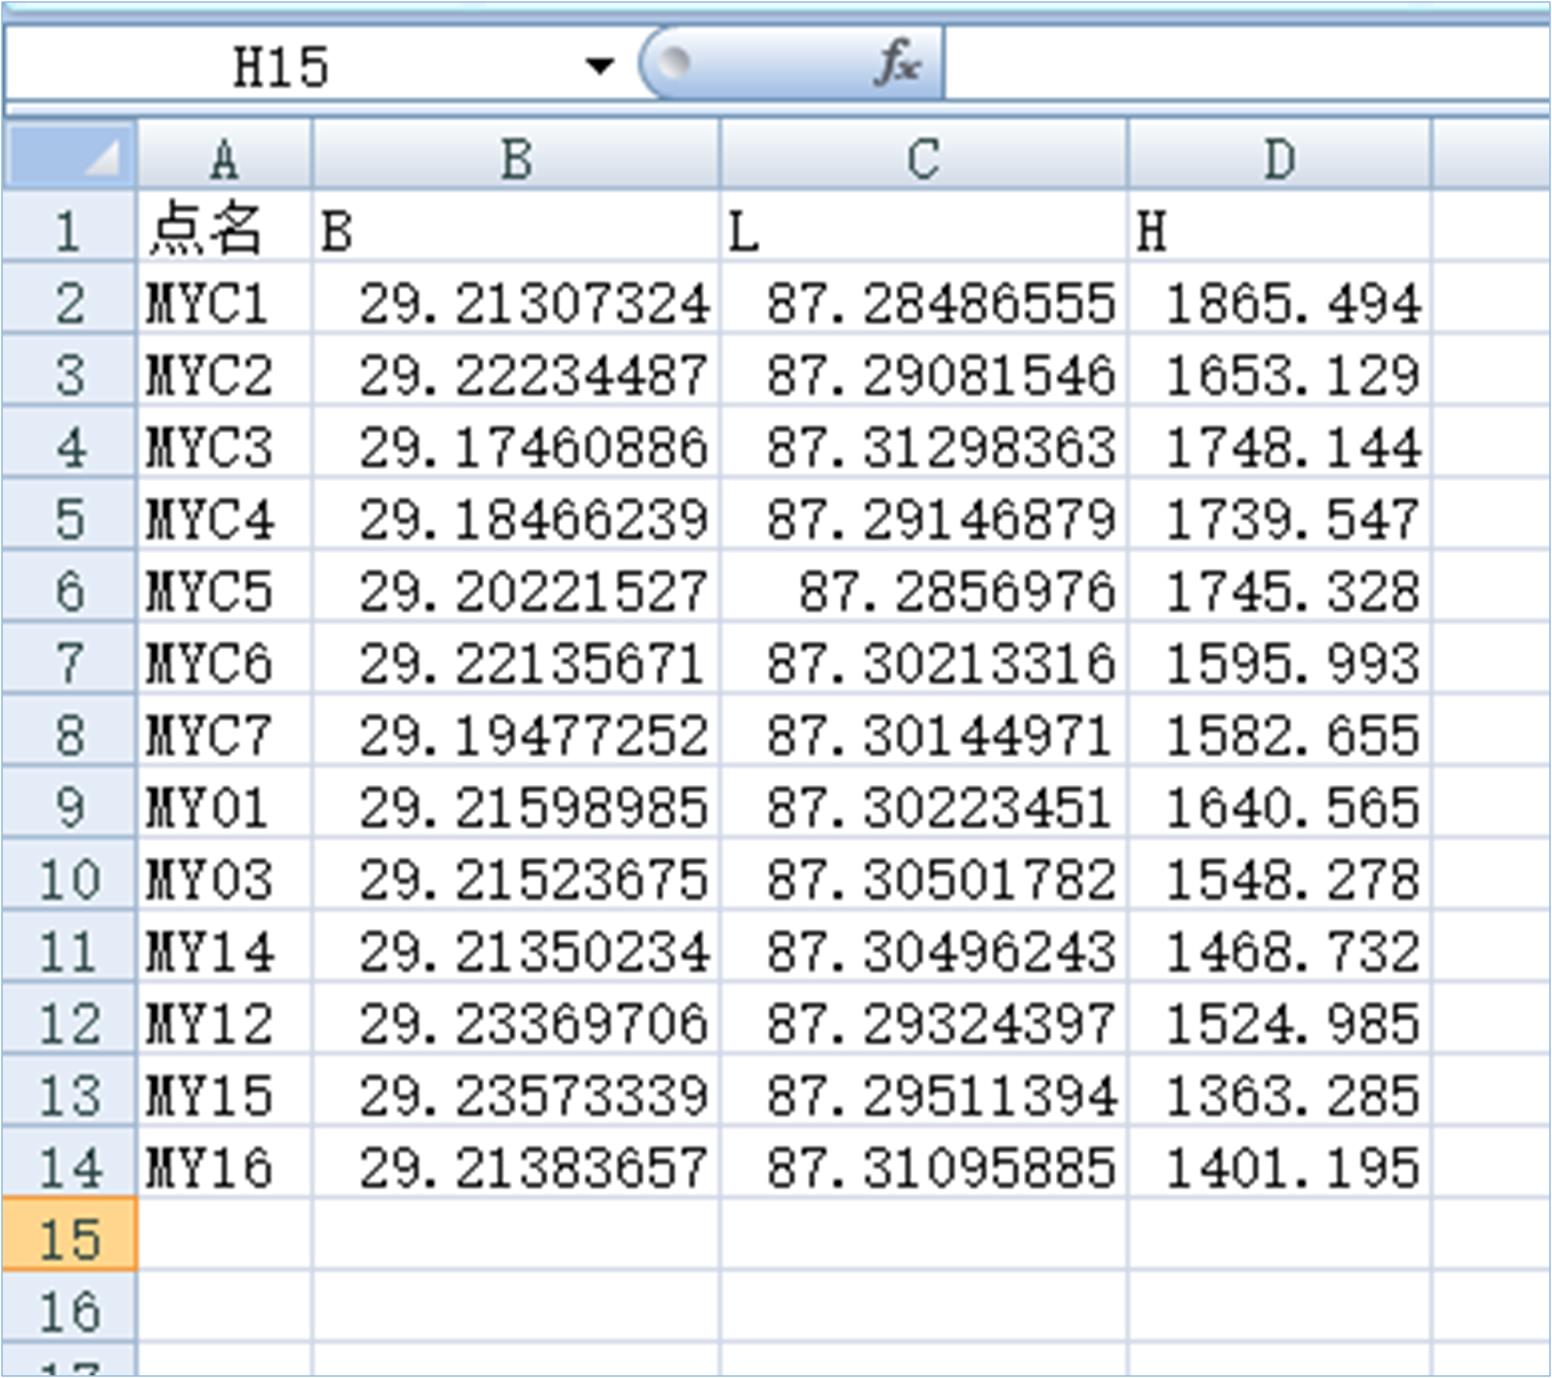
Text file format of geodetic coordinates:
Roll call B L H
MYC1 29.213073240422 87.284865551705 1865.494
MYC2 29.222344865424 87.290815457961 1653.129
MYC3 29.174608856071 87.312983626506 1748.144
MYC4 29.18466238712 87.291468786611 1739.547
MYC5 29.202215267142 87.285697598432 1745.328
MYC6 29.221356705662 87.302133163464 1595.993
MYC7 29.194772516457 87.301449706306 1582.655
MY01 29.215989847157 87.30223451145 1640.565
MY03 29.215236748946 87.305017821945 1548.278
MY14 29.213502343072 87.304962425912 1468.732
MY12 29.233697061179 87.293243972986 1524.985
MY15 29.23573338792 87.295113939058 1363.285
MY16 29.213836570049 87.310958849283 1401.195
Excel document format of geodetic coordinates:
Page format of plane coordinates:

Word document format of plane coordinates:
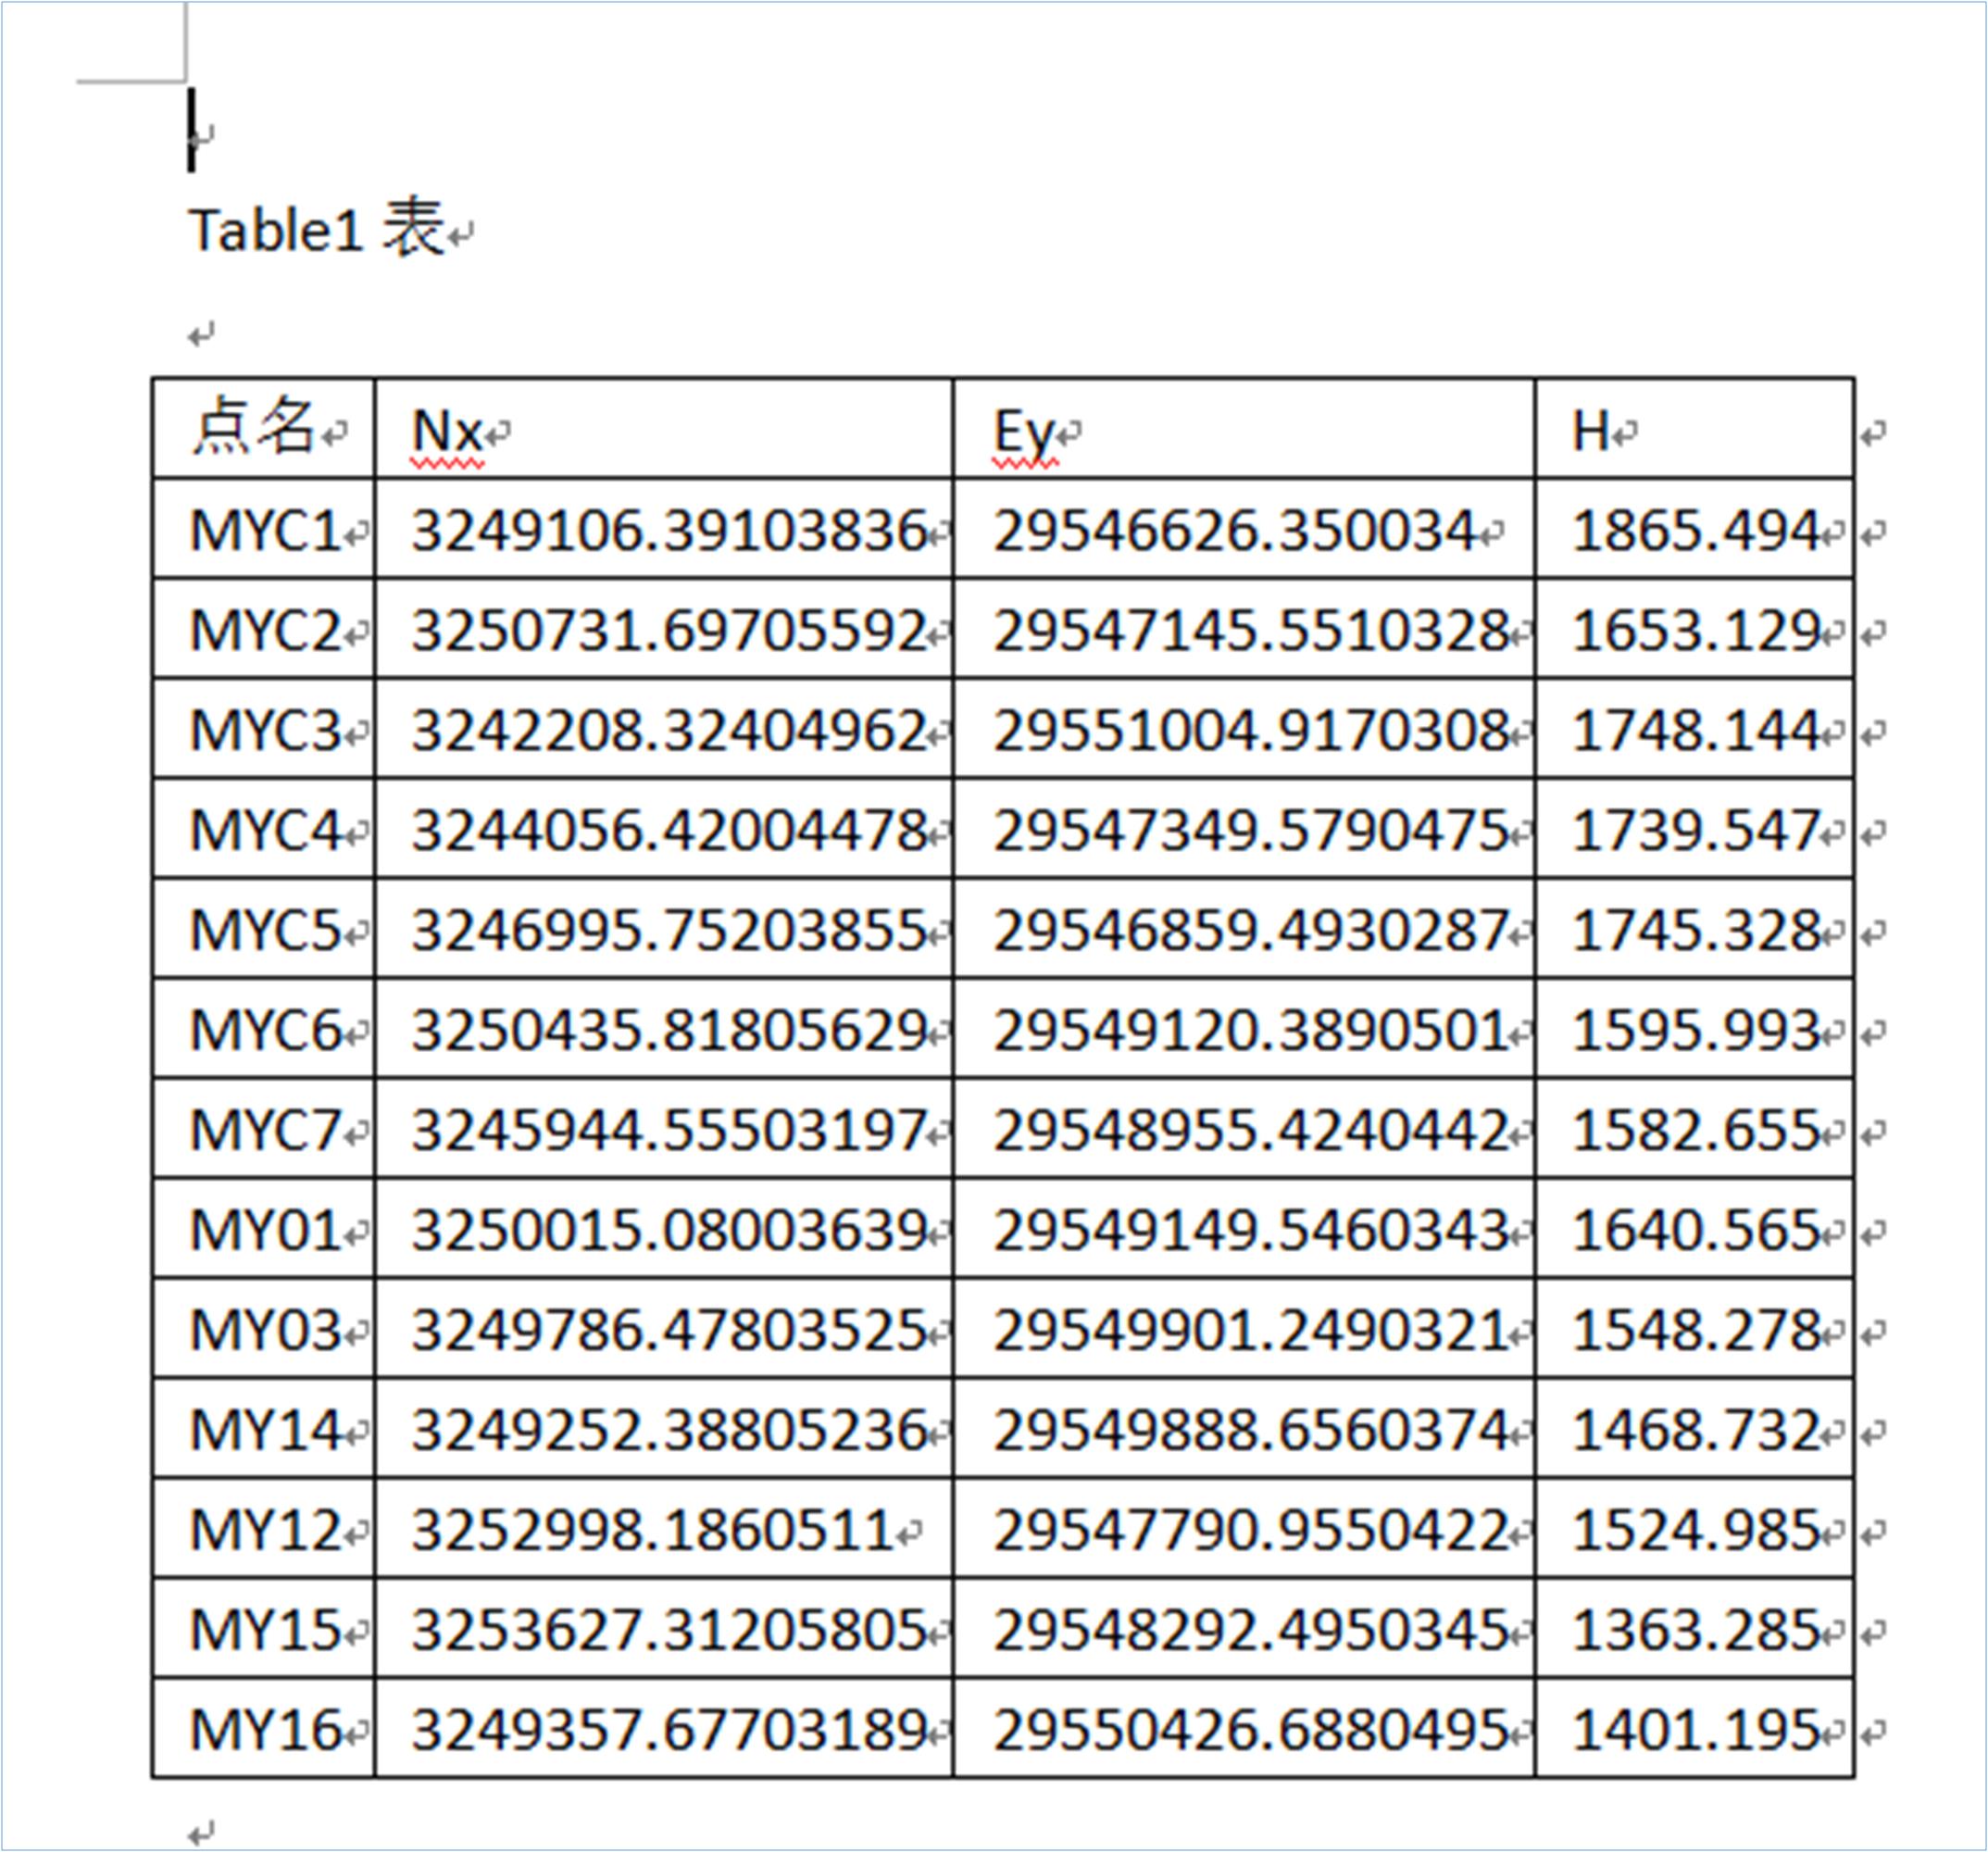
Note: Users can replace the title "Table1 Table" with the name they need.
Text file format of plane coordinates:
Roll call Nx Ey H
MYC1 3249106.39103836 29546626.350034 1865.494
MYC2 3250731.69705592 29547145.5510328 1653.129
MYC3 3242208.32404962 29551004.9170308 1748.144
MYC4 3244056.42004478 29547349.5790475 1739.547
MYC5 3246995.75203855 29546859.4930287 1745.328
MYC6 3250435.81805629 29549120.3890501 1595.993
MYC7 3245944.55503197 29548955.4240442 1582.655
MY01 3250015.08003639 29549149.5460343 1640.565
MY03 3249786.47803525 29549901.2490321 1548.278
MY14 3249252.38805236 29549888.6560374 1468.732
MY12 3252998.1860511 29547790.9550422 1524.985
MY15 3253627.31205805 29548292.4950345 1363.285
MY16 3249357.67703189 29550426.6880495 1401.195
Excel document format of plane coordinates:
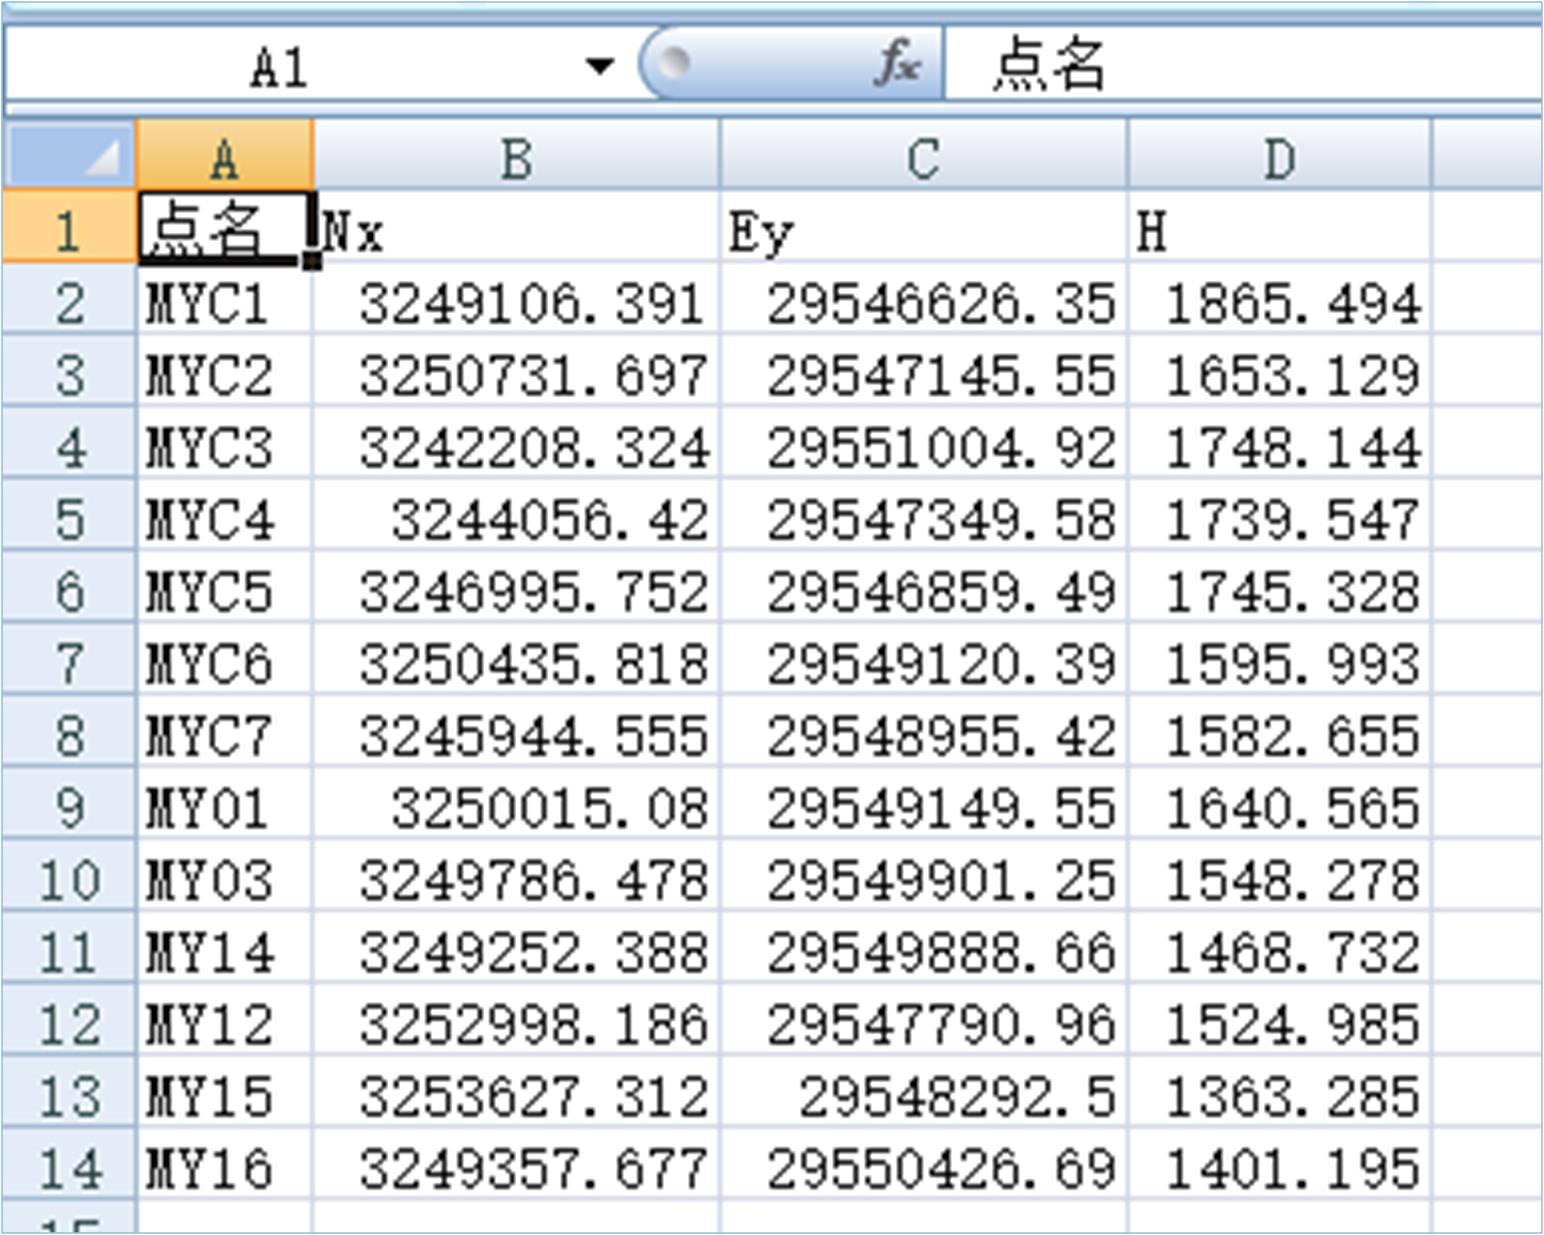
Coordinates in the original handset:
Roll call B L H
MYC1 29.2131079776 87.2852865498 1863.38001
MYC2 29.2223795908 87.2912365337 1651.0271
MYC3 29.1746434352 87.3134044041 1746.09577
MYC4 29.1846970893 87.2918896103 1737.437
MYC5 29.2022499923 87.2901185276 1743.21445
MYC6 29.2213913664 87.3025542444 1593.92571
MYC7 29.1948071719 87.3018706204 1580.57688
MY01 29.2200245057 87.302655574 1638.49749
MY03 29.215271383 87.3054388868 1546.22346
MY14 29.2135369767 87.3053834761 1466.6763
MY12 29.2337317717 87.2936651455 1522.89857
MY15 29.2357680845 87.2955351488 1361.2086
MY16 29.2138711868 87.3113799112 1399.14905
15.2 Import operation
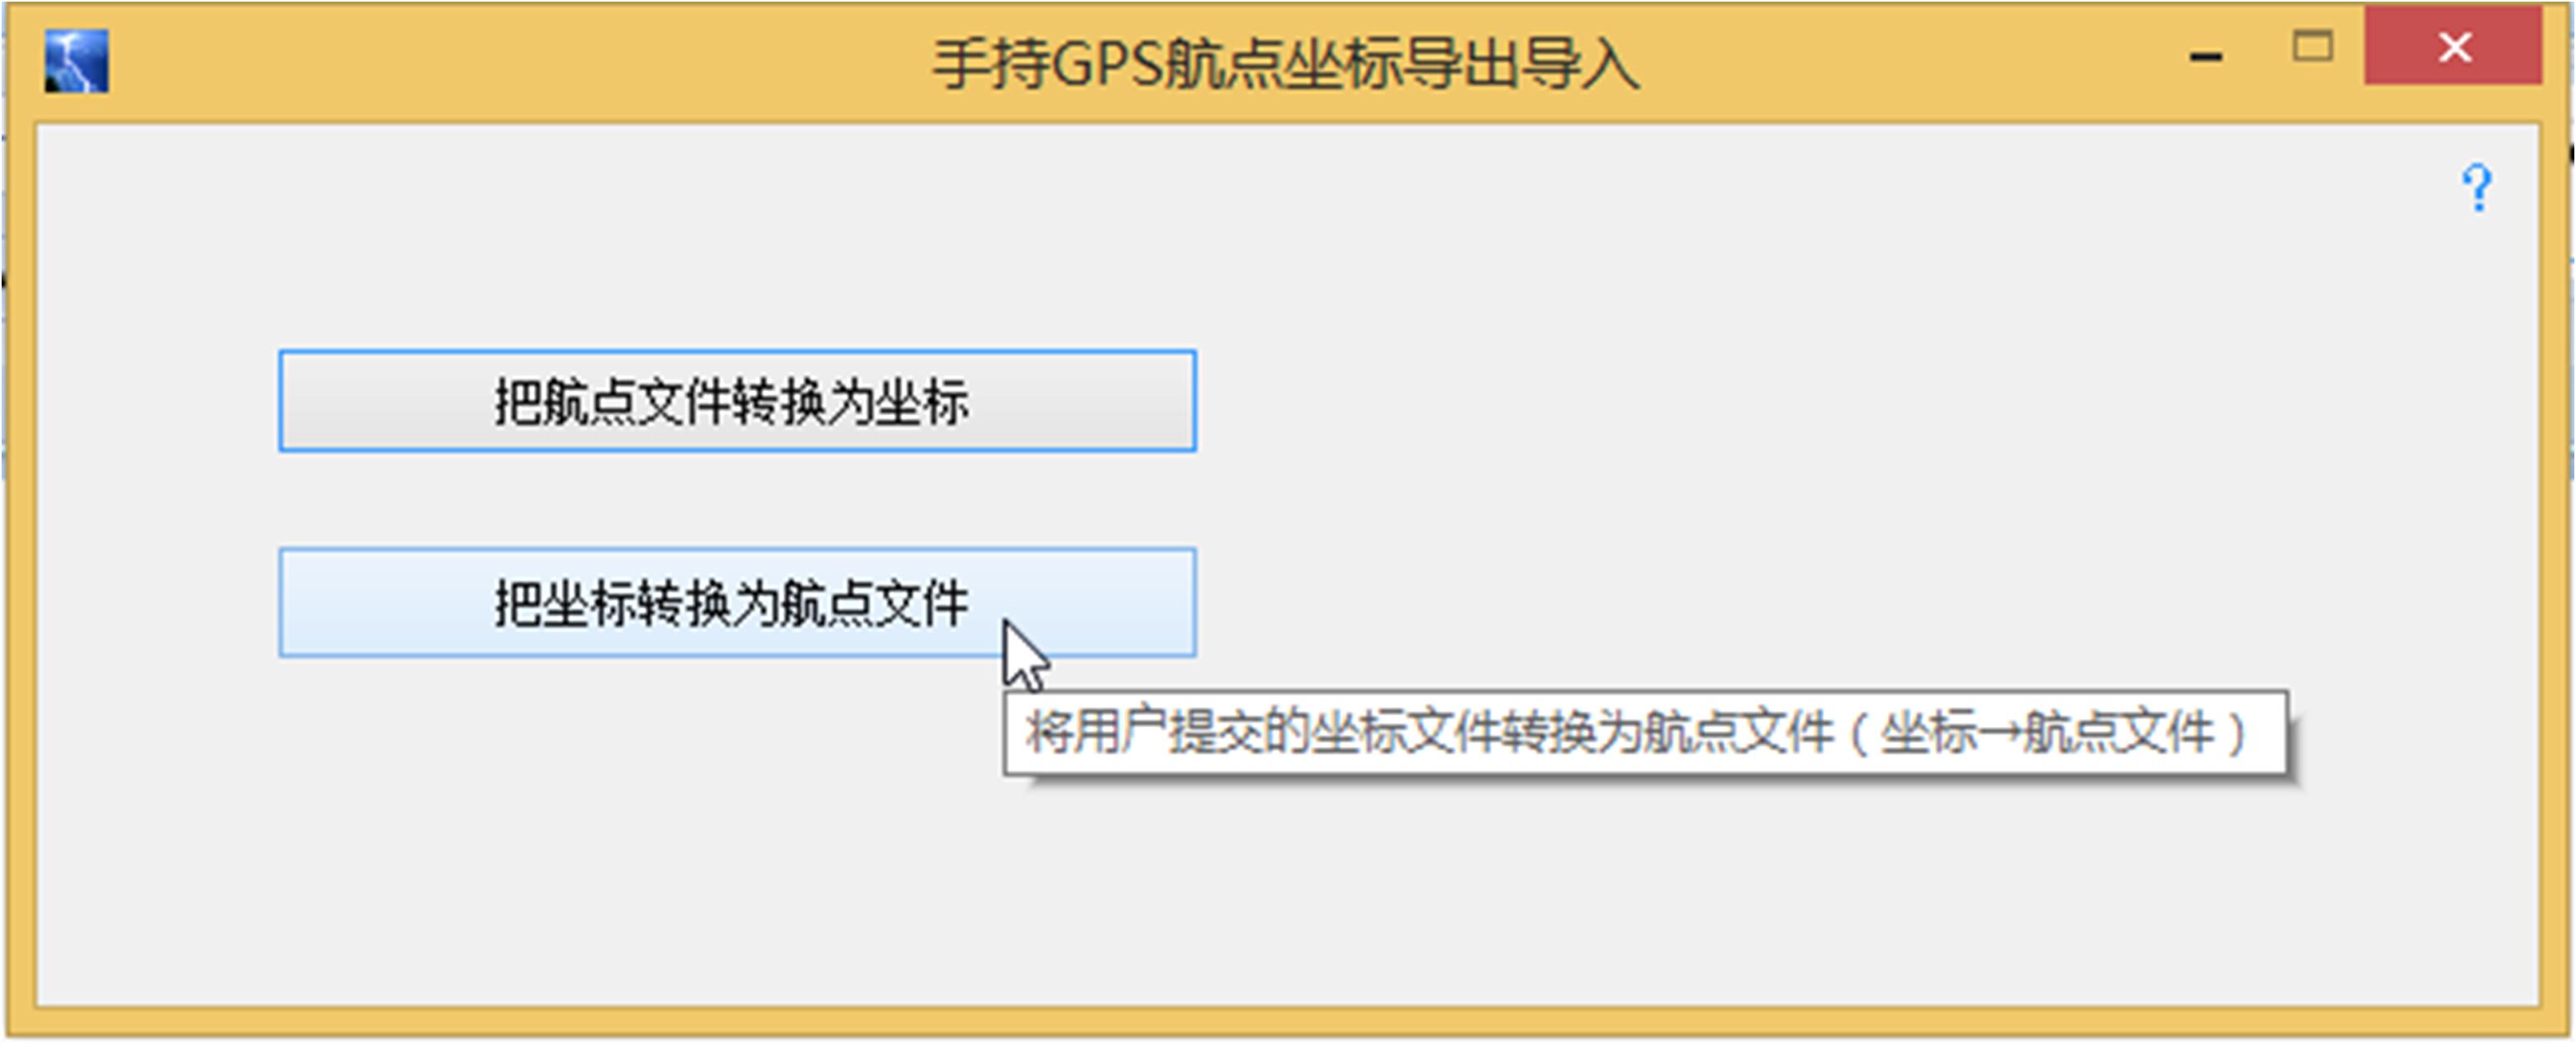
Click "Convert coordinates to waypoint file" to open the corresponding window:

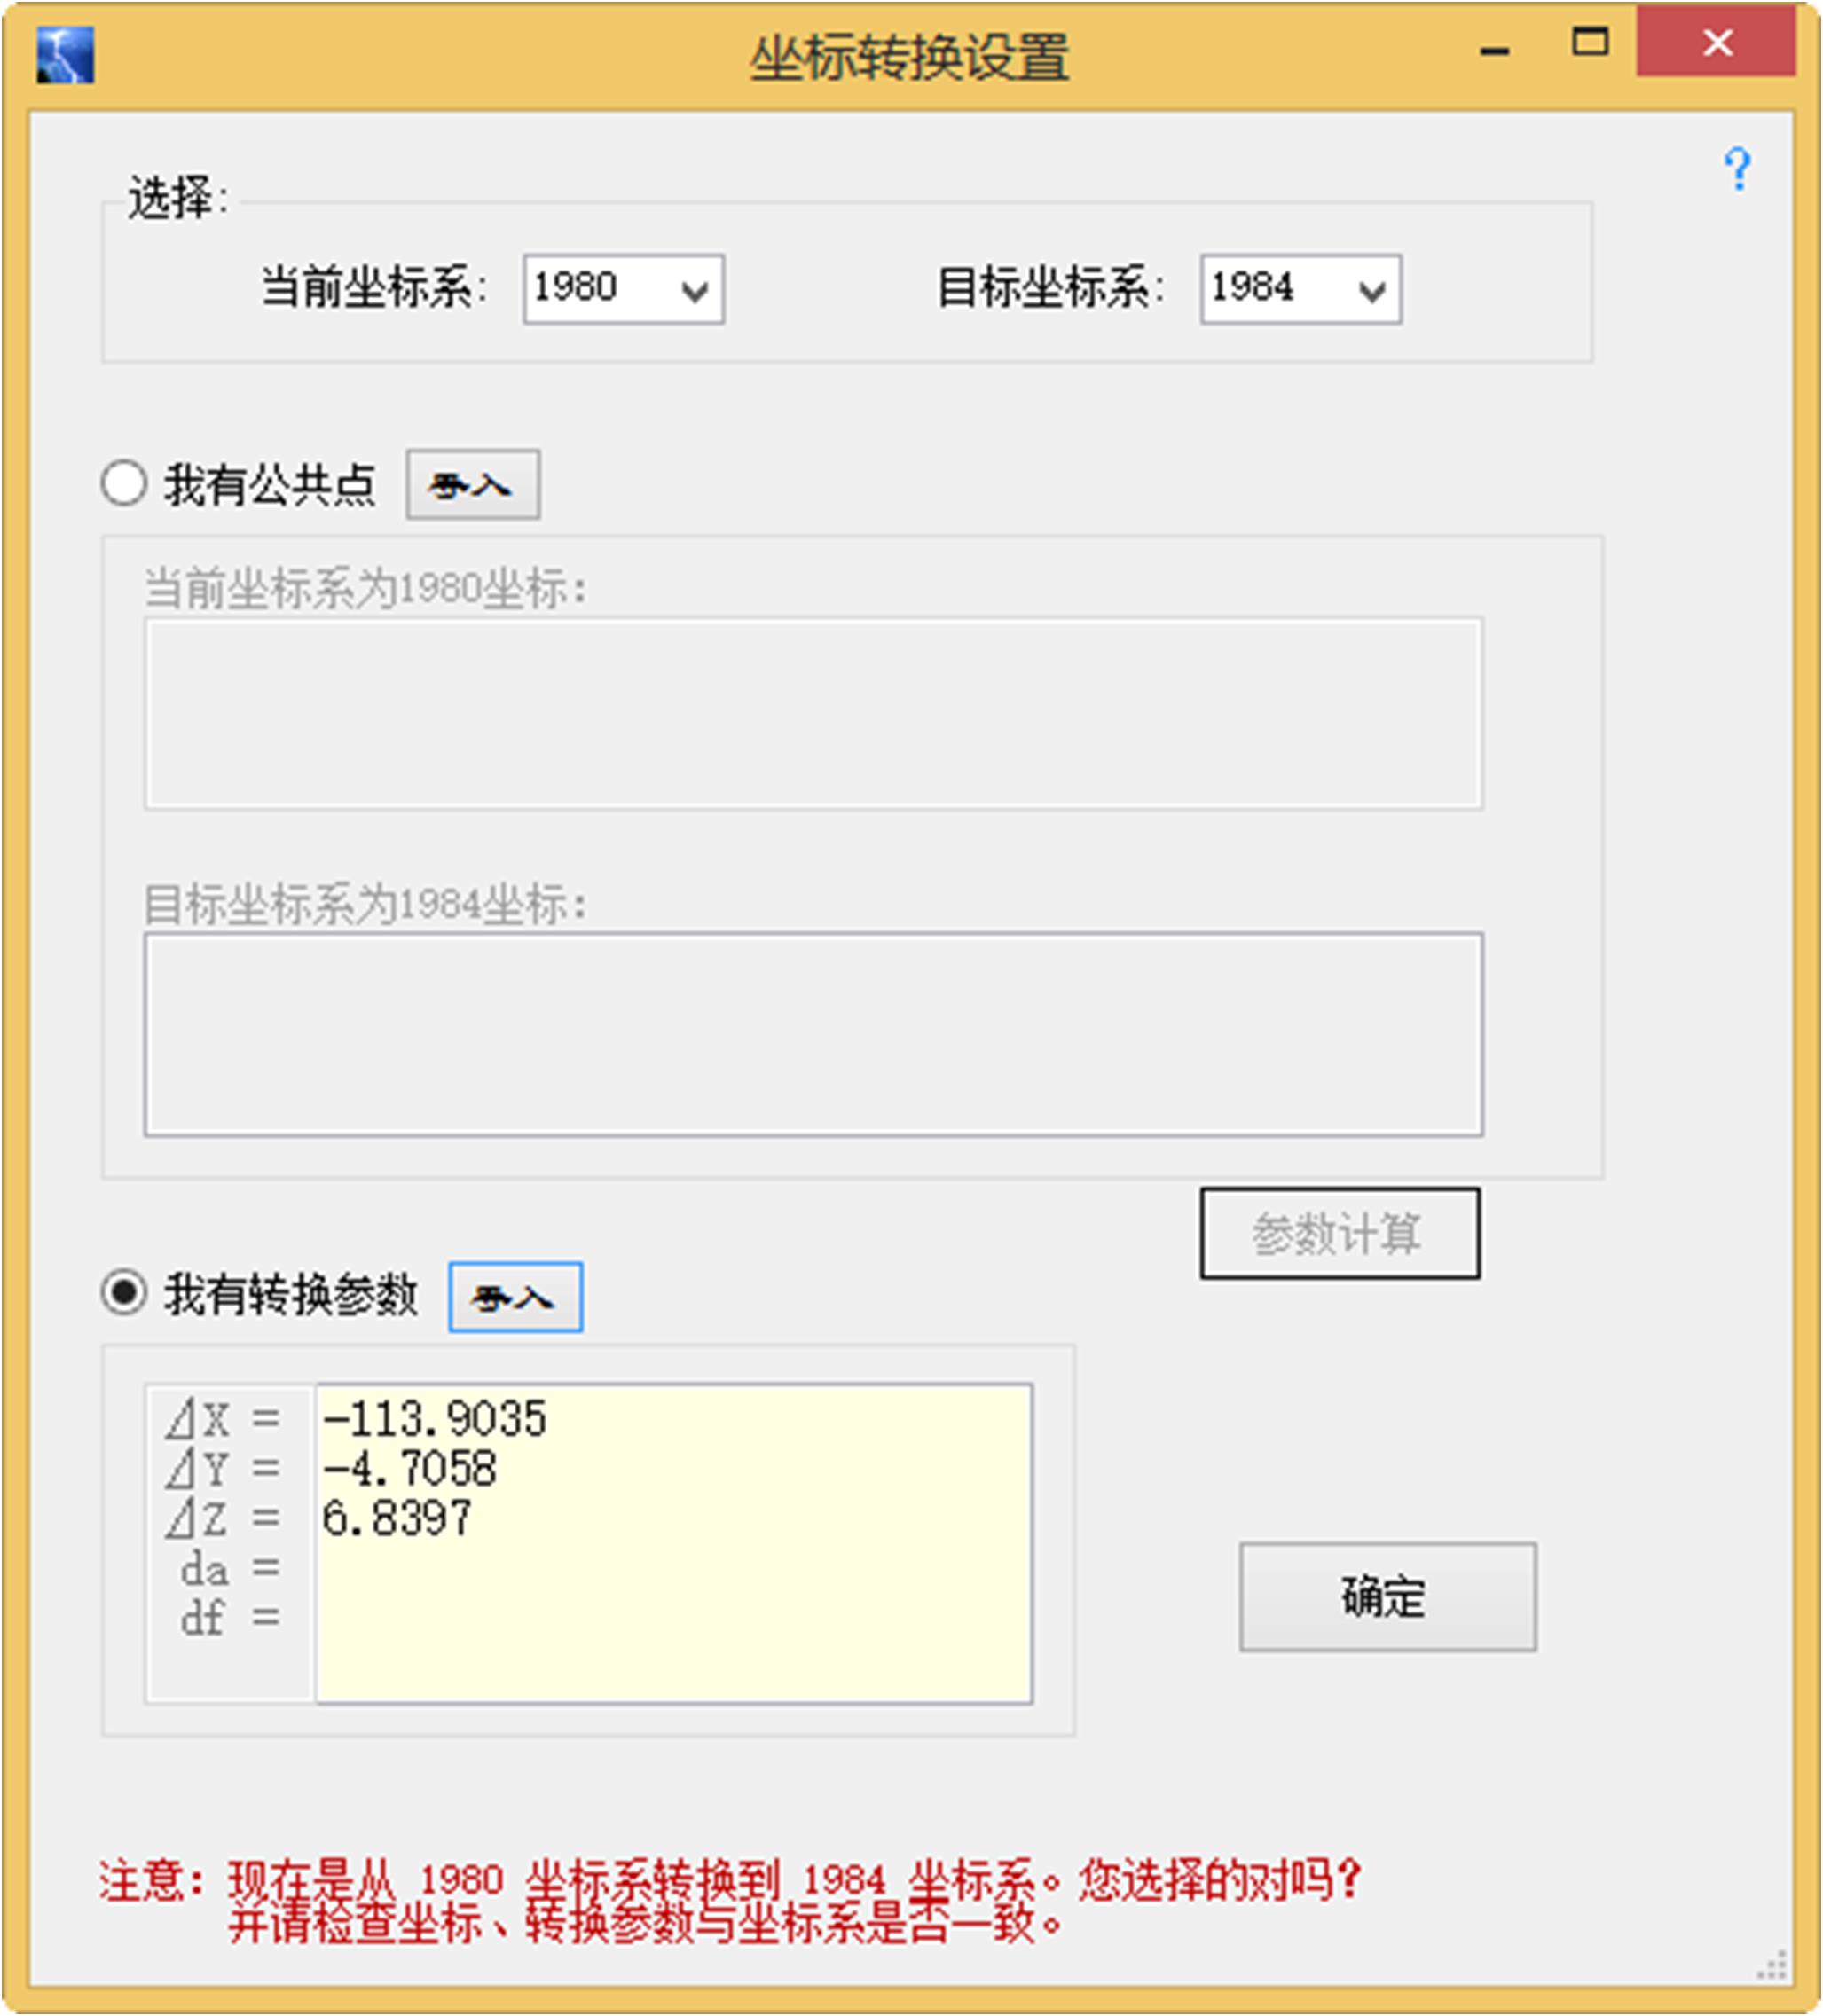
Click "Coordinate conversion required" to automatically pop up the coordinate conversion setting window:
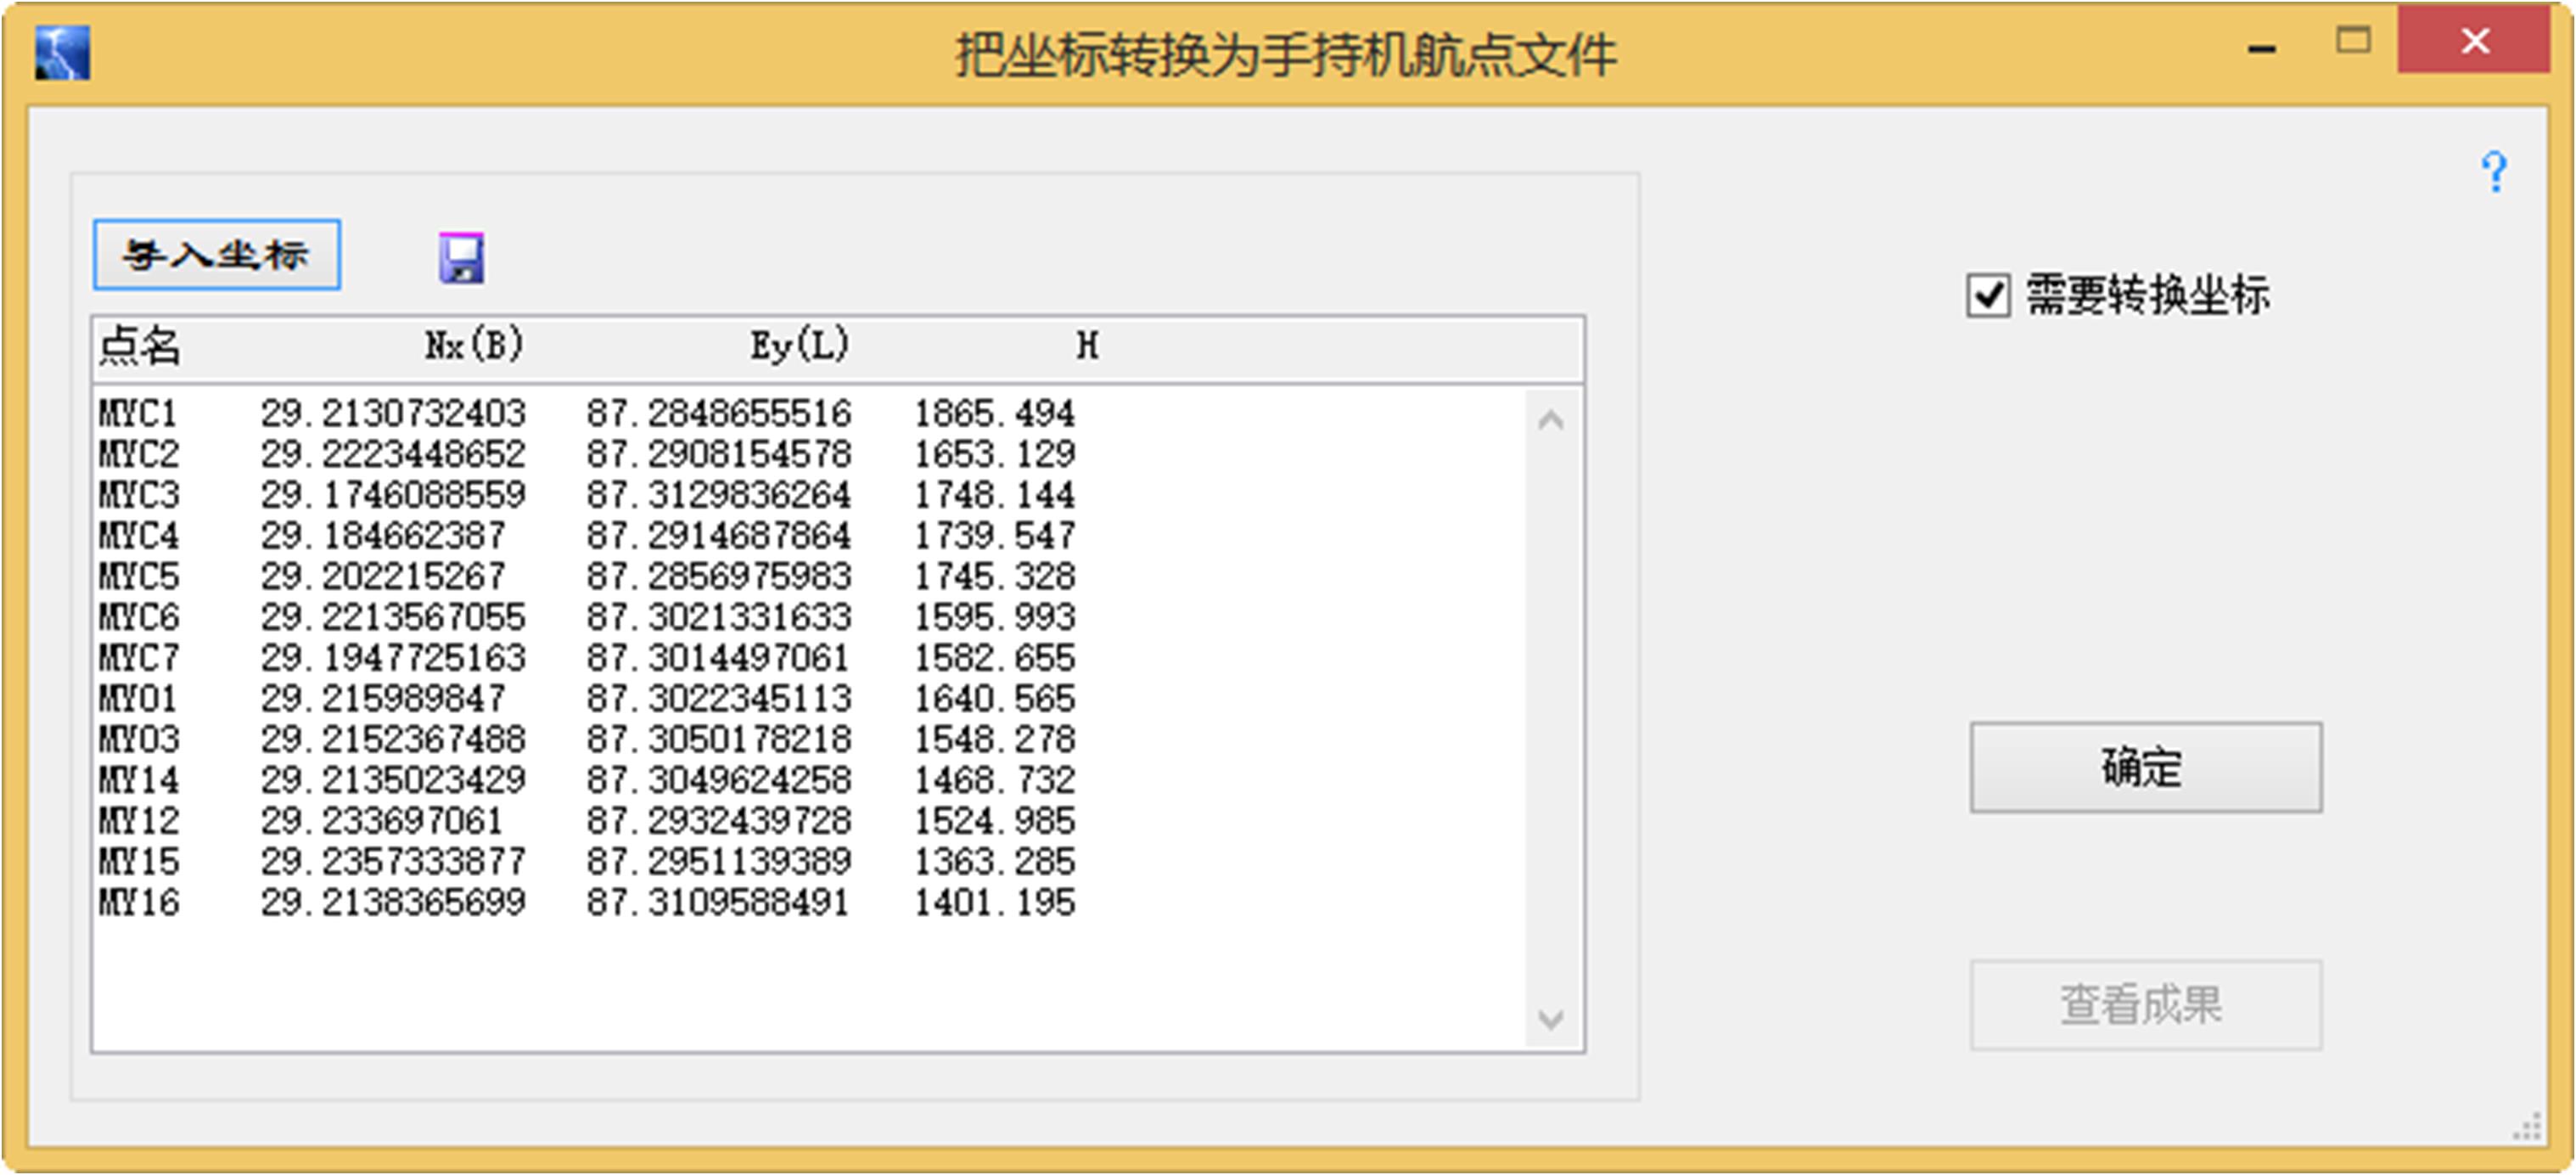
Click "Import Coordinates" to open the coordinate file that the user plans to upload to the handset, as shown in the following figure:
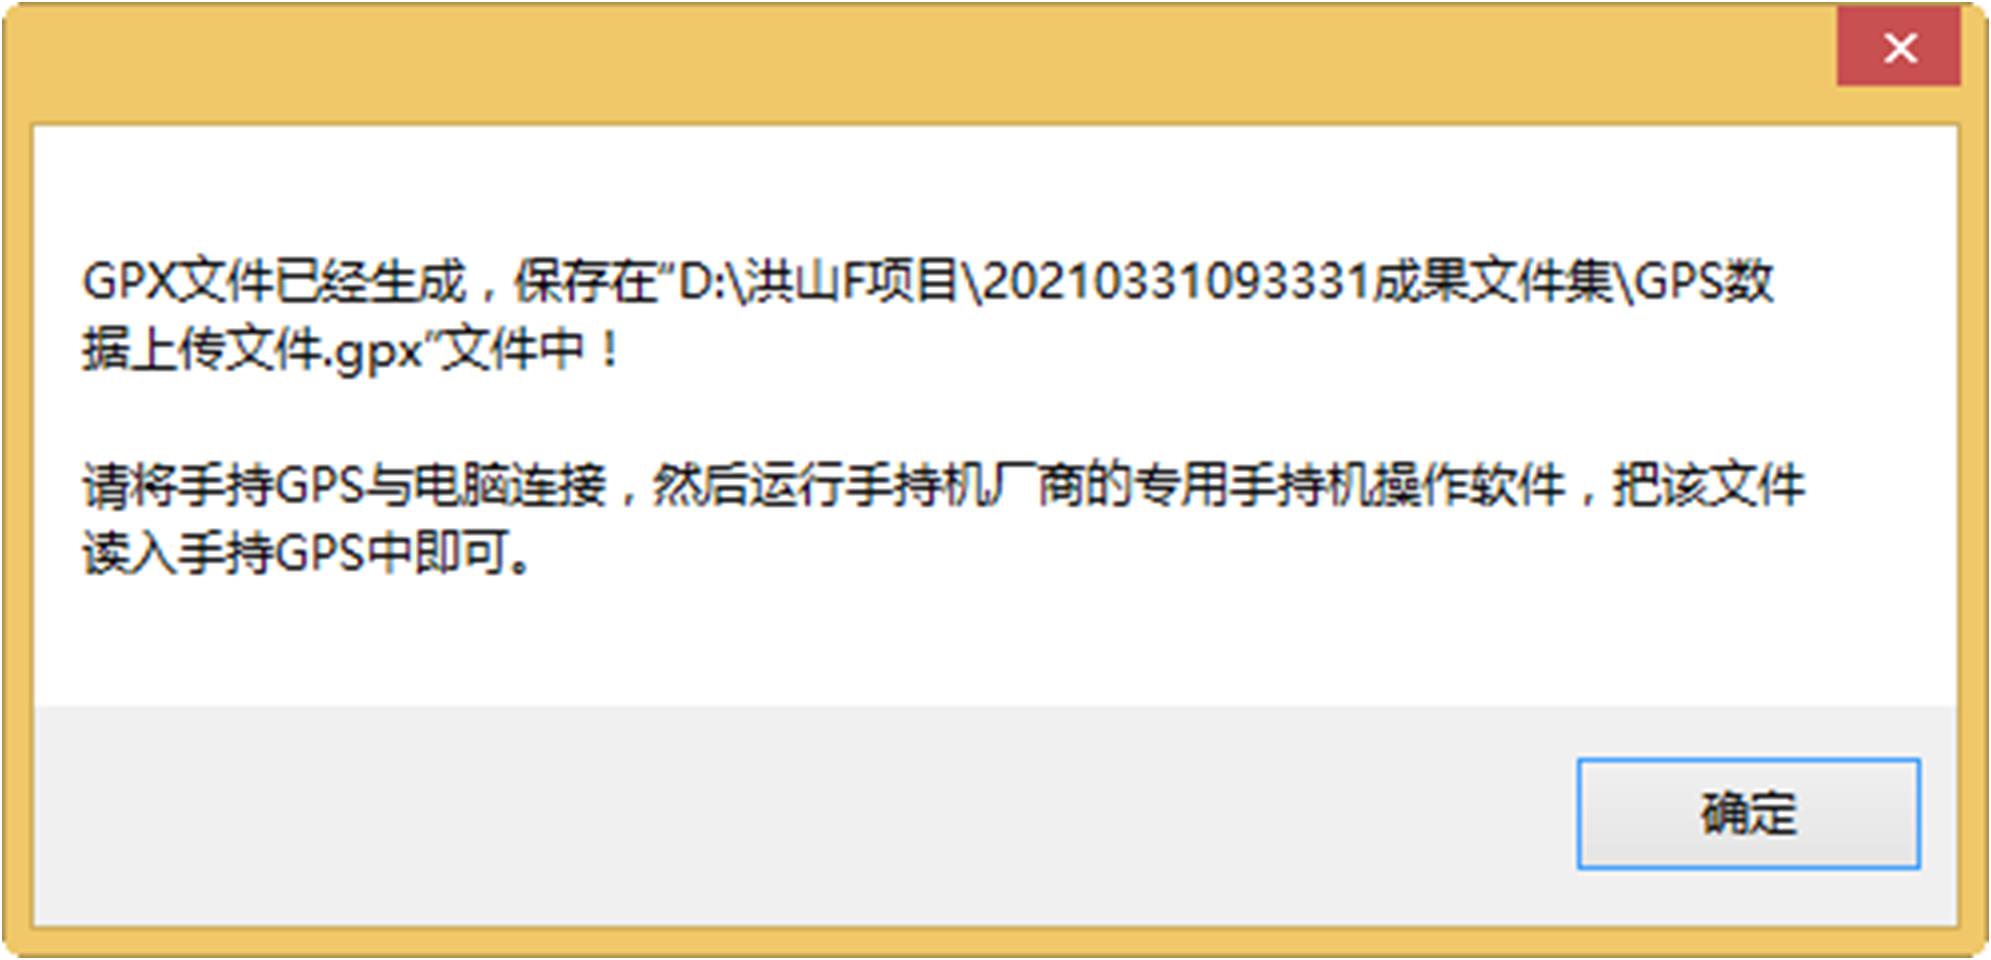
Click "OK" and the following prompt will appear:
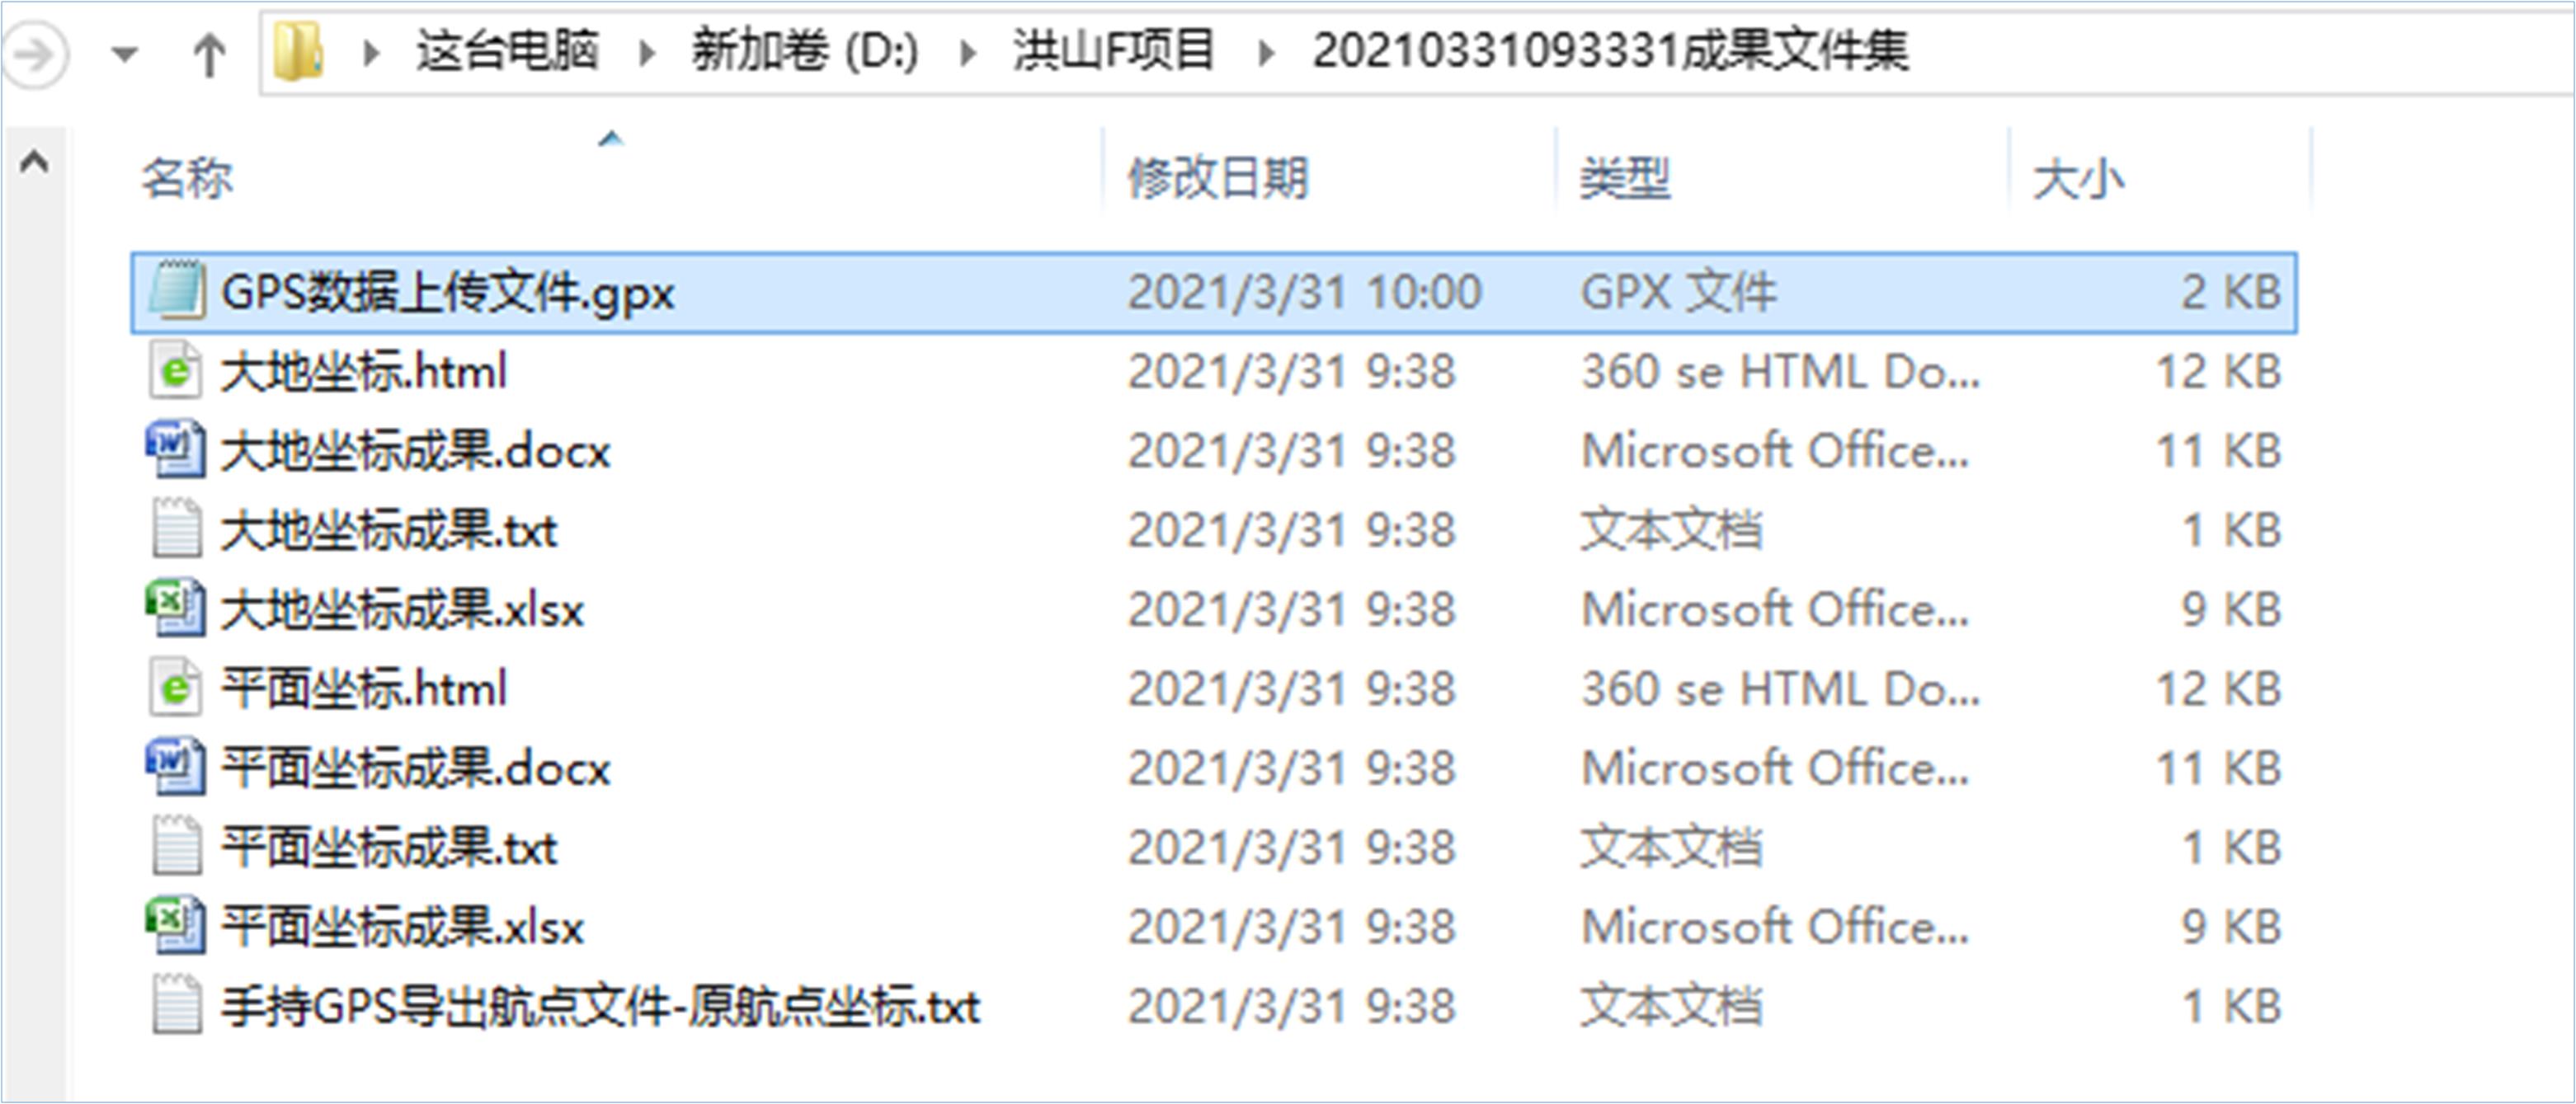
View "GPS data upload file" according to the specified path.gpx”achievements:
Network version operation page
16.1 Export operation
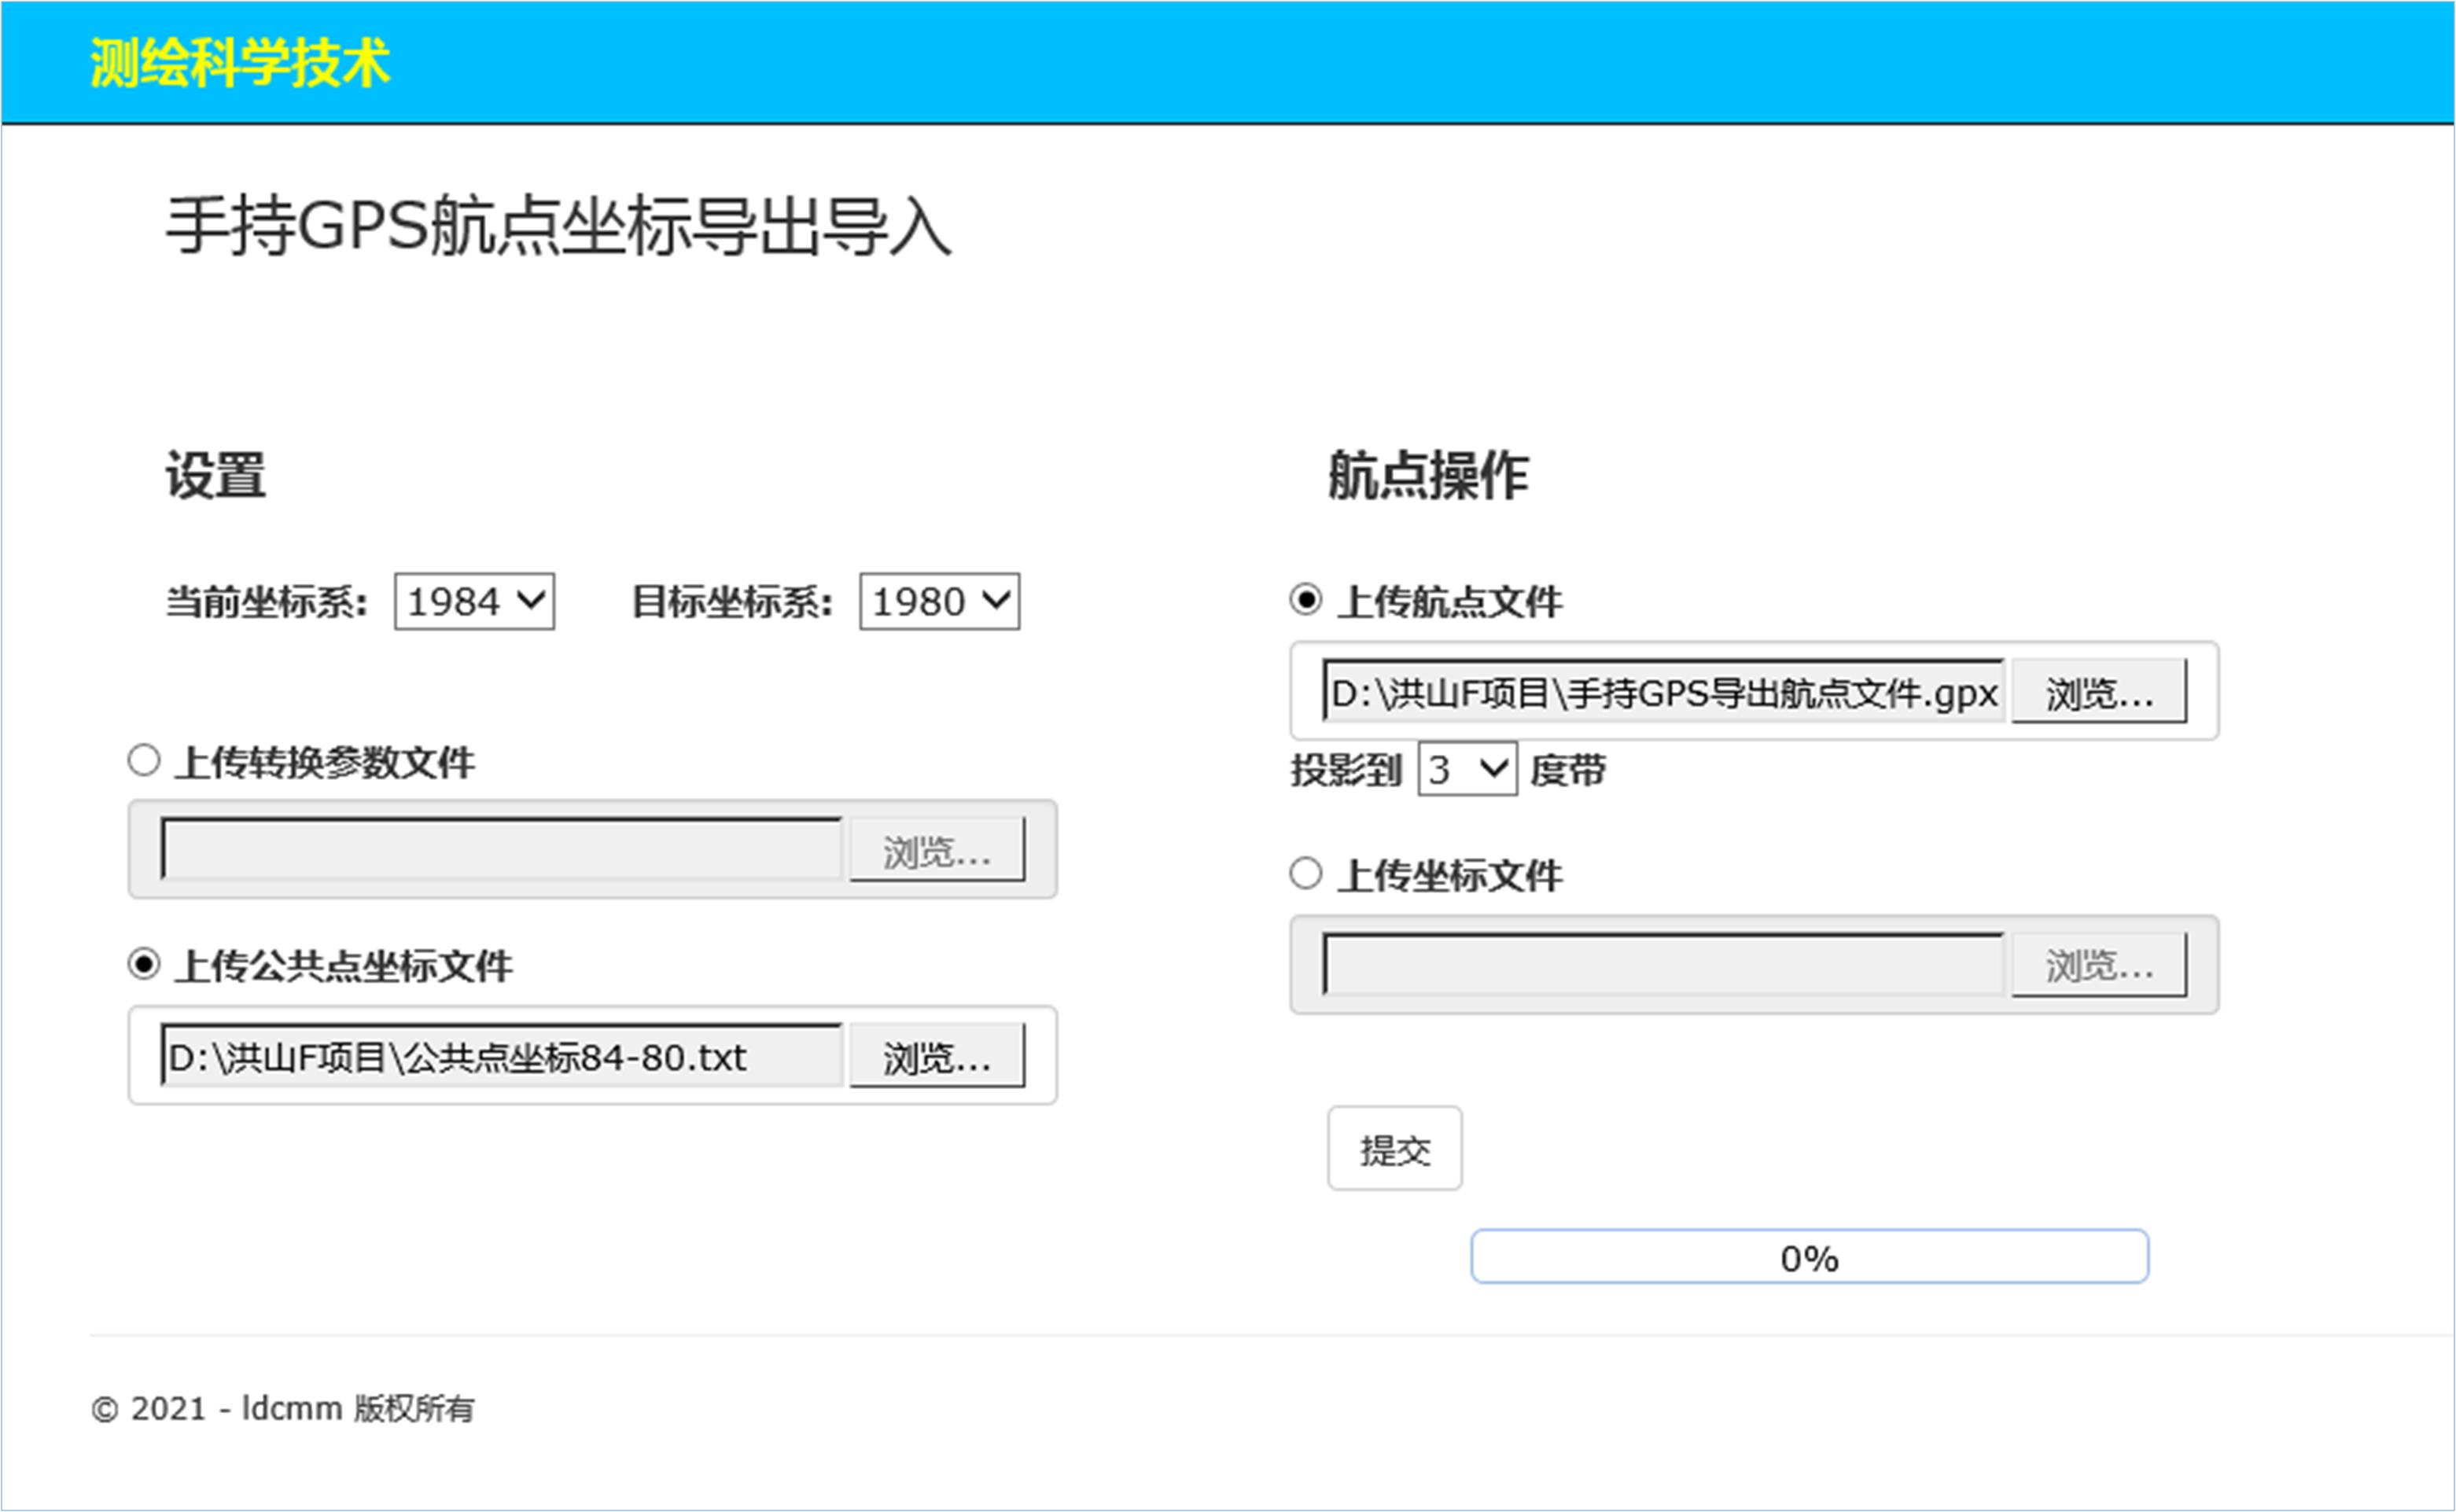
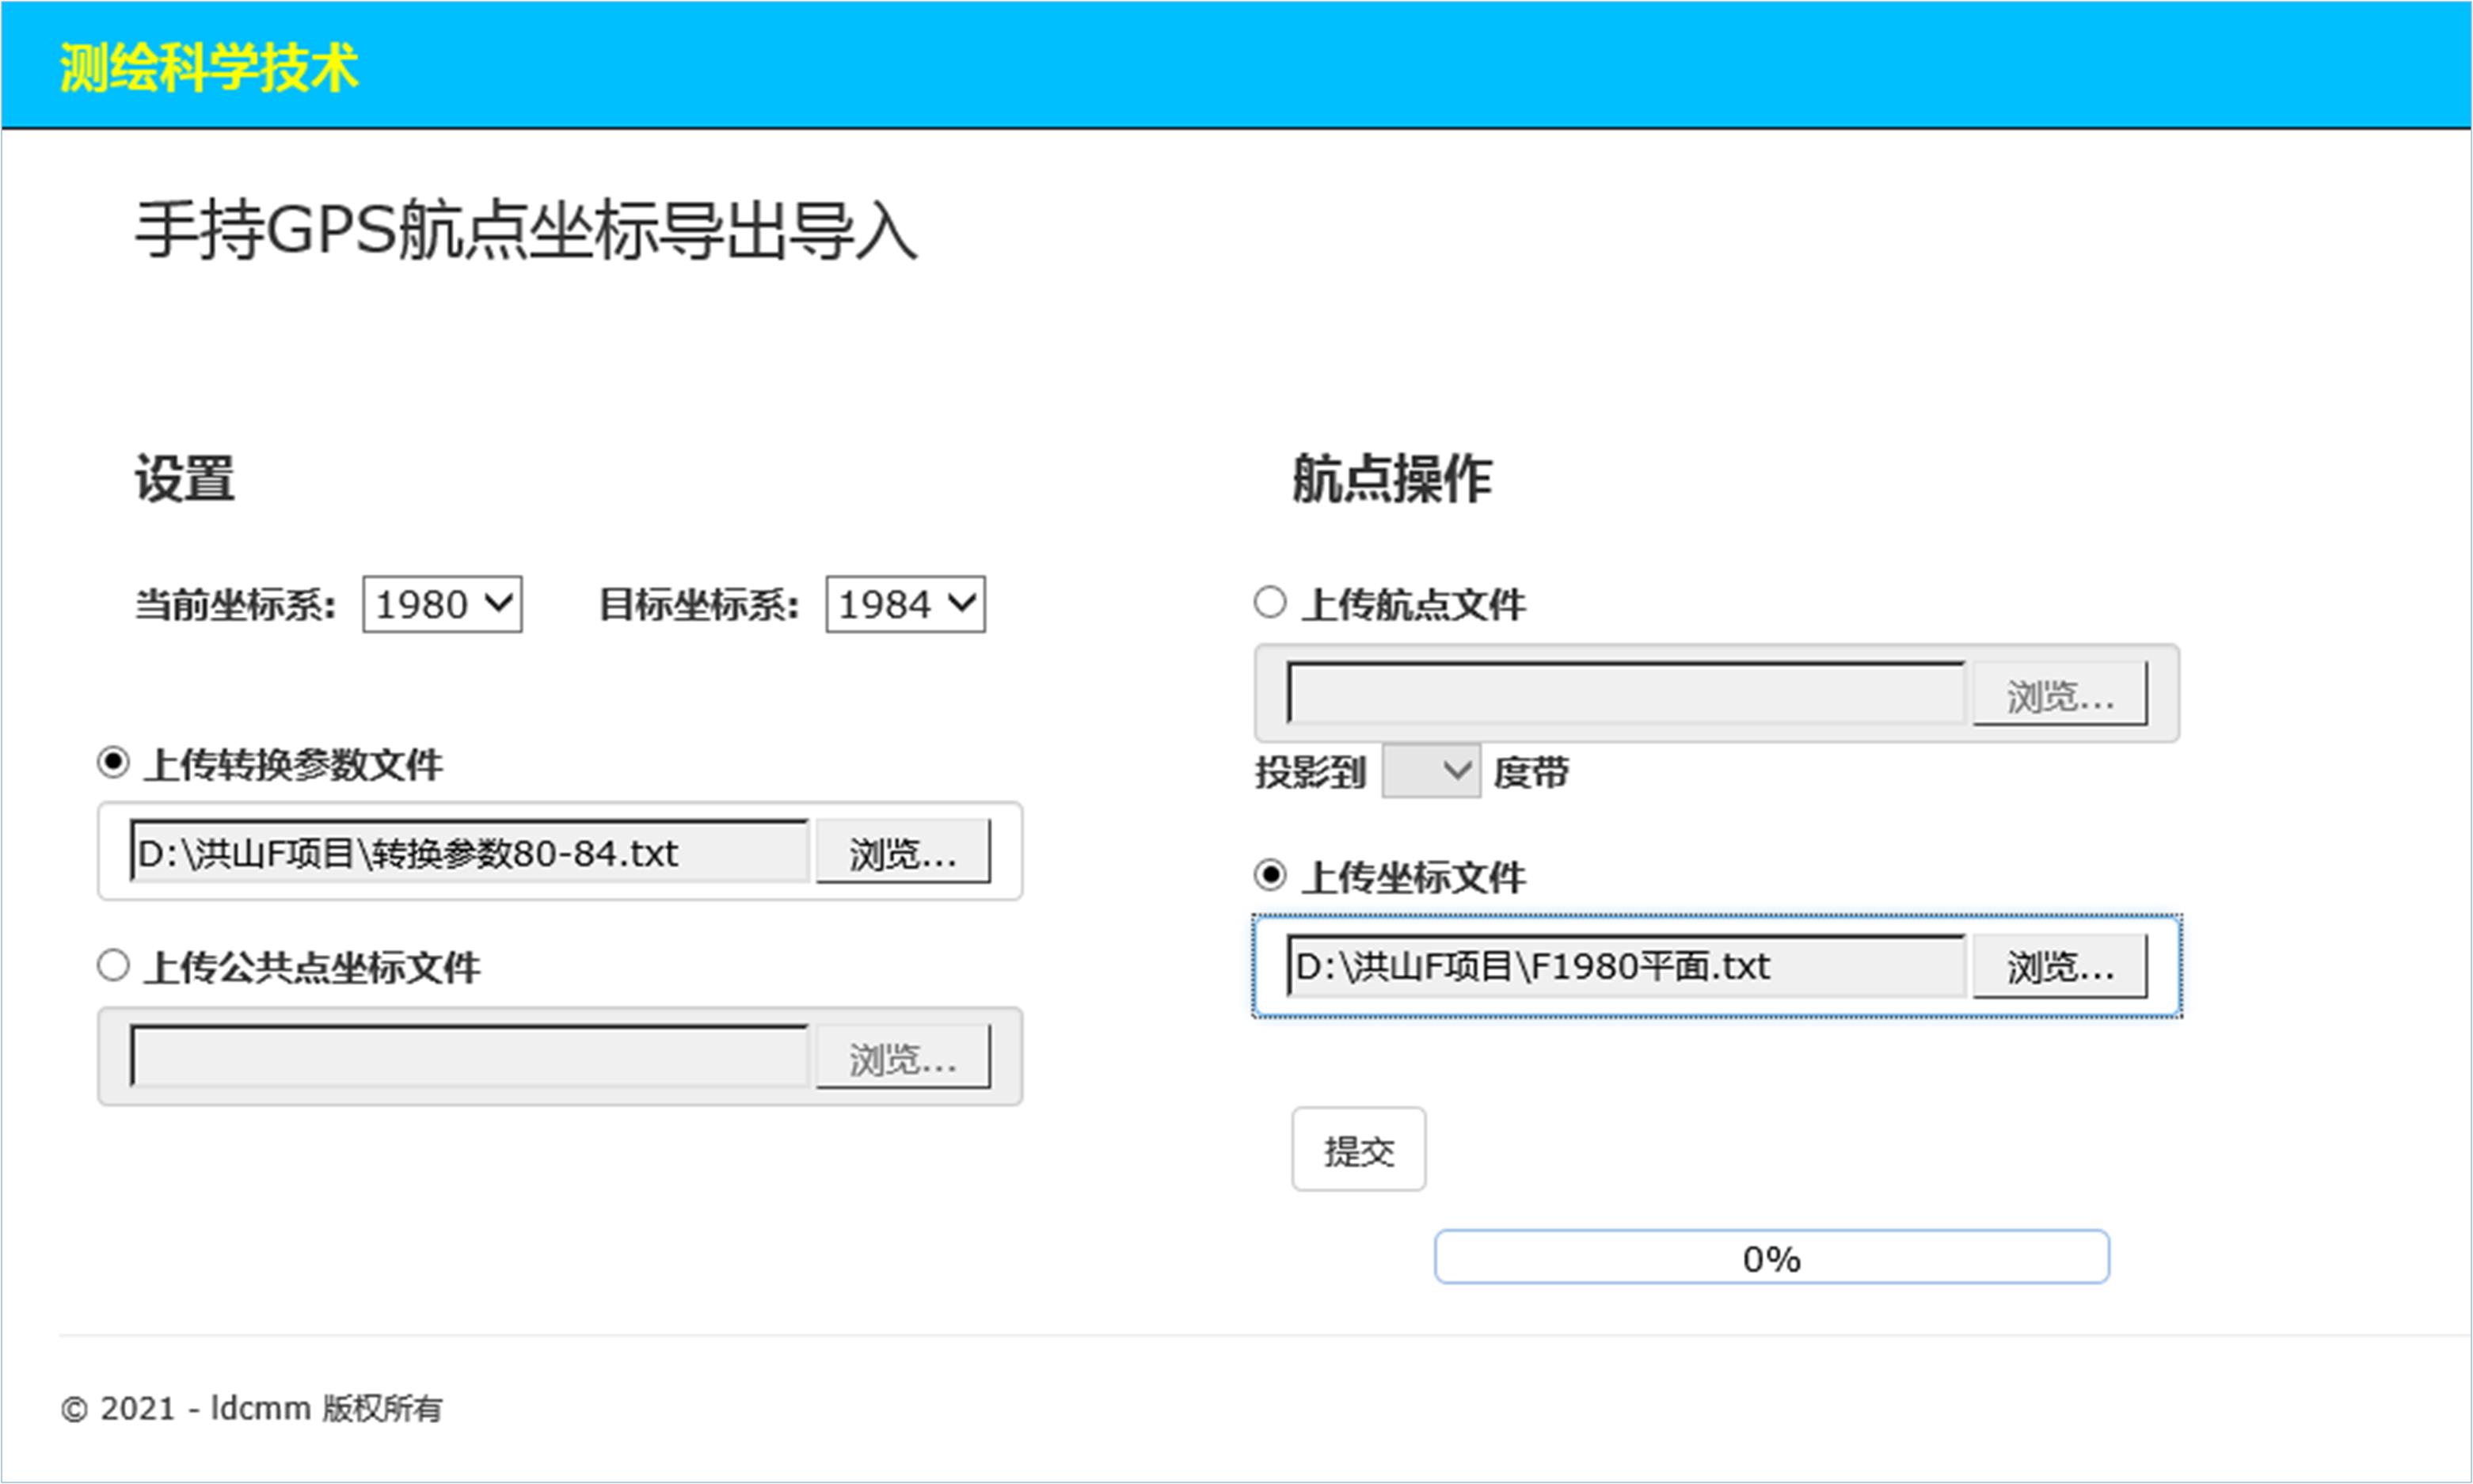
After completing the above operation, click the "Submit" button, the system will process the data and display the processing results on the following page:
Browse the above four pages as follows:
The following is the plane coordinate page and geodetic coordinate page of the two target coordinate systems:

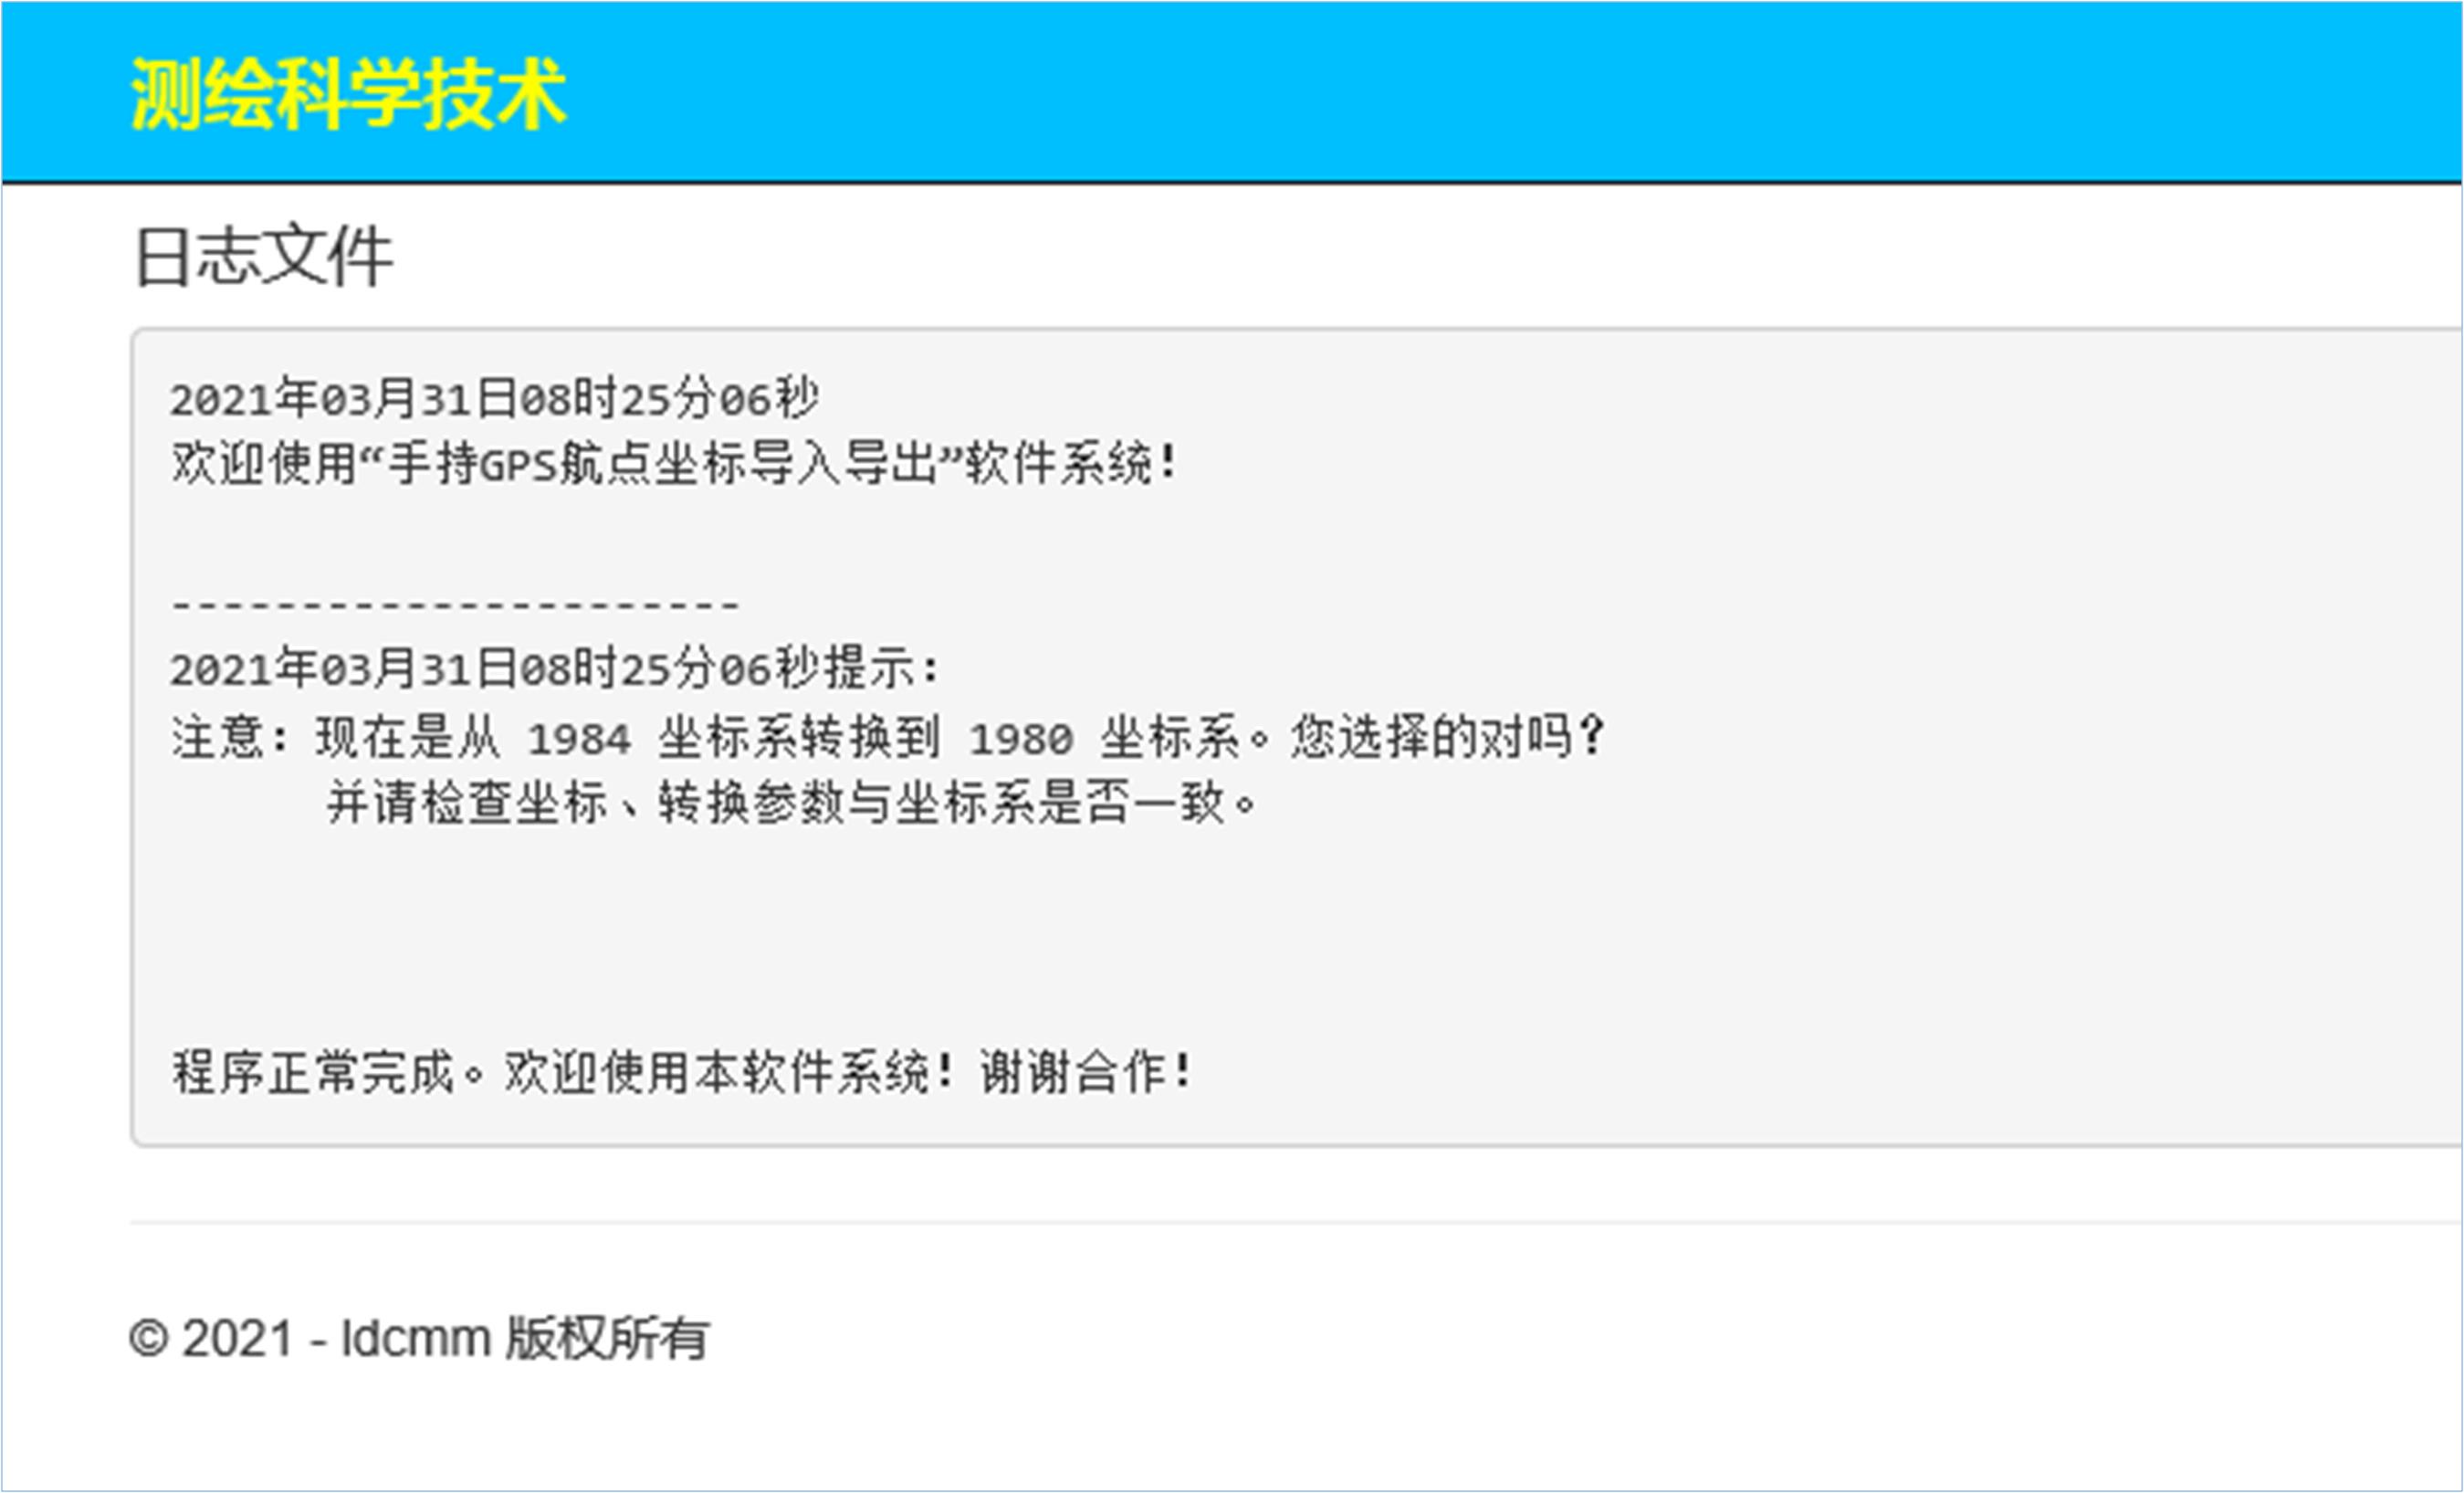
The log file will prompt the user for important information reference:
16.2 Import operation
After clicking "Submit", if there is no problem, the waypoint file will be generated for users to download. As shown below:
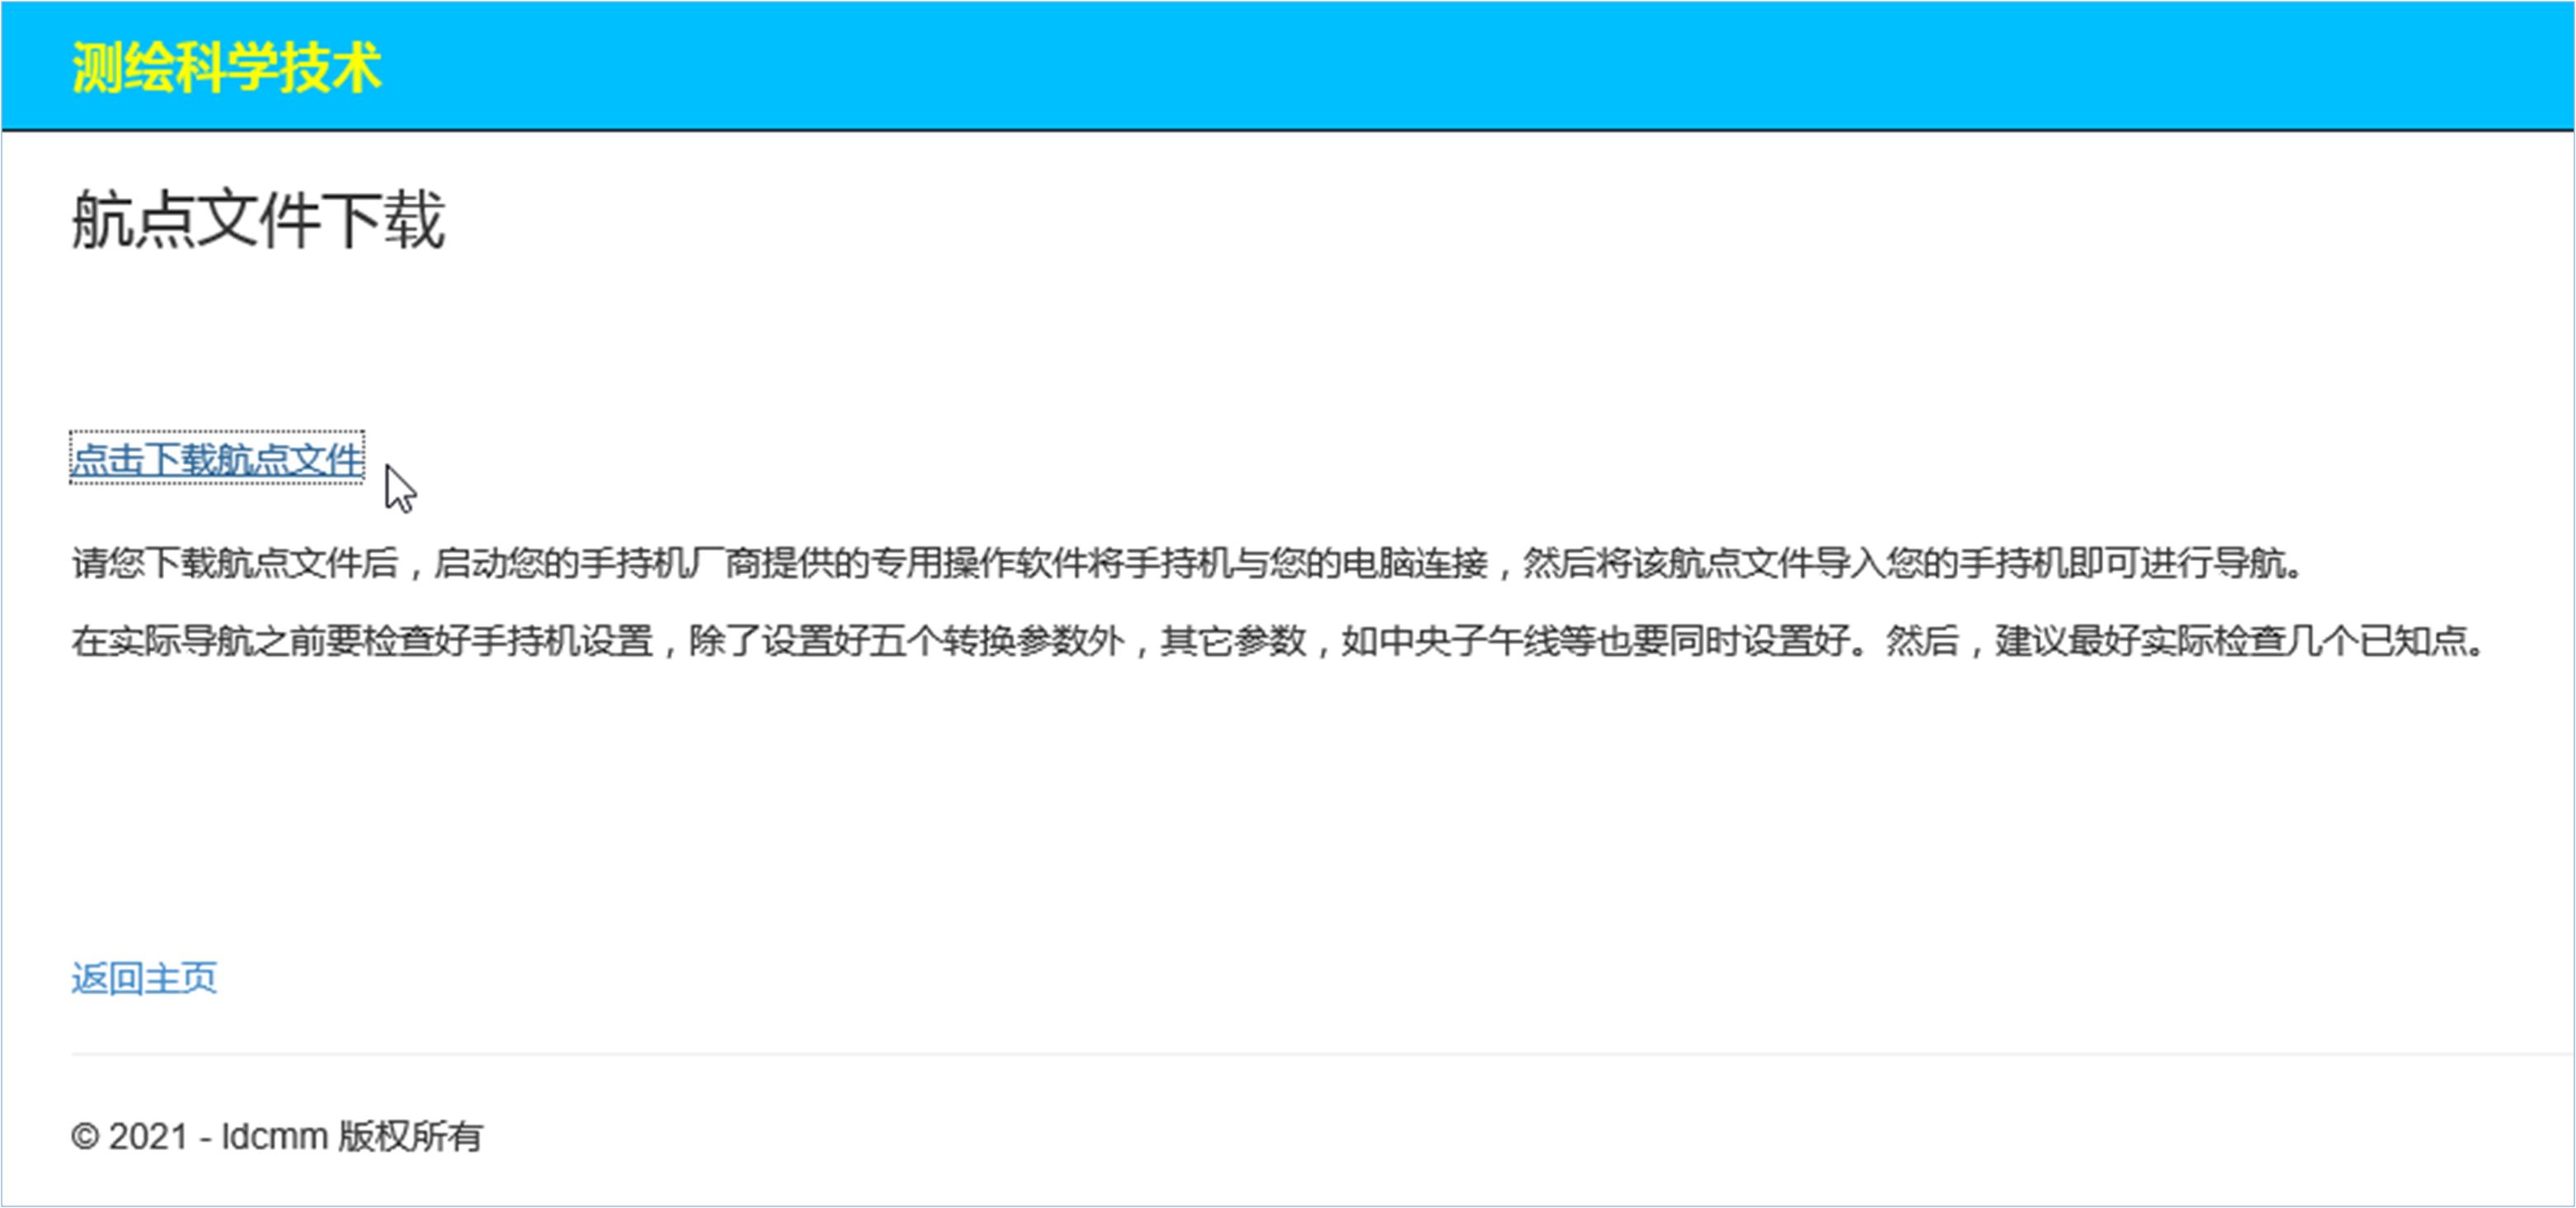
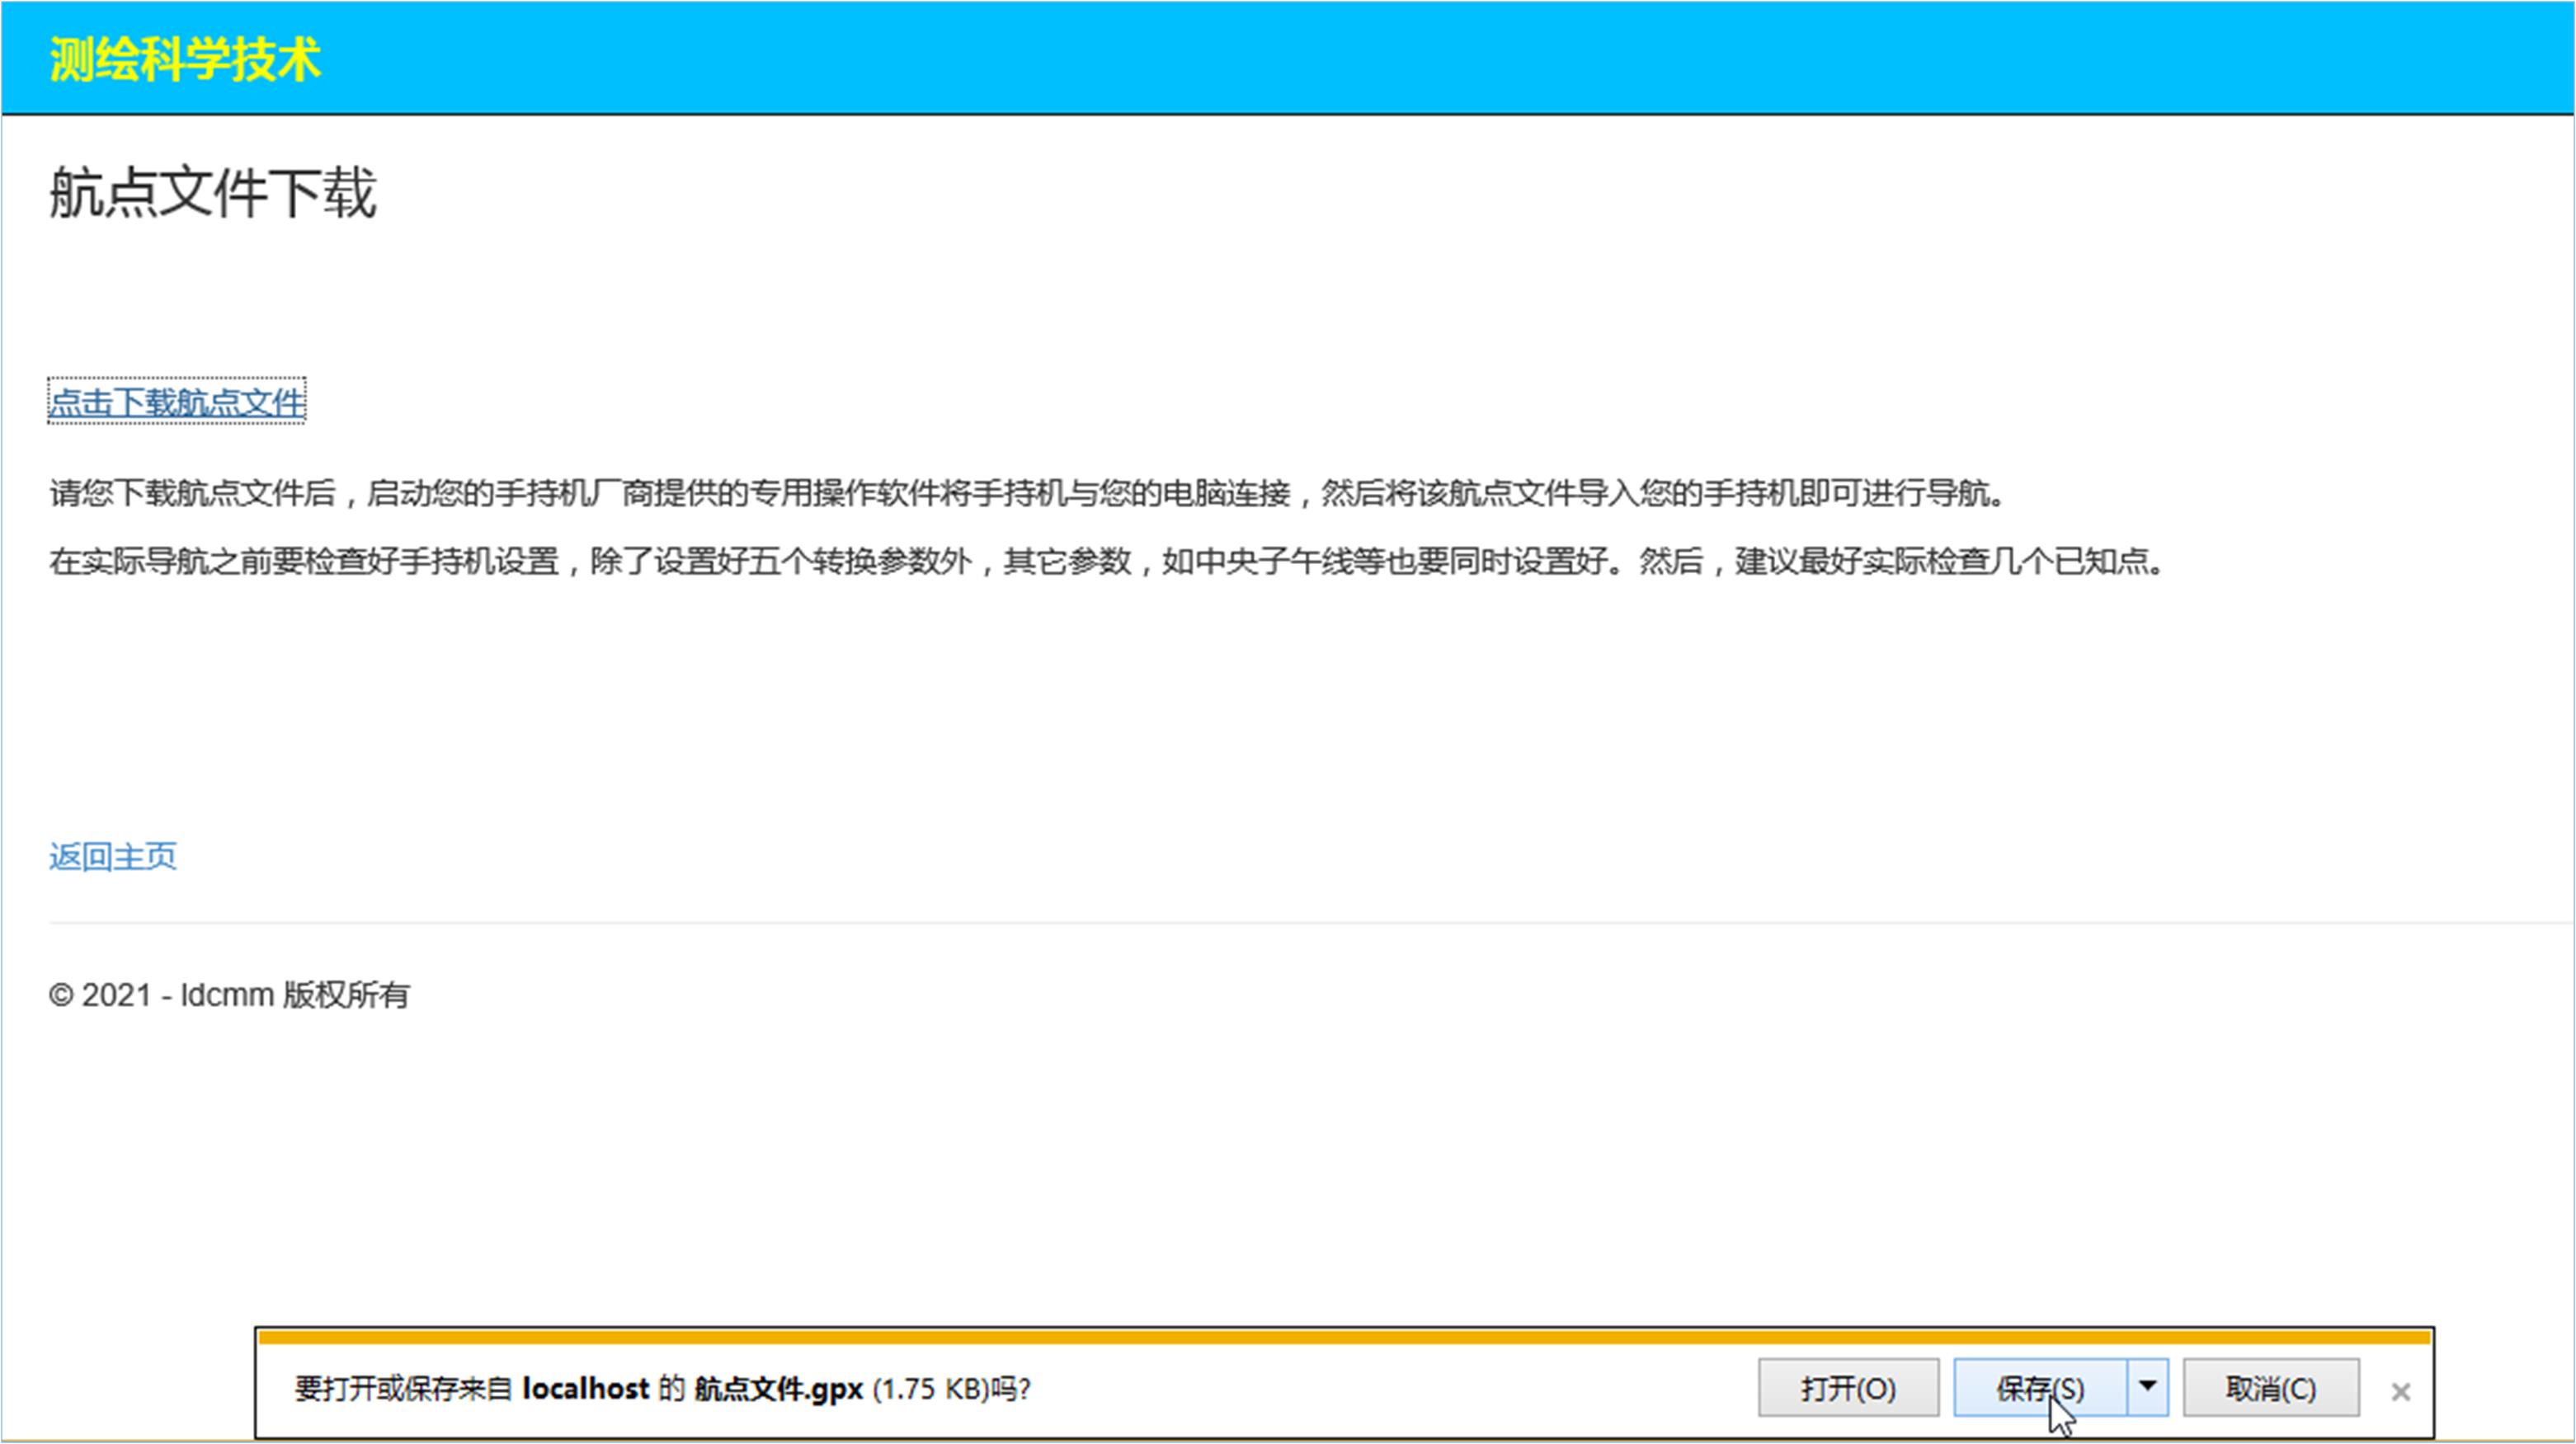
Click Download, save to the local designated location, and use it according to the instructions.
手持GPS航点坐标导出导入软件简介
第一篇 理论部分
手持GPS也简称手持机。
什么是航点文件?
航点文件就是保存航点坐标的文件,比如用户从手持机中导出的GPS交换格式(*.gpx)文件。
软件运行环境
运行本软件系统的软、硬件环境:
本软件系统分网络版和单机版。
1、网络版
又分为互联网版和局域网版。互联网版适合任何人在任何地点网上使用,局域网版适合于公司、单位使用。
本软件系统的互联网版适合多种主流浏览器,最好使用等同于IE10.0以上版本。电脑、手机、虚拟机等均可网上操作使用,不需要安装、不存在卸载。电脑屏幕大、操作方便,推荐。
2、单机版
又分为浏览器版和窗体版。适合单台电脑和虚拟机使用。
虚拟机的使用主要适合于密级较高的单位和个人。
本软件将同时发布网络版和单机版。
对于单机版,需要Intel i3 CPU或以上,最低2G内存硬件配置,Windows7以上版本操作系统(32位和64位均可)。安装卸载简单明了,并且卸载彻底,不留痕迹。
手持GPS种类很多,目前本软件只在少数手持机上调试通过,如果用户在使用过程中发现什么问题,请及时与我方联系解决。
主要功能特点
本软件系统可以帮助手持GPS用户快速导出导入大量航点坐标。
所谓导出是指,把用户从手持机存为的航点文件解析转换为用户所需要的坐标系坐标。其可以是1954、1980、1984、2000这四种坐标系中的任意一种平面坐标和大地坐标。
所谓导入是指,把用户坐标转换为航点文件,以便用户通过电脑读入到手持机中导航之用。即,把这四种坐标系中的任意一种平面坐标或大地坐标转换为手持机中的坐标。用户只需要把本系统生成的航点文件连上电脑读入到手持机中即可。
可导出导入的航点数量没有最高限制,只与电脑硬件配置和网络环境等因素有关,并进行1954、1980、1984、2000坐标系之间的相互转换。如果用户没有坐标转换参数,本系统将利用用户提交的一个(或一个以上)公共点坐标直接计算出来,同时供用户设置手持机之用。
两个主要功能可简单描述为:
从用户提交的航点文件中导出坐标(航点文件→坐标),或,把航点文件转换为坐标。
将用户提交的坐标转换为航点文件(坐标→航点文件),或,把坐标转换为航点文件。
本软件的第三个功能是求解手持机的五个转换参数:ΔX、ΔY、ΔZ、da和df。
本软件可完成十几种需求任务
概括简述如下:
只计算手持机的五个转换参数;
只导出原本大地坐标,不进行高斯投影计算,也不用选择坐标系和目标投影带;
只导出平面坐标,不转换参数(即不上传),选择坐标系和目标投影带;
导出坐标(大地和平面),上传转换参数(或公共点坐标),选择坐标系和目标投影带;
导出大地坐标,上传转换参数(或公共点坐标),选择坐标系,不选择目标投影带;
导出平面坐标,上传转换参数(或公共点坐标),选择坐标系,选择目标投影带;
只生成航点文件,不转换参数,不选择坐标系和目标投影带。例如,用户原本84大地坐标直接写入xml航点文件(即:*.gpx文件);
上传转换参数(或公共点坐标),生成航点文件。
系统约定
约定1:关于坐标与坐标系表示方面的约定
本软件要求,高斯平面坐标必须为真实坐标,其横坐标必须包含带号和500公里。如果用户提供的横坐标没有带号,或者为了工作方便省去了若干高位整数,则本软件系统在运行中将提示用户输入此高位整数一次。在我国,纵坐标为7位整数,横坐标包含带号为8位整数。
本软件以数字表示坐标系:1954、1980、1984、2000分别表示1954北京坐标系、1980西安坐标系、WGS84坐标系、2000国家大地坐标系。
约定2:关于角度格式方面的约定
度分秒之间的分隔符不得用空格、制表符、逗号和分号,因为它们已经被指派为完整数据之间的分隔符。本系统支持三种角度格式输入:度.分秒、°′″、度:分:秒。根据需要,角度的输出格式一般比较多。
度分秒以其它单字符分隔的都可以首先统一替换为冒号分隔符,反过来也一样。冒号将作为单字符对度分秒之间分隔的代表符号。
关于导出导入的定义
导出导入也可以称为下载上传。但,更确切地,本软件所称的导出导入的具体定义如下:
把用户通过电脑保存为的手持机航点文件解析转换为用户所需要坐标系的坐标,称为导出。
把用户坐标转换为航点文件,以便用户通过电脑读入到手持机中,称为导入。
也就是说,用户通过电脑利用手持机厂家提供的专用软件把手持机中的航点首先保存(下载)为航点文件,然后利用本软件解析转换其中的坐标为用户所需要的坐标系坐标,用户也利用这些专用软件把由本软件将用户坐标生成的航点文件通过电脑读入(上传)到手持机中。
用户需要特别注意的事项
坐标系的选择要正确,应认真检查;
所用坐标转换参数的当前坐标系与目标坐标系要搞清楚;
如果提供公共点坐标,则公共点与相应的坐标系要一致。所采用的投影带也要一致,如同为3度带或同为6度带。
以上是需要用户特别注意的。
另外注意:
① 如果用户导出导入的坐标与手持机坐标系的坐标相同,则不需要任何设置。即,不需要选择坐标系,也不需要转换参数等,直接上传航点文件或坐标文件即可。但,这两种情况往往很少见。一般都需要用户清楚地知道所使用的坐标和手持机中的坐标都是各自来自于何种坐标系。
② 如果直接导入航点坐标而不需要坐标转换,则因手持机中大都是采用的大地坐标,用户应该注意检查,以免误上传为平面坐标。若只有平面坐标而没有大地坐标,则需要进行坐标转换方面的设置。
对于单机版,何时选择“需要转换参数”检查框?答:当当前坐标系与目标坐标系不同时,则应该首先选中此检查框。
操作步骤归纳
现归纳操作步骤:
1、若不需要转换坐标,则选择坐标系后直接提交航点文件或坐标文件之一进行导出或导入、点击“提交”按钮即可。但对于导出,若还需要高斯平面坐标,则应该选择当前坐标系和目标坐标系以及目标投影带。
对应的成果有:
对于导出,有导出坐标(即手持机中的原坐标系坐标)或目标平面坐标。
对于导入,有航点文件。
2、若需要转换坐标,则选择坐标系后还需要提交转换参数文件或公共点坐标文件,然后提交航点文件或坐标文件之一进行导出或导入。但对于导出,若还需要高斯平面坐标,应该选择当前坐标系和目标坐标系以及目标投影带。然后,点击“提交”按钮即可。
对应的成果有:
对于导出,有导出坐标(即手持机中的原坐标系坐标),目标平面坐标和目标大地坐标。
对于导入,有航点文件。
坐标转换参数仅需要三个坐标平移量。但,如果提交了公共点坐标文件,还得到五个转换参数供用户手持机设置之用。
以上对于单机版同样适用,只需要把上述“提交”改为“确定”即可。
3、关于投影带的确定问题
如果用户提交的是高斯平面坐标,则软件能自动算出投影带。即,凡是用户提交的是高斯平面坐标,则一律不需要考虑投影带的选择,本软件系统中也不安排这样的选择项。如果目标坐标需要的是高斯平面坐标,则用户必须选择投影带,因为本软件无法预知用户的意图。
凡是需要转换坐标系和需要高斯投影,则必须选择坐标系。即,除了两种情况不需要选择坐标系和投影带:从用户上传的航点文件中直接取出坐标或把坐标原本放入航点文件。
手持机与电脑联机操作
用户应该熟悉自己所使用的手持机厂家提供的专用软件把手持机与电脑进行连接操作,以便能够熟练地把航点从手持机保存(也称下载)为航点文件,也能够把由本软件根据用户提交的坐标生成的航点文件读入(也称上传)到手持机。
对于各种型号的手持机,用户把手持机与电脑连接、把航点文件导出导入手持机的方法类似,现以GARMIN GPS 72型手持机为例简要说明其简单步骤供用户参考:
a) 从手持机导出航点文件
运行MapSource6.16.3(若用户电脑中没有则需要先到对应厂商官网下载或安装) → 点击“从设备接收” → 查找设备 → 打钩“航点”检查框 → 点击“接收”,此时航点读入MapSource中,在左边航点选项卡的窗口显示出来,选择(很重要:必须在左边航点窗口中选择要导出的航点才能另存为gpx文件导出航点)要导出的航点,另存为“无标题.gpx”文件,即在另存为时选择GPS交换格式(*.gpx),使用缺省名“无标题.gpx”或改名即可。
有时会另存为不成功,多试几次即可。或者先选择复制航点(左边航点选项卡窗口中的航点),然后再另存为gpx文件也可以。
注意:以上是基本方法参考,具体方法应以用户使用的软件版本和手持机型号以及具体手持机用户使用手册等为准。
b) 把gpx文件导入手持机
本系统把用户提供的坐标生成航点文件。
·用户将手持GPS与电脑连接并将手持GPS开机;
·运行MapSource6136,从文件菜单中点击“打开”,浏览到上述制作的gpx文件,然后点击“发送到设备”命令 → 点击“查找设备” → 选中“航点” → 点击“发送”即可;
·这时可以查看手持GPS。按“查找”键 → 航点 → 按输入键,查看手持GPS吐出的80(54)坐标是否与原来的相同,并由此可以检查手持GPS的三个平移参数的精度和正确性。
注意:
1、由于MapSource软件版本的不同,操作可能存在差异,需要注意。
2、其它型号的手持机请参阅随机使用手册或咨询具体手持机商家以获得详细的信息。
航点文件下载
请用户通过本网下载由本软件系统生成的航点文件后,启动用户手持机厂商提供的专用软件将手持机与用户的电脑连接,然后将该航点文件导入用户的手持机即可进行导航。在实际导航之前要检查好手持机设置,除了设置好手持机五个转换参数外,其它参数,如中央子午线等也要同时正确设置。然后,建议实际检查几个已知点,检查无误后再开始正式导航。
航点文件的一般格式
什么是航点文件。航点文件是坐标包含在类似以下XML代码文件中的文件,也就是形如下面这样的文件:
    <?xml version="1.0" encoding="UTF-8" standalone="no" ?>
    <gpx xmlns="http://www.topografix.com/GPX/1/1" creator="MapSource 6.16.3" version="1.1" xmlns:xsi="http://www.w3.org/2001/XMLSchema-instance" xsi:schemaLocation="http://www.topografix.com/GPX/1/1 http://www.topografix.com/GPX/1/1/gpx.xsd">
    <metadata>
    <link href="http://www.garmin.com" />            <text>Garmin International</text>            </link>
    <time>2012-10-16T03:29:28Z</time>
    <bounds maxlat="28.372980688139796" maxlon="102.3412963616848" minlat="28.349930469244719" minlon="102.86387163735926" />
        </metadata>
    <wpt lat="28.332300294563174" lon="102.86387163735926">
    <ele>683.1289999999999</ele>
    <name>PQS1</name>
    <cmt>2012-04-29 10:24:21AM</cmt>
    <desc>2012-04-29 10:24:21AM</desc>
    <sym>Flag, Blue</sym>
    <extensions>
    <gpxx:WaypointExtension xmlns:gpxx="http://www.garmin.com/xmlschemas/GpxExtensions/v3">
    <gpxx:DisplayMode>SymbolAndName</gpxx:DisplayMode>
                </gpxx:WaypointExtension>
            </extensions>
        </wpt>
    <wpt lat="28.346928978711367" lon="102.86962329931557">
    <ele>650.7639999999999</ele>
    <name>PQS2</name>
    <cmt>2012-04-29 10:24:21AM</cmt>
    <desc>2012-04-29 10:24:21AM</desc>
    <sym>Flag, Blue</sym>
    <extensions>
    <gpxx:WaypointExtension xmlns:gpxx="http://www.garmin.com/xmlschemas/GpxExtensions/v3">
    <gpxx:DisplayMode>SymbolAndName</gpxx:DisplayMode>
                </gpxx:WaypointExtension>
            </extensions>
        </wpt>
    <wpt lat="28.349930469244719" lon="102.3412963616848">
    <ele>645.779</ele>
    <name>PQS3</name>
    <cmt>2012-04-29 10:24:21AM</cmt>
    <desc>2012-04-29 10:24:21AM</desc>
    <sym>Flag, Blue</sym>
    <extensions>
    <gpxx:WaypointExtension xmlns:gpxx="http://www.garmin.com/xmlschemas/GpxExtensions/v3">
    <gpxx:DisplayMode>SymbolAndName</gpxx:DisplayMode>
                </gpxx:WaypointExtension>
            </extensions>
        </wpt>
    <wpt lat="34.686749847605824" lon="102.87150998190045">
    <ele>637.182</ele>
    <name>PQS4</name>
    <cmt>2012-04-29 10:24:21AM</cmt>
    <desc>2012-04-29 10:24:21AM</desc>
    <sym>Flag, Blue</sym>
    <extensions>
    <gpxx:WaypointExtension xmlns:gpxx="http://www.garmin.com/xmlschemas/GpxExtensions/v3">
    <gpxx:DisplayMode>SymbolAndName</gpxx:DisplayMode>
                </gpxx:WaypointExtension>
            </extensions>
        </wpt>
    <wpt lat="28.313265495374799" lon="102.86631051972508">
    <ele>642.963</ele>
    <name>PQS5</name>
    <cmt>2012-04-29 10:24:21AM</cmt>
    <desc>2012-04-29 10:24:21AM</desc>
    <sym>Flag, Blue</sym>
    <extensions>
    <gpxx:WaypointExtension xmlns:gpxx="http://www.garmin.com/xmlschemas/GpxExtensions/v3">
    <gpxx:DisplayMode>SymbolAndName</gpxx:DisplayMode>
                </gpxx:WaypointExtension>
            </extensions>
        </wpt>
    <wpt lat="28.344176948443055" lon="102.89117359146476">
    <ele>922.62800000000004</ele>
    <name>PQS6</name>
    <cmt>2012-04-29 10:24:21AM</cmt>
    <desc>2012-04-29 10:24:21AM</desc>
    <sym>Flag, Blue</sym>
    <extensions>
    <gpxx:WaypointExtension xmlns:gpxx="http://www.garmin.com/xmlschemas/GpxExtensions/v3">
    <gpxx:DisplayMode>SymbolAndName</gpxx:DisplayMode>
                </gpxx:WaypointExtension>
            </extensions>
        </wpt>
    <wpt lat="28.303700402751565" lon="102.88913385532796">
    <ele>630.28999999999996</ele>
    <name>PQS7</name>
    <cmt>2012-04-29 10:24:21AM</cmt>
    <desc>2012-04-29 10:24:21AM</desc>
    <sym>Flag, Blue</sym>
    <extensions>
    <gpxx:WaypointExtension xmlns:gpxx="http://www.garmin.com/xmlschemas/GpxExtensions/v3">
    <gpxx:DisplayMode>SymbolAndName</gpxx:DisplayMode>
                </gpxx:WaypointExtension>
            </extensions>
        </wpt>
    <wpt lat="28.340383131429553" lon="102.89146947264671">
    <ele>788.2</ele>
    <name>V001</name>
    <cmt>2012-04-29 10:24:21AM</cmt>
    <desc>2012-04-29 10:24:21AM</desc>
    <sym>Flag, Blue</sym>
    <extensions>
    <gpxx:WaypointExtension xmlns:gpxx="http://www.garmin.com/xmlschemas/GpxExtensions/v3">
    <gpxx:DisplayMode>SymbolAndName</gpxx:DisplayMode>
                </gpxx:WaypointExtension>
            </extensions>
        </wpt>
    </gpx>
航点文件扩展名一般用GPS交换格式(*.gpx)。
关于坐标系的选择
本节将回答什么是当前坐标系、什么是目标坐标系等问题。
1、对于导出,当前坐标系就是用户手持机中的坐标系,目标坐标系就是用户需要把手持机中的坐标系的坐标转换为所需要坐标的坐标系。
2、对于导入,当前坐标系就是用户所要提交坐标的坐标系。目标坐标系就是用户手持机中的坐标系。
如果用户给出的直接就是手持机中的坐标系坐标,则就不需要转换参数了。此时,目标坐标系和当前坐标系是完全相同的坐标系,这同时也是一个不需要转换坐标的标志。
本软件的导出导入是分别进行提交运算的,不能同时进行,这在本软件的界面已经做了区分控制,使得用户一般不会搞错。这样,两个功能分别入库两次记录。其中,坐标转换参数的计算是内置功能,导出导入功能都包含。
由于用户没有选择转换到哪种投影带,或没有设置转换参数,或设置了完全相同的两个坐标系,都说明用户不需要坐标转换。
简单总结如下。
对于导出:
当前坐标系,是指手持机中采用的坐标系。一般缺省为1984坐标系,当然也可以设置为其它坐标系。
目标坐标系,是指用户希望将手持机中的航点坐标转换为用户所需要坐标的坐标系。
对于导入:
当前坐标系,是指用户提交坐标的坐标系。
目标坐标系,是手持机中的坐标系。
坐标转换与坐标转换参数
如果有转换参数,直接提交即可。用户只需要提交三个坐标平移参数ΔX、ΔY、ΔZ,不需要提交da和df。
三个坐标平移参数如果要求精确不高,可以到相近地区搜集,只要满足用户需要即可。例如,可以到有关测绘单位或部门收集,或到网上搜集可靠的转换参数。
如果要求三个转换参数精度比较高,可提交两个坐标系的一个(或一个以上)公共点坐标,由本软件的内置坐标转换参数程序自动解算,并完成坐标转换。
通过公共点计算得到转换参数除三个坐标平移参数外,还包括另外两个参数da和df,由本软件计算得到的这五个坐标转换参数还可供用户设置手持机之用。
注意:两种坐标系的相互转换参数绝对值相同,仅符号相反。如果用户有其中的一种转换参数,当需要另一种时,只需将转换参数反一负号即可。
例如,用户若从1984坐标系转换为1980坐标系的转换参数,若遇到将从1980坐标系坐标转换为1984坐标系的坐标时,只需要将前者的转换参数反一负号即可使用。
同时注意两个坐标系不要搞反。
计算得到的转换参数文件,其中指明了原坐标系和目标坐标系,用户不应当把其中的这些坐标系信息删除,除非必要,可以复制其中的内容,以免混淆转换参数所适用的原坐标系和目标坐标系。
1、转换参数数据文件格式
转换参数数据文件格式为:
ΔX
ΔY
ΔZ
或
ΔX ΔY ΔZ
2、公共点坐标数据文件格式
用户提交的公共点坐标数据文件的格式是:
当前坐标系坐标
============
目标坐标系坐标
注:应使用一个以上等号(建议五个连续“=”)作为两种坐标系坐标分隔符。
公共点的点名应该相同,多于一个公共点时,其点名前后顺序必须一致。
例子:
P01 Nx1 Ey1 H1
P02 Nx2 Ey2 H2
===========
P01 Nx1' Ey1' H1'
P02 Nx2' Ey2' H2'
用户要注意当前坐标系和目标坐标系的选择不要选错,并注意公共点坐标与相应的坐标系必须一致。
如果用户只是需要手持机中的坐标,而不需要转换,对于单机版不需要选择“需要转换参数”检查框,这时,系统只解析并显示用户下载的手持机中的坐标系坐标。对于网络版,其两个选项钮是互斥的,用户一般不会选错。
关于导入功能文本框中的坐标
对于单机版导入功能界面上的文本框中的坐标,以导入坐标文件为宜,但也可以从别的文件中复制坐标粘贴到该文本框中,系统会对这些坐标进行差错检查。
如果是在该文本框中手工输入建立的坐标,希望用户保存后再导入一次。这样,系统会对用户的输入坐标数据进行一次全面的检查,以发现用户输入中可能存在的一些重要错误以便用户进行改正,节省用户的数据检查时间。
技术服务
因用户自身条件而异,用户购买本软件后,我方会有专门的工作人员主动联系用户,根据具体情况指导用户用最短的时间掌握本软件的使用要领,使用户节约大量的上手摸索时间。
联系方式:
负责人:杨浩
手机:15324911957
咨询电话:0371-67117589
电子邮箱:yanghao1959@sina.com
地址:河南省郑州市金水区水科路10号院
邮编:450008
第二篇 操作部分
单机版操作界面
本软件系统可完成十几种需求任务,不能一一列举,本使用说明书只列举“3 本软件可完成十几种需求任务”中的“4)”和“7)”为例介绍导出和导入的具体操作方法。用户若遇到其它需求任务,可参照之完成。
15.1 导出操作
运行本软件后的主界面:
点击“把航点文件转换为坐标”:
弹出如下窗体:
选择投影带(下例中是选择3°投影带),这时如果目标坐标系与原坐标系相同,则是把手持机坐标系的大地坐标投影到3度带高斯平面坐标;若目标坐标系与原坐标系不相同,则是转换到目标坐标系下的高斯平面坐标,同时本软件也给出目标大地坐标。选择好投影带后,则自动弹出坐标转换设置窗体,用户应仔细进行设置,尤其注意两种坐标系的选择不要搞反,且选择的两种坐标系与公共点坐标和坐标转换参数关系必须对应,并注意设置窗体下方的提示信息:
如果还没有坐标转换参数,应该选择“我有公共点”,然后装入公共点坐标文件,或从别的文档复制粘贴过来,或直接输入。然后,点击“参数计算”,软件会把计算好的五个手持机坐标转换参数填入“我有转换参数”下面的文本框中。如下图所示:
点击“确定”后回到原来的窗口:
然后,点击“打开航点文件”:
点击“打开”后,成果即出现,可以查看原手持机中的坐标和目标3度带的平面坐标:
点击右上角“>”可以查看目标大地坐标:
点击“查看成果”,可以看到生成了以下四种格式的目标坐标系坐标文档和原坐标系坐标文档共九个文档(前八个文档为目标坐标系坐标文档),供用户在工作中选用。
注:其中的docx文件和xlsx文件在用户安装有Microsoft Office Word、Excel时产生。
浏览上述九个文件内容:
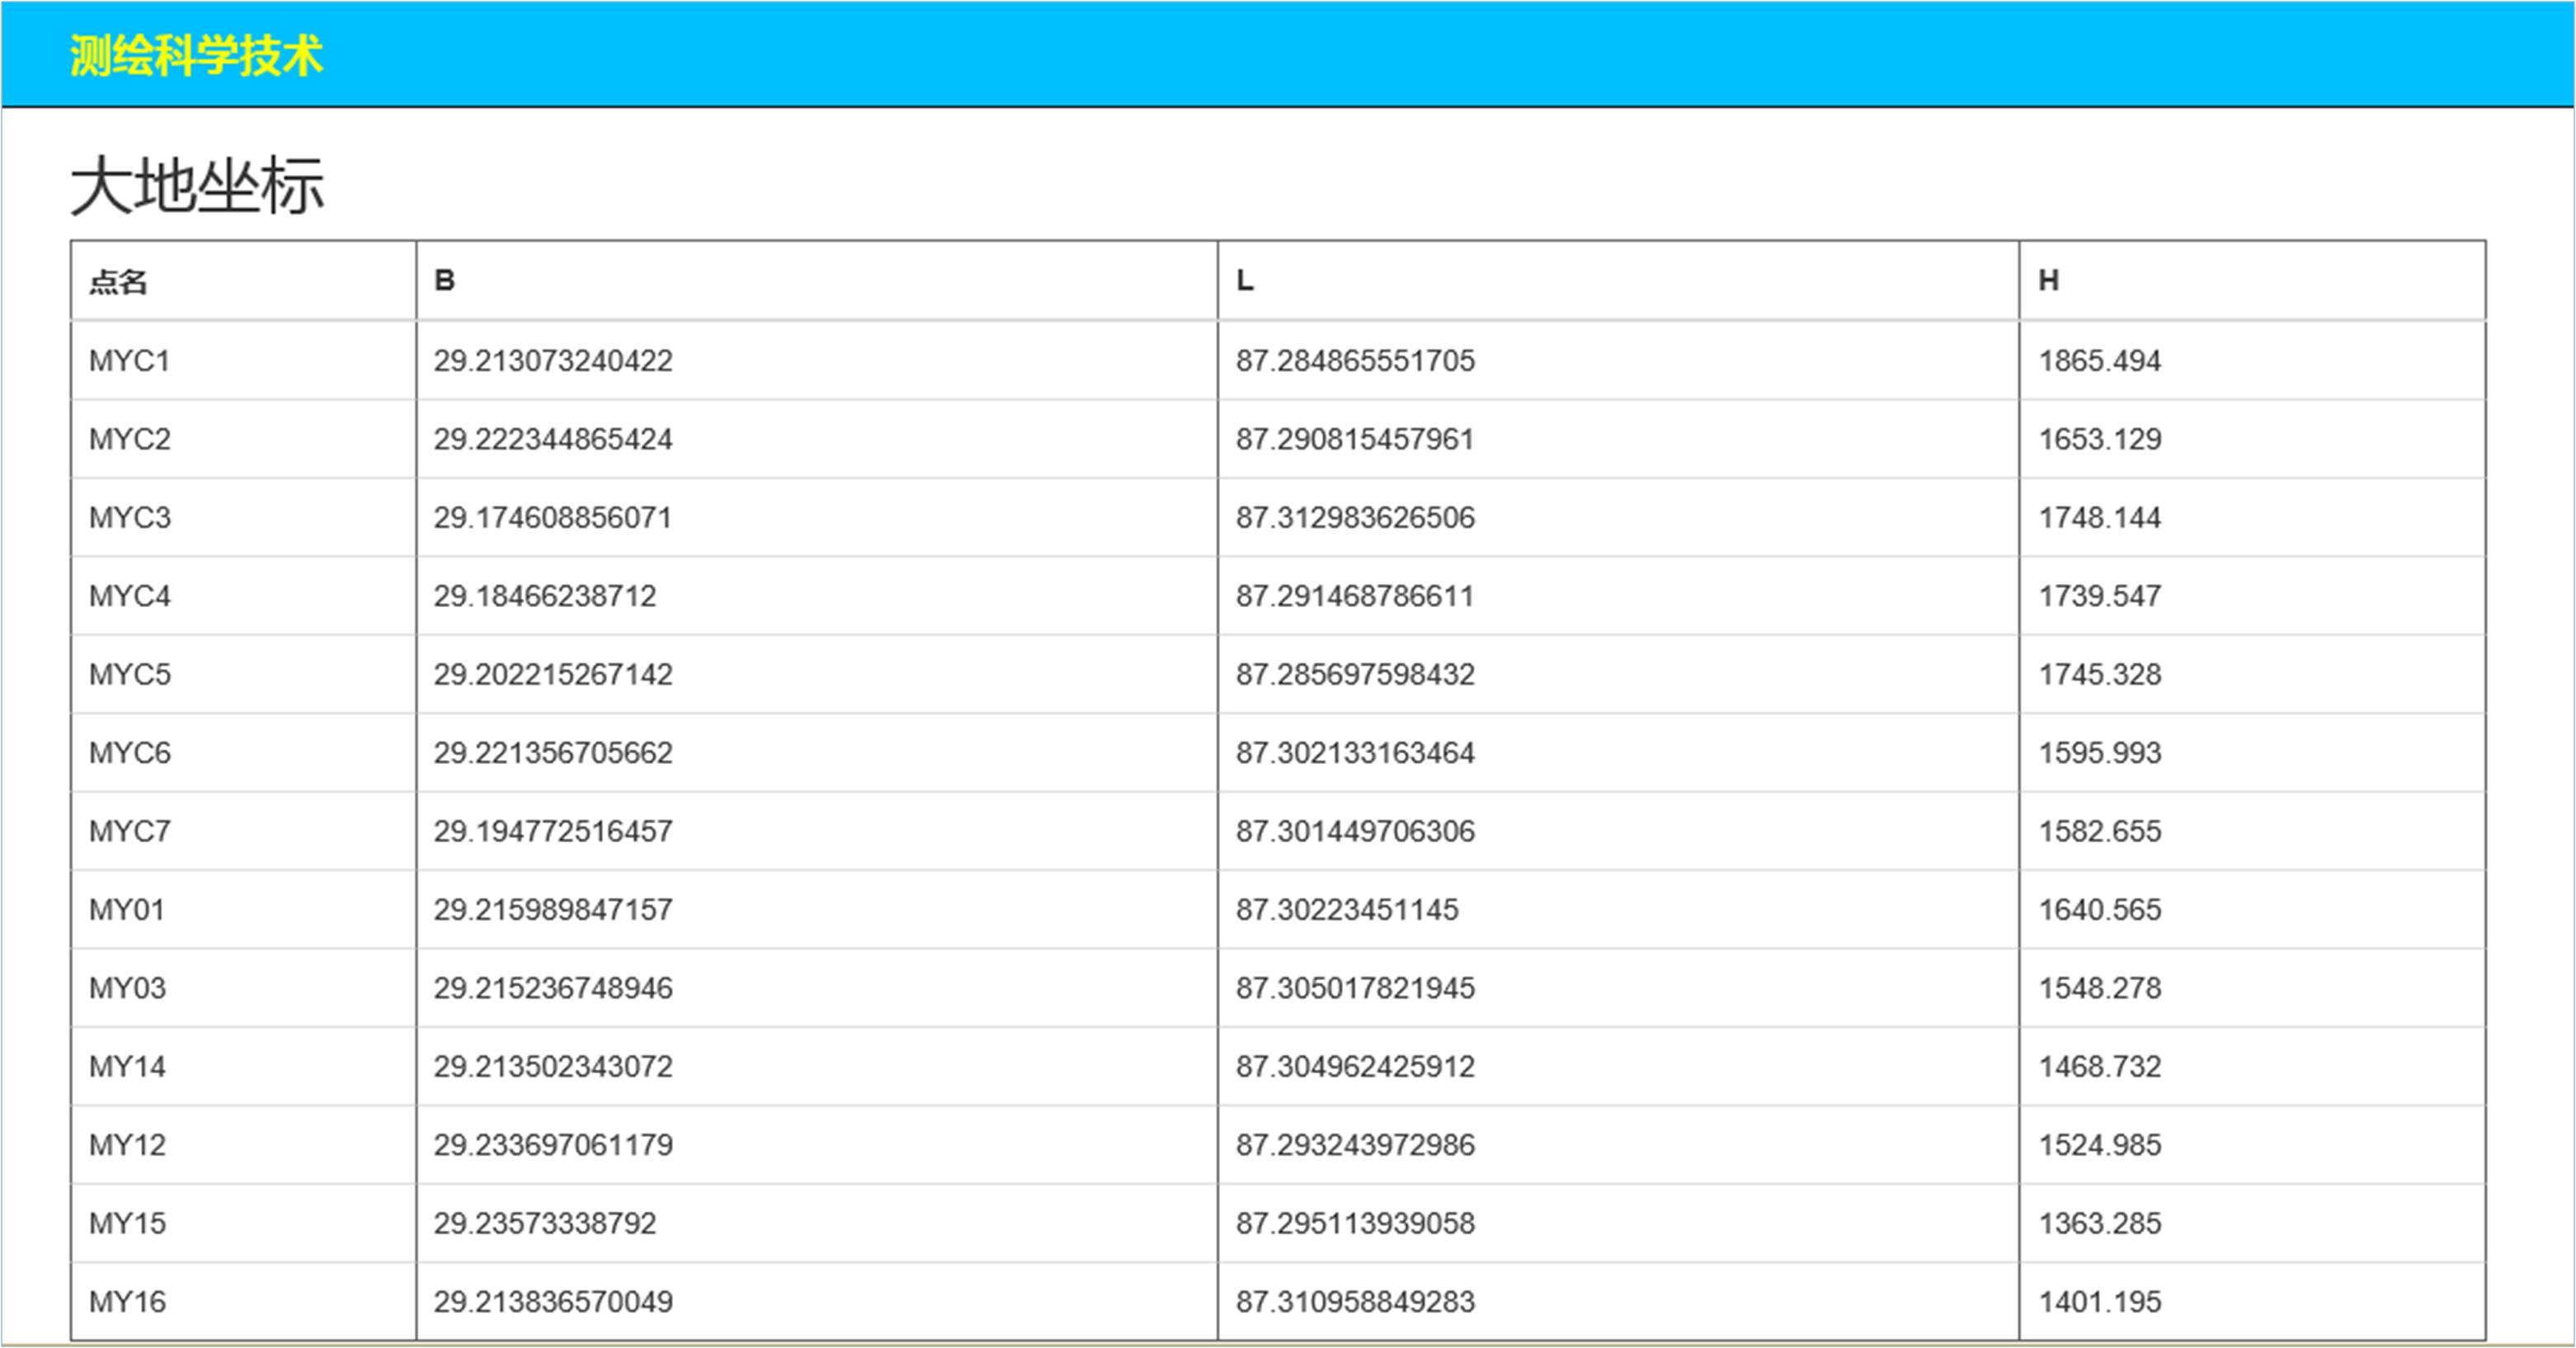
大地坐标的网页格式:
大地坐标的Word文档格式:
大地坐标的文本文件格式:
点名 B L H
MYC1 29.213073240422 87.284865551705 1865.494
MYC2 29.222344865424 87.290815457961 1653.129
MYC3 29.174608856071 87.312983626506 1748.144
MYC4 29.18466238712 87.291468786611 1739.547
MYC5 29.202215267142 87.285697598432 1745.328
MYC6 29.221356705662 87.302133163464 1595.993
MYC7 29.194772516457 87.301449706306 1582.655
MY01 29.215989847157 87.30223451145 1640.565
MY03 29.215236748946 87.305017821945 1548.278
MY14 29.213502343072 87.304962425912 1468.732
MY12 29.233697061179 87.293243972986 1524.985
MY15 29.23573338792 87.295113939058 1363.285
MY16 29.213836570049 87.310958849283 1401.195
大地坐标的Exce文档格式:
平面坐标的网页格式:
平面坐标的Word文档格式:
注:用户可以把标题“Table1表”换成自己需要的名称。
平面坐标的文本文件格式:
点名 Nx Ey H
MYC1 3249106.39103836 29546626.350034 1865.494
MYC2 3250731.69705592 29547145.5510328 1653.129
MYC3 3242208.32404962 29551004.9170308 1748.144
MYC4 3244056.42004478 29547349.5790475 1739.547
MYC5 3246995.75203855 29546859.4930287 1745.328
MYC6 3250435.81805629 29549120.3890501 1595.993
MYC7 3245944.55503197 29548955.4240442 1582.655
MY01 3250015.08003639 29549149.5460343 1640.565
MY03 3249786.47803525 29549901.2490321 1548.278
MY14 3249252.38805236 29549888.6560374 1468.732
MY12 3252998.1860511 29547790.9550422 1524.985
MY15 3253627.31205805 29548292.4950345 1363.285
MY16 3249357.67703189 29550426.6880495 1401.195
平面坐标的Excel文档格式:
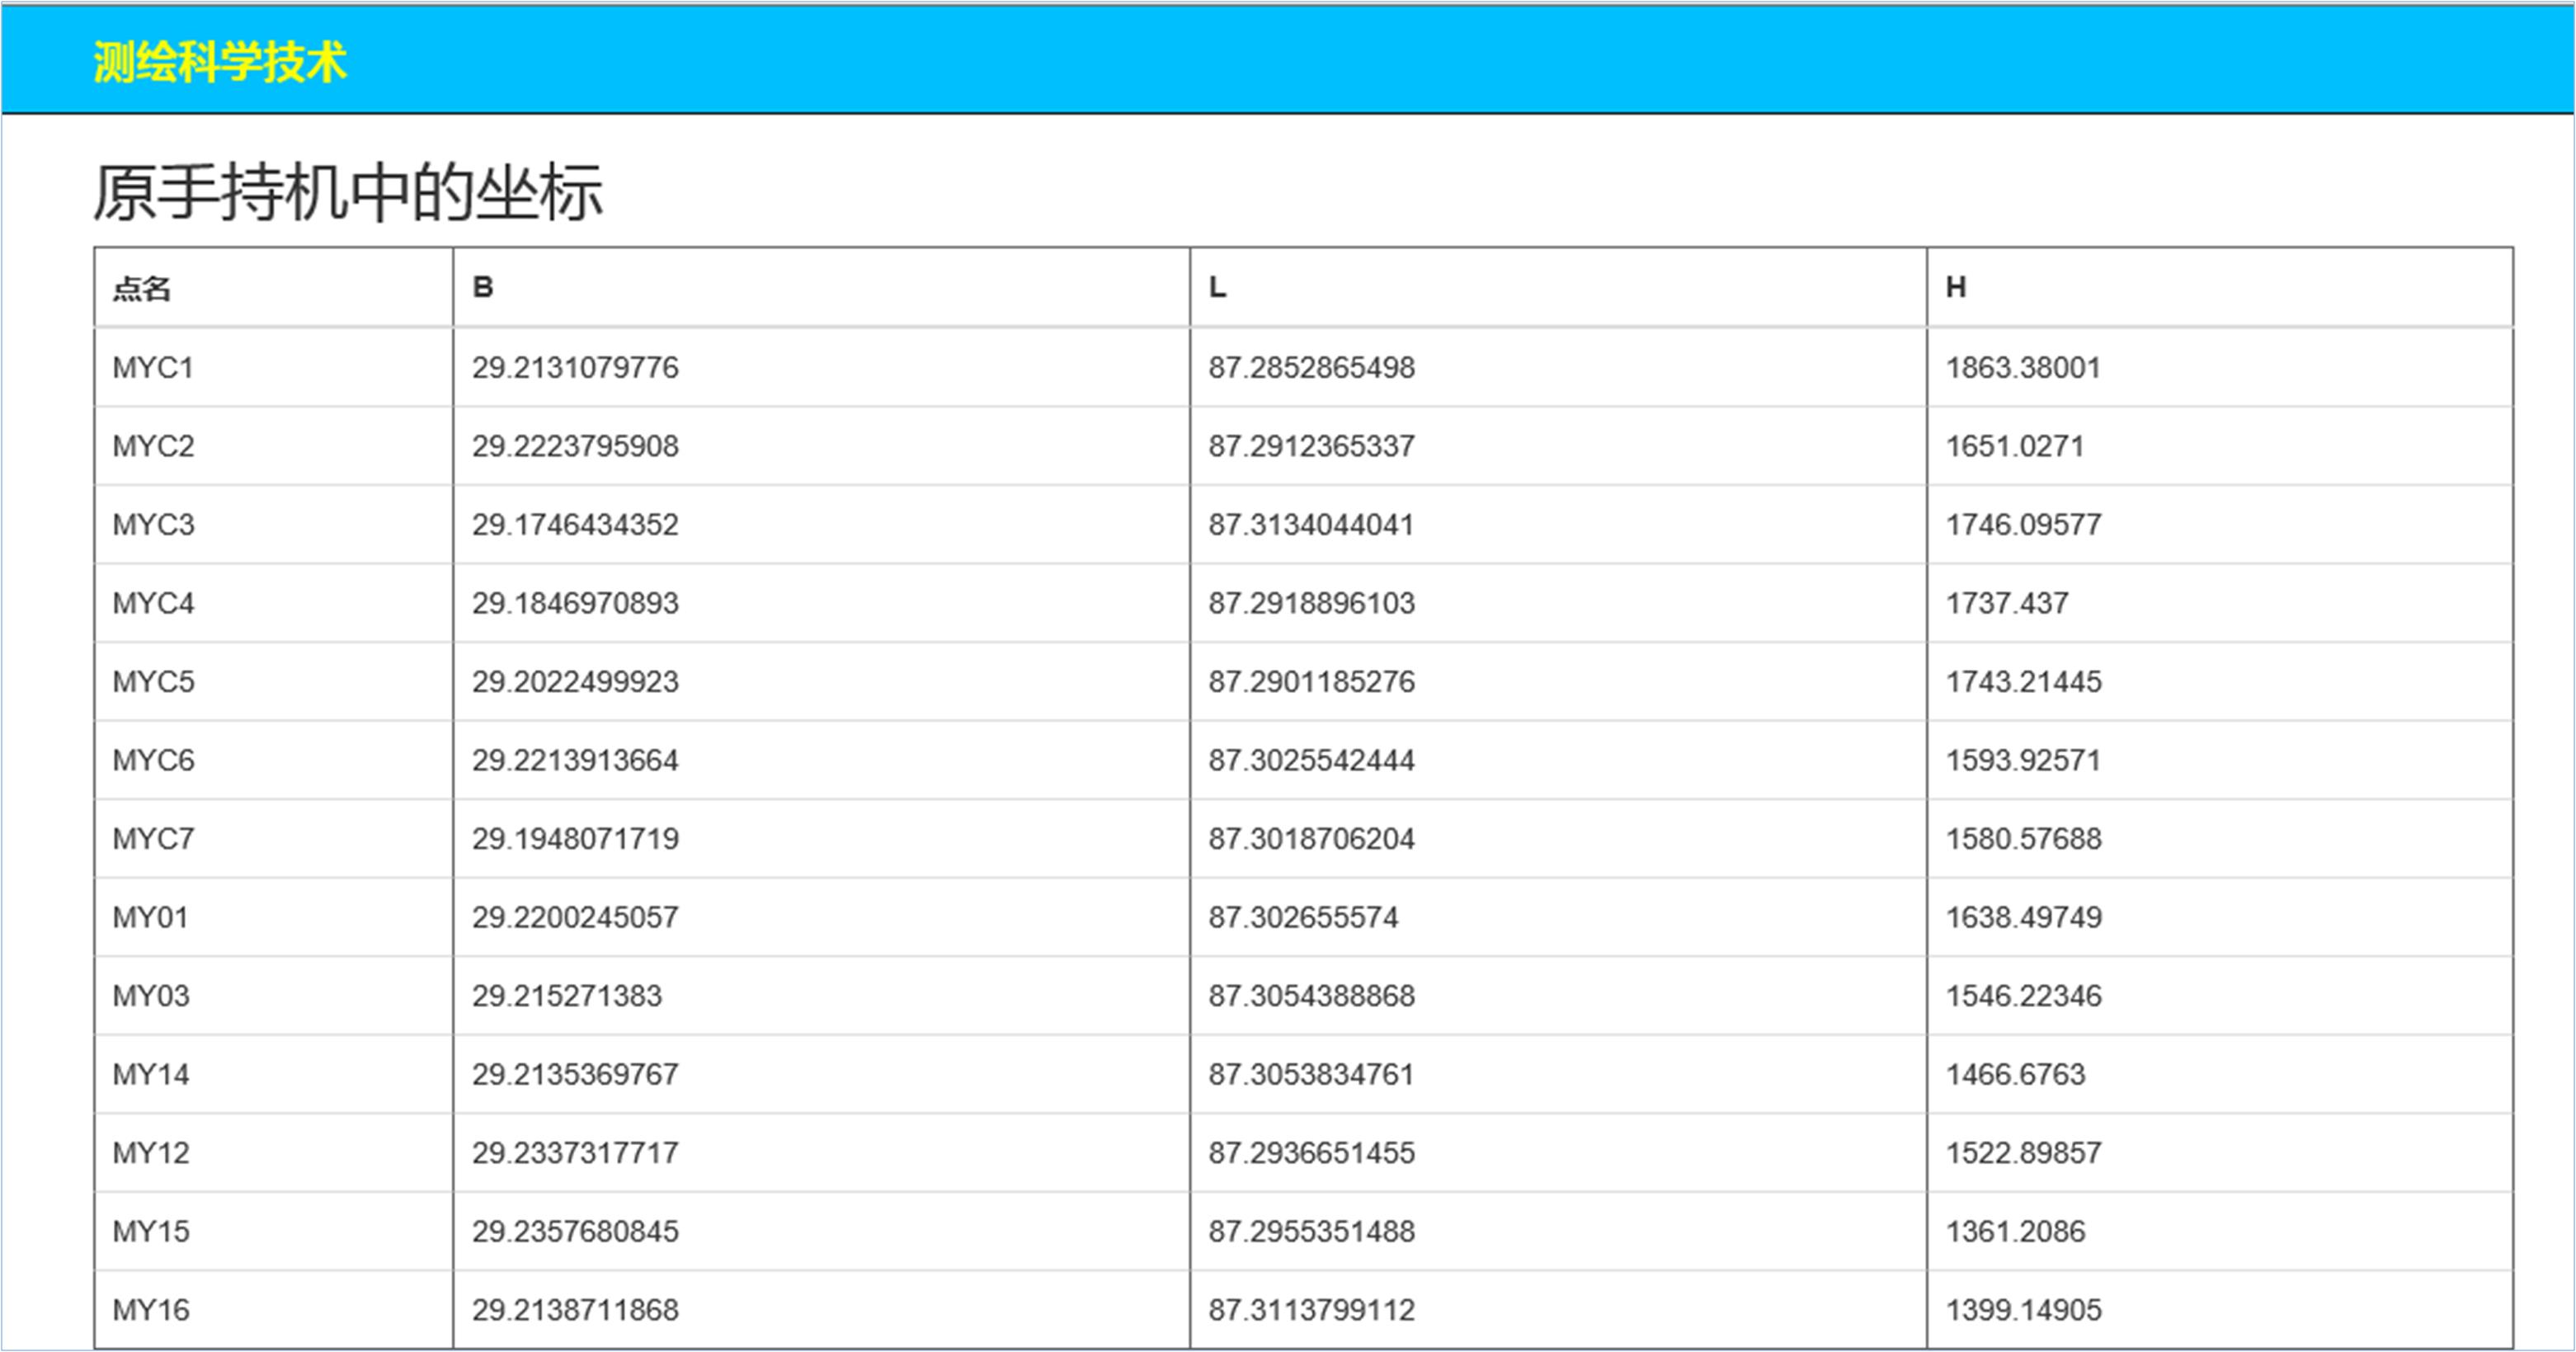
原手持机中的坐标:
点名 B L H
MYC1 29.2131079776 87.2852865498 1863.38001
MYC2 29.2223795908 87.2912365337 1651.0271
MYC3 29.1746434352 87.3134044041 1746.09577
MYC4 29.1846970893 87.2918896103 1737.437
MYC5 29.2022499923 87.2901185276 1743.21445
MYC6 29.2213913664 87.3025542444 1593.92571
MYC7 29.1948071719 87.3018706204 1580.57688
MY01 29.2200245057 87.302655574 1638.49749
MY03 29.215271383 87.3054388868 1546.22346
MY14 29.2135369767 87.3053834761 1466.6763
MY12 29.2337317717 87.2936651455 1522.89857
MY15 29.2357680845 87.2955351488 1361.2086
MY16 29.2138711868 87.3113799112 1399.14905
15.2 导入操作
点击“把坐标转换为航点文件”打开对应窗体:
点击“需要转换坐标”自动弹出坐标转换设置窗体:
点击“导入坐标”打开用户准备上传到手持机中的坐标文件后如下图所示:
点击“确定”则有如下提示:
按照指定的路径查看“GPS数据上传文件.gpx”成果:
网络版操作页面
16.1 导出操作
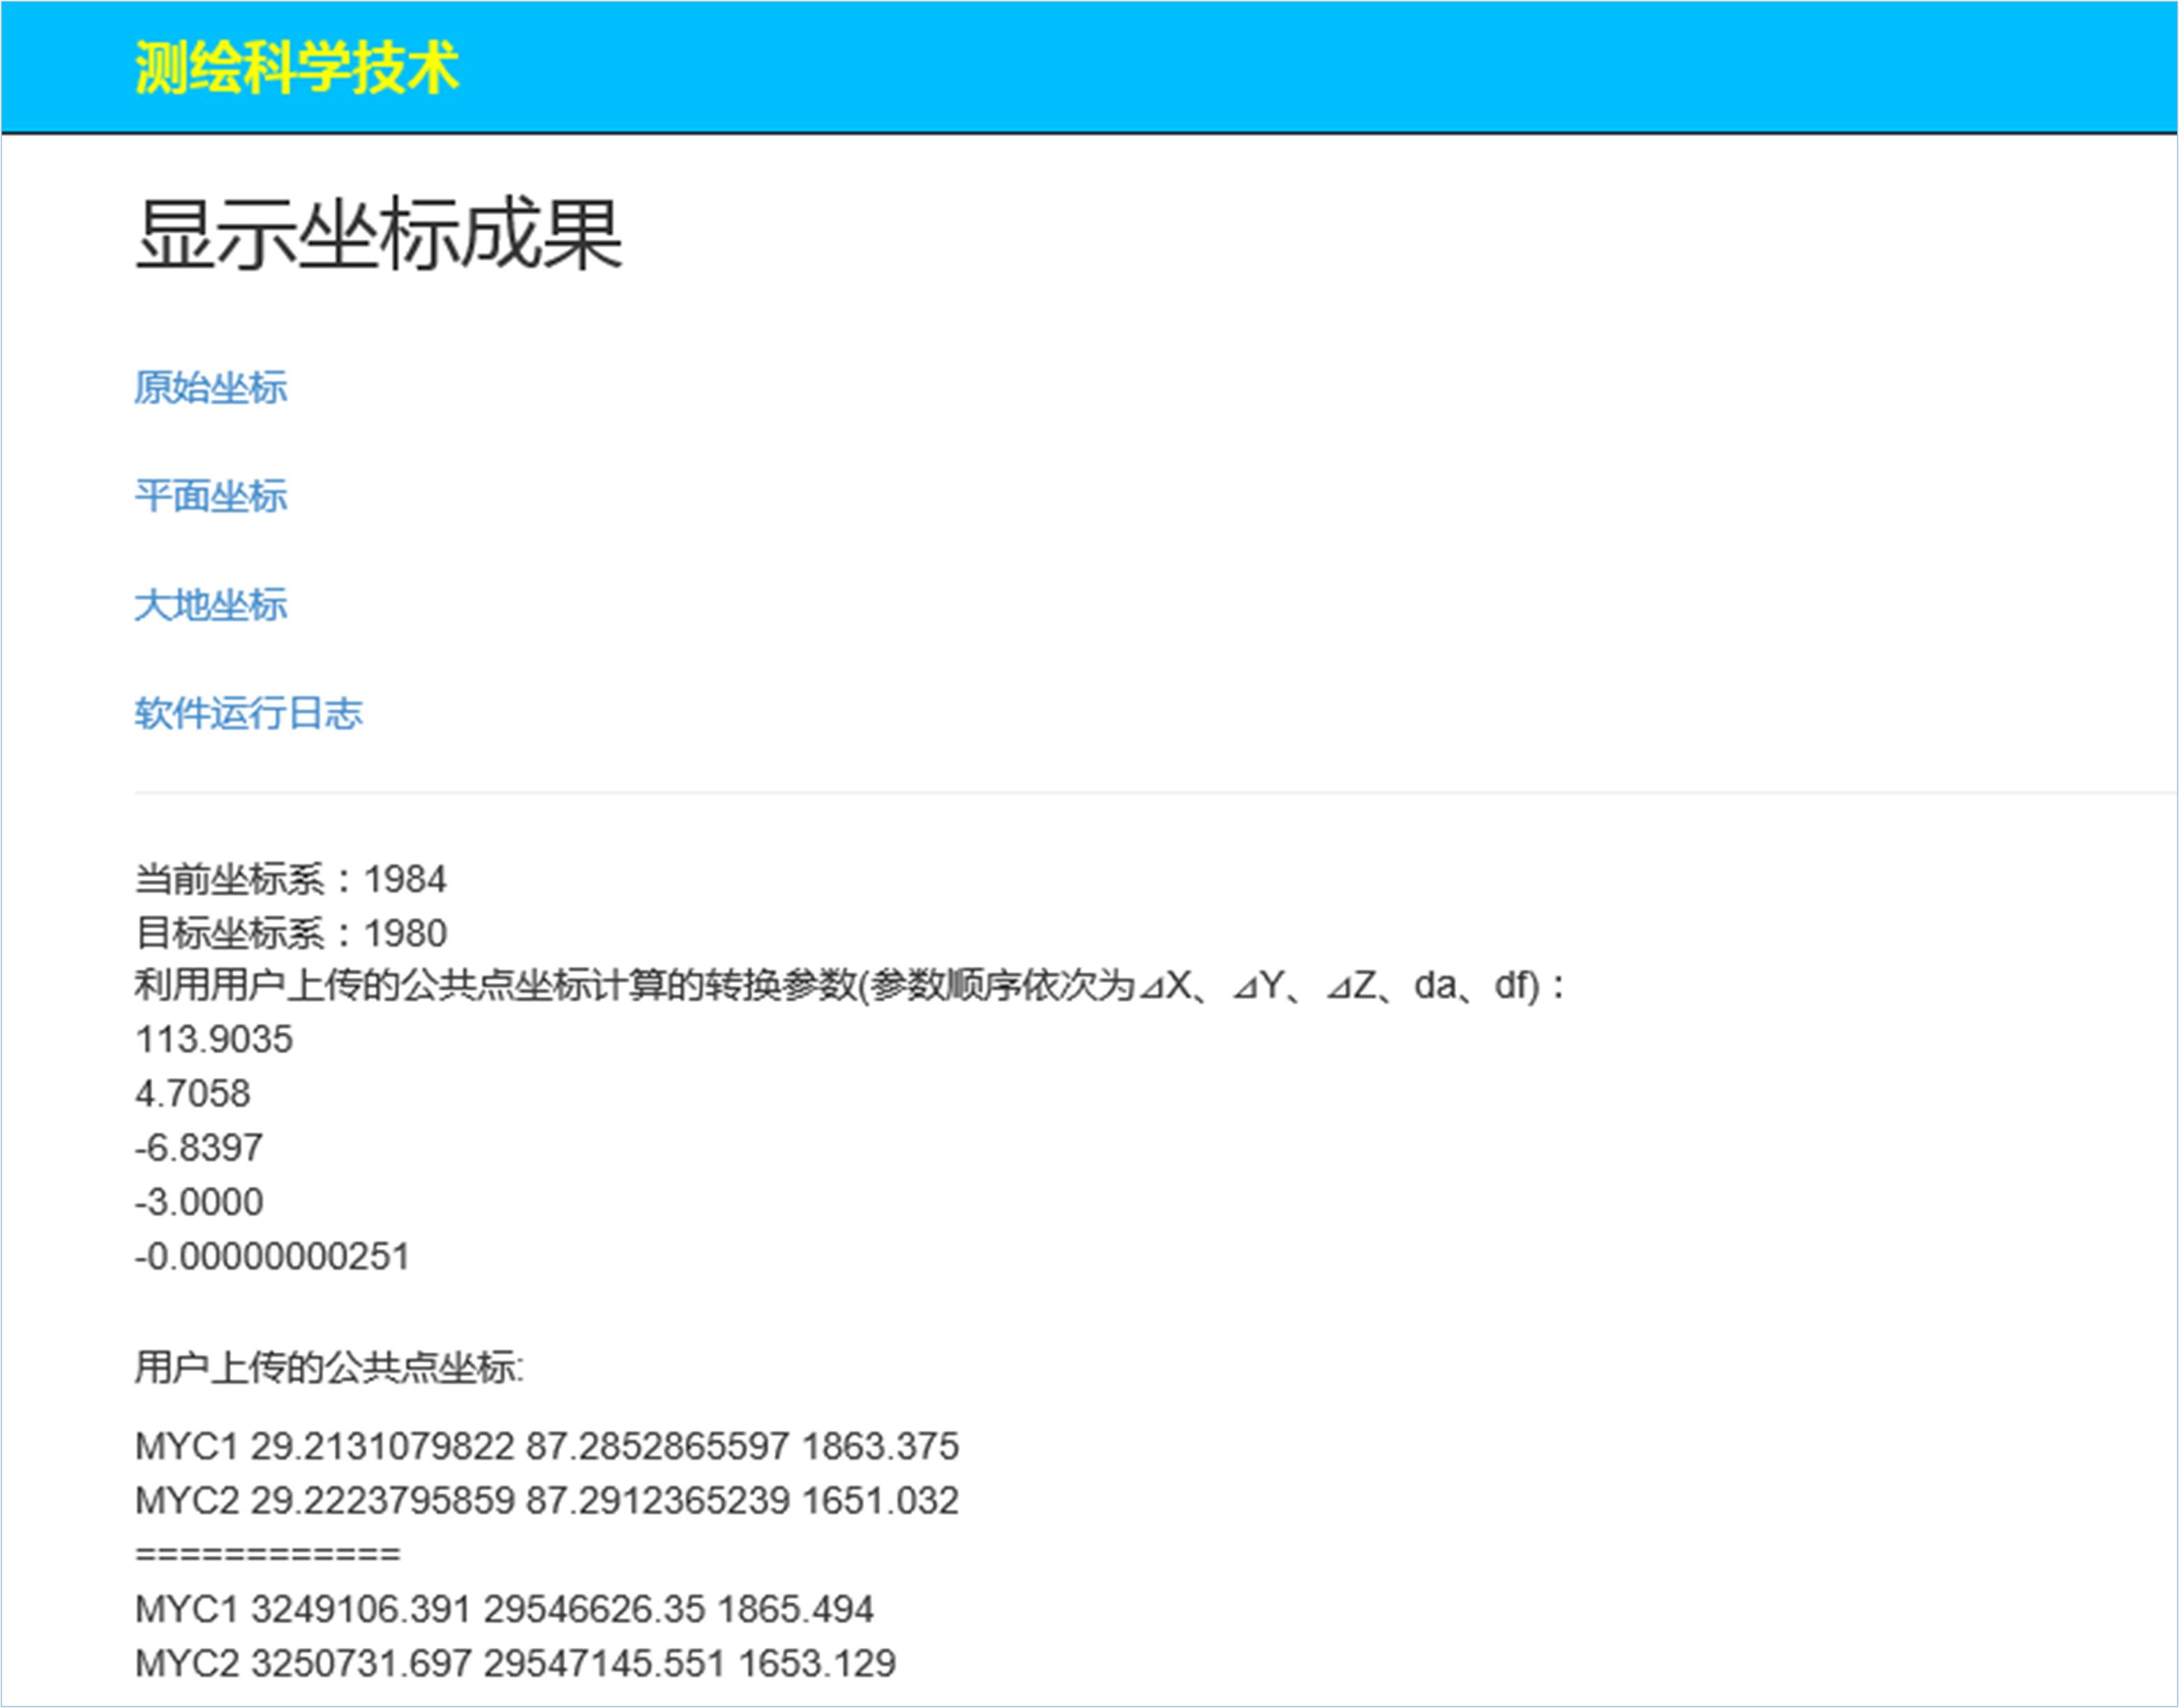
完成上图操作后,点击“提交”按钮,本系统将进行数据处理,并将处理结果显示在下述页面:
浏览上述四个网页如下:
以下是两个目标坐标系的平面坐标页面和大地坐标页面:
日志文件将提示用户重要信息参考:
16.2 导入操作
点击“提交”后,如果没有问题,将产生航点文件供用户下载。如下图:
点击下载,保存到本地指定位置,根据说明使用即可。